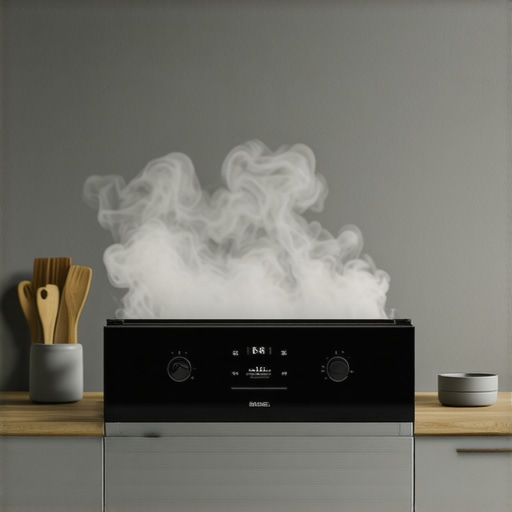
I remember the first time I fired up my brand-new oven, expecting it to be a quick way to make dinner. Instead, I was greeted with a wretched smell—like burning plastic mixed with chemicals—completely overwhelming and unsettling. That moment felt like a disaster, especially since I thought new appliances were supposed to be ready to go. Turns out, that discomfort is more common than you might think, and understanding why it’s happening can save you a lot of stress.
Getting to the Bottom of That Burning Chemical Smell
Most new ovens emit a strange odor during their initial use, often described as a chemical or burning smell. This isn’t just an unpleasant surprise; it’s typically due to residues like manufacturing oils, protective coatings, or even dust that settle during shipping and installation. These substances burn off during the first few cycles, which is why it’s usually a temporary issue. However, it can be alarming, especially if the smell lingers beyond the first use. The good news is, with a few simple steps, you can eliminate or significantly reduce that odor, making your oven safe and pleasant to use.
Did you know? According to appliance safety experts, most of these smells are due to substances that can emit volatile organic compounds (VOCs) when heated, which can be irritating or even harmful if inhaled in high concentrations (source: EPA), so it’s worth addressing early.
Before jumping to conclusions or worrying about potential damage, I want to share some common mistakes I made early on—like ignoring the manufacturer’s initial instructions or not properly ventilating the area—which only prolonged the smell. Instead, I’ll guide you through straightforward, proven tips to clear out that burning sensation and restore peace of mind.
Are you tired of that weird smell every time you use your new oven? Don’t worry—you’re not alone. Next, we’ll explore exactly what you should do during those first few uses, and how to prevent the smell from sticking around. Trust me, a little effort now ensures it’s just a distant memory quicker than you think.
Start with a Thorough Cleaning
Before firing up your oven for cooking, give it a deep clean. Remove all racks and clean them separately. Use a mixture of baking soda and water to scrub interior surfaces, focusing on corners and crevices where residues tend to accumulate. During my first attempt, I used a commercial oven cleaner, but I found that natural solutions like baking soda avoided harsh fumes. After cleaning, wipe everything down with a damp cloth to remove any leftover debris. This step helps eliminate residues that could cause burning smells during initial uses.
Run an Empty Cycle to Burn Off Residues
Set your oven to a high temperature—around 450°F (230°C)—and run it empty for 30 to 60 minutes. Opening windows during this process is essential; it acts like a natural exhaust fan, ventilating VOCs emitted from residues like oils or protective coatings. In my own experience, I chose to do this during the daytime with the kitchen window wide open and fans on. The smell tends to diminish significantly after this initial run, but if it persists, repeat the process or extend the duration.
Utilize Proper Ventilation Techniques
Ventilation is your best friend. During initial runs, turn on exhaust fans, open windows, and if available, use a portable fan to circulate fresh air. Imagine your kitchen as a chimney; good airflow carries away the fumes much like a breeze clears smoke from a campfire. The more fresh air you can introduce, the faster the smell will dissipate. Pro tip: place a box fan facing outwards to exhaust indoor air, especially if you’re dealing with stubborn odors.
Apply Safe Cleaning Agents
If odors linger, clean the interior again with a vinegar solution—mix equal parts vinegar and water—and wipe down all surfaces. Vinegar neutralizes fumes and reduces residual chemical odors. In my case, I used a spray bottle to target corners, dampened a microfiber cloth, and wiped everything thoroughly. This process not only freshens your oven but also helps in breaking down any remaining residues that could produce smells upon heating.
Check for Manufacturing Residues
Manufacturers often coat oven components with oils or protective films to prevent corrosion during transit. These can burn off over time. Be aware; some models may emit a stronger initial smell. Since I had a new oven, I consulted the user manual, which recommended an initial burn-in cycle. Following this advice saved me from unnecessary concern. If you’re unsure about residues, a quick call to customer support can clarify whether a specific model requires additional steps, like a longer initial burn or special cleaning.
Prevent Smells in Future Use
Once initial residues are burned off, maintain your oven by cleaning spills promptly and avoiding overuse of harsh chemicals. Regular maintenance prevents buildup, reducing the risk of future odors. For ovens prone to lingering smells, consider periodic self-cleaning cycles or the use of odor-absorbing liners. Proper after-use care is like a health routine—keeps unpleasant surprises at bay and extends the life of your appliance.
Remember, the key is proactive steps: cleaning thoroughly, ventilating well, and running initial burn cycles. These simple practices transform your new oven experience from stressful to straightforward, ensuring safety and comfort on every meal prep.
Many homeowners assume that hiring a professional guarantees perfect appliance installation, but even experienced technicians can fall into subtle traps that compromise longevity and safety. A prevalent misconception is that following basic instructions suffices; however, nuances like improper grounding or incorrect leveling can lead to issues down the line. For example, improper grounding not only risks damaging your appliance but can also pose safety hazards—an error often overlooked by DIYers and some pros alike. According to electrical safety standards outlined by the National Electrical Code, correct grounding is essential to prevent such risks. Additionally, many believe that same-day service means urgent repairs are always necessary, but rushing repairs without proper diagnostics can cause more harm than good. Misdiagnosing a problem often leads to unnecessary part replacements or re-installations, increasing costs and downtime. One common mistake is neglecting to verify that all connections, such as water supply lines and electrical outlets, meet manufacturer specifications. For instance, using a non-standard water hose with a dishwasher might seem convenient but can cause leaks or backflow issues, which can be mitigated by following the simple maintenance move outlined in this article. Moreover, some assume warranties cover all installation-related damages, but warranties often exclude improper setup, which can void coverage if the root cause stems from installation errors. When it comes to appliance repair, attempting DIY fixes without understanding internal nuances—such as sensor calibrations or control board diagnostics—can worsen the problem. Advanced homeowners or technicians should recognize the importance of verifying that internal components function correctly after installation or repair, which involves detailed knowledge and testing procedures—like checking the ground-fault protection circuits. A notable trap is overlooking the significance of proper leveling; even a slight tilt can cause water pooling or uneven wear, ultimately shortening your appliance’s lifespan. As noted in appliance safety studies, minor misalignments have outsized impacts over time. To navigate these complexities, always cross-reference manufacturer guidelines and consult credible sources or experts about installation best practices. Especially before warranty claims, documenting compliance with installation protocols can be invaluable. Have you ever fallen into this trap? Let me know in the comments. Remember, understanding these hidden nuances and avoiding advanced mistakes ensures your appliances operate safely, efficiently, and for the long haul.
The Foundations of Reliable Appliance Maintenance
To ensure your appliances function effectively over the long term, investing in the right tools and adopting disciplined maintenance routines is crucial. I personally rely on a digital multimeter for troubleshooting electrical issues—it’s invaluable for diagnosing power problems or faulty sensors in devices like refrigerators and ovens. Additionally, a high-quality, cordless cordless drill with a set of precision screwdrivers allows me to perform minor repairs or replace seals without hassle. These tools save me time and prevent costly repair calls.
Another essential is a dedicated cleaning brush set designed for appliance vents and filters. Regular cleaning of filters in your dishwasher, washer, or dryer can significantly extend their lifespan and efficiency. For instance, I recommend regularly clearing the lint traps in your dryer; neglecting this simple step can cause overheating and even fire hazards, as highlighted in this guide.
Embracing Smart Technology for Long-Term Results
In recent years, smart diagnostic tools have become a game-changer. I use a Bluetooth-enabled multimeter that pairs with my smartphone, providing real-time readings and alerts for anomalies. This approach allows me to catch potential issues early, such as irregular voltage or faulty heating elements, before they escalate into costly repairs. Coupled with appliance-specific apps that offer troubleshooting steps—like troubleshooting your smart fridge or oven—I can perform quick checks that save both money and downtime.
Looking ahead, the trend is moving toward integrated maintenance alerts. Future appliances may notify you proactively about component wear or suggest maintenance schedules, minimizing unexpected breakdowns. Predictive analytics combined with IoT-connected devices will make appliance repair more about prevention than reaction.
How do I maintain appliance performance over time?
Consistency is key. Schedule routine checks for filters, seals, and electrical connections, and don’t wait until something fails. Keep a maintenance log for each appliance; this helps identify recurring issues and makes warranty claims smoother. For critical components like door seals or thermostats, periodic calibration can prevent energy waste and ensure optimal functioning—check out this calibration tip for ovens.
If you notice persistent performance drops, consider using professional-grade tools or consulting a qualified technician. Remember, well-maintained appliances conserve energy, prevent costly breakdowns, and ultimately extend their lifespan. For example, ensuring your refrigerator’s grounding connection is solid, as discussed here, is essential to avoid electrical issues that could cause system failures.
The Value of Professional Support and Warranty
While DIY troubleshooting and maintenance can save money, leveraging professional services for annual inspections and preventative checks is a smart move. Many warranties require proof of regular maintenance, so keeping detailed records or receipts is advisable. Additionally, reputable repair companies often provide same-day service and warranties on their parts, ensuring peace of mind. When in doubt, contacting experts familiar with your appliance’s make and model can prevent misdiagnoses or unintentional damage.
Don’t forget to regularly review your warranties and understand what they cover. A simple move like verifying coverage can save significant expenses later. For example, knowing that improper installation can void your warranty, as explained here, underscores the importance of professional setup.
Try implementing a monthly maintenance ritual with the tools and tips outlined here. Consistency keeps your appliances humming along smoothly and reduces the risk of unexpected failures. Upgrading your toolkit now, perhaps with a smart diagnostic device, could be the difference between emergency repairs and smooth sailing.
What I Wish I Knew Before Jumping into Appliance Fixes
One of the most eye-opening lessons I learned was the power of detailed documentation. Having accurate records of installation dates, maintenance routines, and even subtle performance changes has saved me time and money during warranty claims and repairs. I also discovered that trusting an expert isn’t a sign of weakness; sometimes, a professional’s insight can prevent costly mistakes, especially with complex tasks like proper grounding or leveling. Lastly, I underestimated how significantly proper ventilation during initial runs could reduce lingering chemical smells—simple but often overlooked, yet it made all the difference in my experience.
Tools and Resources That Elevated My Repair Skills
My go-to tool is a reliable digital multimeter; it provides real-time diagnostics that can catch issues early, saving me from surprise breakdowns. I also rely on a quality set of precision screwdrivers tailored for appliances, making disassembly smoother and safer. For reference and continuous learning, I trust ‘The Complete Guide to Appliance Maintenance,’ a book that demystifies technical jargon and offers actionable tips. Additionally, consulting manufacturer support pages and credible online forums, like Appliance Help, has been invaluable for troubleshooting unique problems and understanding warranty nuances.
Believe in Your Power to Improve Your Appliance Setup
Embark on your appliance repair and maintenance journey with confidence. Incorporate proactive habits, like regular cleaning and timely inspections, and leverage trusted tools and resources. Remember, the most effective repairs often start with a bit of knowledge and the willingness to learn. Your efforts not only extend the life of your appliances but also empower you to handle surprises with calm and competence. Don’t wait for issues to escalate—take action today and enjoy the peace of mind that comes with mastering your home appliances.