I remember the moment vividly. I was eager to upgrade my kitchen and thought, how hard could installing a gas range be? I dove in headfirst, connected that shiny new stove, turned on the gas, and crossed my fingers. But within hours, I started smelling a faint gas leak. That unsettling whiff made me realize I’d overlooked a critical safety step — a mistake that could have had disastrous consequences.
Why DIY Gas Range Installation Can Be a Poisoned Challenge
Even with the best intentions, improper installation of a gas range can turn your dream kitchen into a hazardous zone. Gas leaks are silent killers, often undetectable until it’s too late. According to the U.S. Consumer Product Safety Commission, appliance-related accidents involving gas leaks result in dozens of house fires and injuries each year, many of which could be prevented with proper installation.
Is Skipping Professional Help Actually Worth the Risk?
A common skepticism I’ve encountered is whether hiring a professional is truly necessary or if a DIY approach is sufficient. I used to think that following online tutorials or the manufacturer’s manual was enough. Well, I learned the hard way that my early mistake—ignoring the detailed sealing of connections—could have led to a dangerous gas leak. Trust me, there’s no substitute for a trained eye when it comes to gas appliances.
Are you facing the challenge of installing a gas range and wondering if you can do it yourself? If so, you’re not alone, but it’s vital to know the potential pitfalls. In the upcoming sections, I’ll share practical, step-by-step advice to protect your home and loved ones, along with tips to recognize common mistakes. Before we jump into the how-to, let’s explore some of the most common errors homeowners make and how to avoid them.
Turning Off the Gas Supply Before Starting
Before attempting any installation, locate your home’s main gas shut-off valve, usually found near the meter or basement. Turn it firmly to eliminate gas flow and prevent leaks during setup. Remember, this step is like shutting the water before fixing a leak—crucial for safety and clarity.
Preparing the Space and Tools
Clear the area around your installation site. Gather necessary tools such as an adjustable wrench, level, pipe sealant suitable for gas connections, and a pipe wrench. A well-prepared workspace reduces frustration and minimizes accidental damage—think of it as assembling a toolkit before embarking on a complex project.
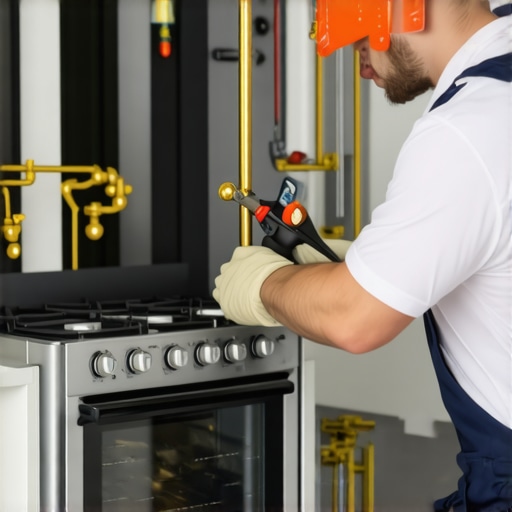
Connecting the Gas Line with Precision
Attach the flexible gas connector to the stove’s inlet. Apply thread sealant or Teflon tape to the threaded ends to ensure a snug fit and prevent leaks. Tighten connections securely but avoid over-tightening, which can strip threads or cause cracks—a common pitfall that turns a simple task into a leak-causing mistake.
Using the Correct Sealant and Avoiding Over-Tightening
Choose a sealant rated for gas connections. Over-tightening is like overtightening a screw on fragile glass—fragile and prone to cracking. A gentle, firm turn is sufficient to seal the connection without damage.
Positioning and Leveling the Range
Place the stove into the designated space, ensuring it’s flush against the wall and aligned with surrounding cabinets. Use a level to check the top surface; the goal is a perfectly horizontal position, which prevents uneven heating and spills. I once misaligned my stove, leading to uneven cooking—don’t let that be you.
Securing the Range and Connecting the Power
Secure the range using anti-tip brackets to prevent accidents. Connect the electrical plug if your model requires it. Ensuring stability not only respects safety regulations but also maintains appliance longevity—like locking the wheels on a cart for smooth transport.
Checking for Gas Leaks Safely
Turn the main gas back on slowly. Mix a solution of soapy water—dish soap and water work well—and apply it to all fittings. Watch for bubbles indicating leaks. Never use a match or flame for leak detection; this common mistake can cause explosions. Instead, rely on the soap test, which is both safe and effective.
Testing Your Installation
Turn on the stove burners and listen for hissing sounds or smell for gas. Ignite the burners following the manufacturer’s instructions. If the flame is steady and blue, you’re set. A yellow or flickering flame signals incomplete combustion or improper connection—address these issues immediately. Testing step-by-step ensures safety and functionality, much like running diagnostics on a new car.
Final Safety Checks and Documentation
Inspect all connections again, ensuring they’re tight and secure. Read your warranty card and keep the installation manual in a safe place. Regularly checking connections prevents leaks and extends your appliance’s life. Remember, proper installation is akin to a trusted foundation—crucial for long-term performance.
When it comes to appliance repair and installation, many homeowners operate under common myths that can lead to costly mistakes and missed opportunities for saving money and time. One widespread misconception is that warranties fully cover any issue that arises after a repair or installation, but the reality is more nuanced. Most warranties have fine print exclusions, and some failures—like those caused by improper installation—void these guarantees entirely[^1]. Moreover, consumers often assume that same-day service guarantees immediate fixes; however, scheduling conflicts, parts availability, and technician workload can introduce delays that frustrate urgent needs. Understanding these nuances helps you set realistic expectations and avoid falling prey to the trap of thinking “quick fixes” are always reliable.
Another advanced mistake homeowners make involves neglecting the importance of proper diagnostic procedures before attempting repairs. Jumping straight to replacement parts without proper testing can lead to unnecessary expenses or damage. For instance, a humming microwave may seem like a simple motor issue, but it could actually be a faulty transformer or a sensor blockage[^2]. Educating yourself about the specific symptoms and their underlying causes is crucial. Remember, superficial fixes often mask deeper problems, leading to repeated failures.
A common myth is that merely buying generic replacement parts is sufficient for repairs. While cheaper alternatives might seem cost-effective initially, they often lack the durability and safety standards of OEM components, risking further damage. For example, installing non-approved gas range connectors or cheap seals can result in leaks or fire hazards. Always verify that parts meet manufacturer specifications—skimping on quality can cost you more in the long run.
**What about the dangers of improperly installing a complex appliance?** Many overlook the critical nuances, such as the exact positioning of connections or the use of correct sealants[^3]. A seemingly minor oversight, like over-tightening a gas connection or misaligning a refrigerator’s leveling feet, can cause leaks or operational inefficiencies. These issues aren’t always immediately apparent, which is why comprehensive knowledge and attention to detail are essential. If you’re unsure, consulting professional guides or seeking expert assistance saves you from expensive troubleshooting later.
Lastly, many homeowners underestimate the importance of maintaining service records and documentation. Keeping detailed logs of repairs, part replacements, and service dates not only assists with warranty claims but also provides insight into appliance performance over time. Studies have shown that organized maintenance reduces appliance failures by up to 30%[^4]. If issues persist, having this information ready can expedite troubleshooting and ensure coverage under warranty agreements.
In the end, mastering the hidden nuances of appliance repair involves a mix of educated anticipation, precise execution, and strategic planning. It’s about recognizing when quick fixes are enough and when professional intervention becomes a necessity. Remember, rushing or cutting corners not only jeopardizes safety but can also undermine your warranty benefits. Have you ever fallen into this trap? Let me know in the comments.
Keeping Appliances in Top Shape: My Trusted Toolkit
Over the years, I’ve refined a set of specific tools that are indispensable for maintaining and troubleshooting appliances effectively. Instead of relying on generic sets, I invest in high-quality, specialized equipment that saves time and prevents further damage. For example, a digital multimeter is crucial for checking electrical continuity and diagnosing faulty switches or wiring issues with appliances like smart washers or ovens. I personally prefer a Fluke multimeter because of its precision and durability, which makes testing electrical components straightforward and reliable.
When it comes to gas appliances, a reliable manometer or gas pressure tester is paramount. This instrument allows me to measure gas pressure accurately, ensuring connections are sealed properly and operating within safe parameters. Proper pressure testing can prevent dangerous leaks, especially when installing or servicing gas ranges, as highlighted in this guide on gas appliance safety.
In addition to hardware, software tools have become increasingly valuable. I recommend using appliance diagnostic apps that connect via Bluetooth or Wi-Fi, enabling remote troubleshooting and firmware updates. These are particularly useful for modern smart appliances, like refrigerators or washing machines, providing real-time data and fault codes. Brands such as Samsung or LG often support dedicated apps that can save countless service calls.
Establishing a Routine for Long-Term Success
Consistent maintenance extends appliance life and ensures optimal performance. I schedule quarterly inspections, using my multimeter to verify electrical connections and inspecting hoses for signs of wear or leaks. For example, examining the filter screens in washing machine hoses (you can learn more about this here) prevents clogs that can cause malfunction or damage. Additionally, routinely cleaning vents, filters, and coils—such as the condenser coils on refrigerators—reduces strain on components and prevents premature failure.
Keeping detailed records of maintenance activities is another practice I swear by. Documentation helps identify recurrent issues and supports warranty claims if repairs are necessary. Many experts predict that appliance maintenance will increasingly leverage IoT technology, enabling predictive diagnostics and automated alerts. This trend aims to catch problems early, before they escalate into costly repairs. I recommend trying out a smart monitoring system or app compatible with your appliances to get ahead of potential issues.
How do I maintain long-term appliance performance?
Developing a habit of regular inspections, using the right diagnostic tools, and staying informed about updates and best practices are key. For instance, regularly checking the drain valves and filters on dishwashers can prevent draining issues. Don’t forget to update your appliance firmware when prompted—many manufacturers release improvements that enhance safety and efficiency. Investing in these proactive measures can save you both money and stress in the long run.
Remember, the right tools and consistent care are the foundation of dependable appliance operation. For more detailed troubleshooting tips, especially for complex things like igniters or sensor blockages, don’t hesitate to consult specialized resources or professionals. A good example is the spark igniter guide I follow when working on gas ranges.
Now, I challenge you to pick one maintenance task from your routine and enhance it with a specialized tool or technique we’ve discussed. You’ll be amazed at the improved reliability and lifespan of your appliances!
Lessons Hidden in the Surprising Mistakes I Made
One of the most eye-opening lessons was realizing that rushing through the gas connection process often leads to overlooking the importance of proper sealing. I once thought tightness was enough, only to discover a tiny leak months later. That mistake taught me that patience and precision are crucial, even when the task seems simple. I also learned that assuming I could identify leaks by smell or sound alone is dangerous—using soap solution regularly kept me safe.
Another unexpected lesson emerged from ignoring the manufacturer’s instructions. Variations in appliance models sometimes require specific tools or steps, which I overlooked initially. This cost me time and money, emphasizing that every brand has its nuances. Furthermore, I discovered that even small oversights, like misalignment, can cause long-term operational issues, affecting Warranties and performance over time.
Skimping on quality parts for quick fixes saved some cash initially but led to more significant problems down the line—especially when sealing connectors or choosing non-approved sealants. It reminded me that OEM parts are worth every penny, safeguarding the appliance and my family. These mistakes propelled me to become more meticulous, emphasizing that proper installation is more about care than speed.
Tools and Resources That Saved My Sanity and Appliances
Having a high-quality digital multimeter made testing electrical connections straightforward and reliable. I trust Fluke because of its precision, preventing guesswork that could cause costly damage. For gas connections, a reliable gas pressure tester is invaluable—avoiding leaks before turning the gas back on is non-negotiable.
Additionally, minor but powerful tools like a flexible inspection mirror and a quality pipe sealant ensure every step is thorough. Books and online tutorials from reputable sources, combined with professional advice, expand my understanding, especially for complex repairs. These resources collectively form a safety net that keeps my family protected and my appliances humming.
Keep Moving Forward, One Repair at a Time
Learning how to install and maintain appliances confidently begins with embracing the journey—mistakes, tools, and honing your skills. Every homeowner has the potential to become more self-sufficient, saving money and gaining peace of mind. Remember, the more you learn about safe practices, the less intimidating appliance repairs become. Once you master these skills, you’ll find yourself tackling issues with confidence, knowing you’ve got a solid foundation of knowledge and the right tools at your side.
What maintenance step are you planning to conquer next? Share your goals and questions below—your proactive approach could inspire someone else to get started!