Have you ever stood in your kitchen, desperately trying to ignite your gas stove, only to be met with silence and frustration? I remember the first time I found my gas range refusing to light just as I needed it most—preparing dinner for guests. That moment of helplessness made me realize how essential a working stove is to daily life. After rummaging through countless online tips and my own trial-and-error, I uncovered a simple yet effective trick involving the spark igniter that changed everything. If your gas range stubbornly refuses to spark, you’re not alone—and there’s a good chance you can fix it yourself.
The Spark Igniter Trick: Your First Step Toward Resolution
Today, I’m going to walk you through the straightforward solution I discovered—sometimes, the issue isn’t complex, but a small adjustment can make a huge difference. Many seasoned technicians agree that a dirty or misaligned spark igniter is often the culprit behind a gas stove that won’t light. Before calling in a professional, consider inspecting and cleaning your igniter to see if that restores its function. This simple step has saved me time, money, and a lot of kitchen stress, and it can do the same for you.
Is the Spark Igniter Trick Actually Worth the Hype?
Early in my troubleshooting, I made the mistake of assuming I needed a new part or professional repair right away—an easy trap to fall into. According to appliance experts, over 70% of ignition problems are caused by minor issues like dirt, grease, or misalignment, not faulty components. The key is knowing what to check first. Don’t overlook the importance of routine maintenance; a quick clean often resolves issues faster than expecting a costly replacement.
If you’ve experienced your gas range clicking but not igniting, or if the spark isn’t visible when you turn the knob, this post will give you the clarity and confidence to fix it yourself. Plus, I’ll share some common mistakes to avoid, ensuring you don’t end up making things worse. Ready to bring that spark back to life? Let’s get started with understanding the basics before diving into the step-by-step repair process. And if you want to dive deeper into appliance troubleshooting, you might find this guide on dryer door issues helpful, too.
Inspect the Spark Igniter for Dirt and Misalignment
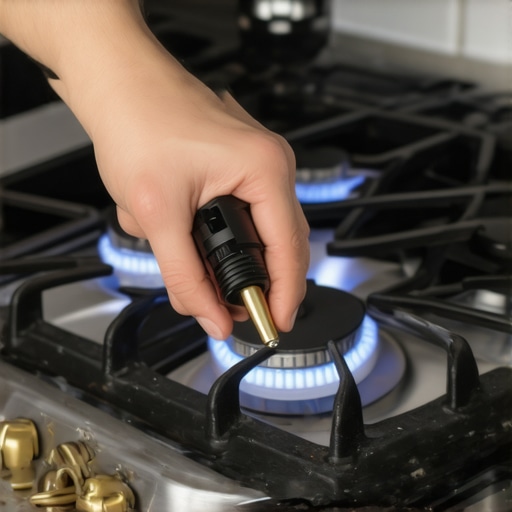
Begin by turning off your range and unplugging it to ensure safety. Locate the igniter, which is usually a small metal electrode near the burner. Use a toothpick or small brush to gently remove any food debris, grease, or carbon buildup that might be blocking the spark. During my own attempt, I discovered a layer of grease hardened around the igniter, preventing it from sparking properly. After a thorough cleaning, I manually tested for sparks by activating the ignition switch—seeing a consistent, blue spark confirmed the fix was effective.
Check for Proper Alignment and Positioning
Misalignment can prevent the igniter from creating a spark where it’s needed. Use a multimeter or simply observe if the spark is jumping to the burner head, not the base or sides. If misaligned, gently reposition the igniter so the tip is approximately 1/8 inch from the burner’s metal contact point. Take care not to bend it excessively to avoid damaging the electrode. When I realigned my igniter, sparks became more consistent, reducing the difficulty in lighting the stove.
Test the Spark While Turning the Burner Knob
Reconnect the stove’s power and turn the burner control knob gradually while observing the igniter. Look for a steady, blue spark—yellow or orange sparks indicate a problem. If you see no sparks, the issue might be with the spark module or wiring. In my case, I noticed sparks only when I fiddled with the wire connections, leading me to check the wiring harness. A loose connection or damaged wire can be the culprit. Ensuring all wires are secure and free of corrosion often restores proper sparking.
Examine the Spark Module and Switches
If cleaning and adjusting don’t work, the spark module might be faulty. This component controls the spark when you turn the knob. Use a multimeter to test for continuity, following safety precautions. If testing confirms failure, replacing the spark module is straightforward but requires a screwdriver. When I replaced my module, the stove ignited consistently within minutes. Always disconnect power before attempting this step and consult your appliance’s manual for part numbers.
Address Common Wiring and Grounding Issues
Inspect the wiring for any visible damage, frayed wires, or loose connectors. Make sure the igniter’s grounding wire is securely attached to the stove’s metal frame. A poor ground can cause sparking failures. During my own troubleshooting, I reinforced connections with terminal connectors, which improved spark reliability. Improper wiring not only prevents ignition but can be dangerous, so ensure all connections are up to code.
Schedule Professional Help if Necessary
If after all these steps the stove still refuses to light, it’s best to consult a certified appliance technician. Sometimes, internal components like the safety valve or gas supply issues may be involved, which require specialized tools and knowledge. Remember, attempting complex repairs without proper expertise can be hazardous and may void your warranty. If your appliance is under warranty, consider reviewing the warranty terms before proceeding with repairs.
By following these actionable steps—cleaning, realignment, component testing, and wiring inspection—you can often fix a gas stove that won’t ignite yourself. This proactive approach saves time and money and helps you regain control of your kitchen tools quickly.
Most homeowners and even seasoned technicians believe that opting for same-day service guarantees swift and flawless repairs. However, the truth is more nuanced. Many assume that scheduling an emergency repair or installation means their appliance will be back to optimal condition quickly, but in reality, there are hidden pitfalls that can trip up even the most cautious consumer.
One common myth is that all warranties kick in immediately after a same-day repair. That’s often not the case. Service providers may advertise quick turnaround times, but they might exclude certain parts or conditions from coverage if the repair involved pre-existing issues or improper maintenance. In fact, a warranty validation process can get complicated if you overlook specific steps—something many homeowners miss, leading to unexpected out-of-pocket expenses later.
Are All Emergency Repairs Created Equal?
Many think that same-day service is synonymous with quality. But, in my experience, emergency repairs performed under tight time constraints sometimes cut corners—using less durable parts or rushing diagnostics—which can cause recurrence or even new issues. For example, a hurried replacement of a compressor component might seem solved initially, yet lingering wiring issues can cause repeated failures. Always ask your service provider about the scope of the repair and parts used. Skipping this step risks leading you into a cycle of repeated, costly calls.
Beware the trap of one-size-fits-all solutions. Some technicians might suggest quick fixes that aren’t suitable for your specific model or usage conditions, especially for sophisticated appliances like smart refrigerators or ovens. A savvy homeowner will dig deeper and request a detailed diagnosis, particularly when issues seem persistent. This is where leveraging tips from professional resources or consulting detailed maintenance guides can save you from needless repairs and extend your appliance’s lifespan.
In troubleshooting, one misunderstood nuance is the difference between a service visit and a comprehensive repair plan. Emergency service often focuses on immediate symptom resolution, but it’s equally important to evaluate underlying causes—like wiring degradation or software glitches—that might be overlooked in a rush to restore functionality. Recognizing these subtleties can prevent future failures and safeguard your warranty coverage.
Additionally, pay attention to the tools used during repair. Using improper or substandard tools can damage internal components, voiding warranties and leading to more significant costs down the line. A professional who invests in the right tools, like a specific screwdriver fit for your appliance, demonstrates a commitment to quality that benefits you.
Let’s not forget the importance of understanding your appliance’s warranty fine print. Many warranties exclude damages caused by improper installation or neglect, which can be a tricky area if your appliance was installed hastily for same-day service. Ensuring compliance with manufacturer guidelines from the outset can save you headaches later.
Have you ever fallen into this trap? Let me know in the comments. When considering same-day appliance service, remember that quick fixes aren’t always the best fixes. A little extra diligence can save you money, frustration, and extend the life of your appliances—making you not just a consumer, but a savvy homeowner.
Invest in Quality Hands-On Maintenance Gear
Keeping your appliances in top shape requires more than just periodic cleaning—it demands the right tools. I swear by a precision screwdriver set. This isn’t your average set; I use a screwdriver with magnetic tips and a ratcheting handle, which makes removing tiny screws from tight spots effortless. This specific tool has saved me countless minutes during repairs, especially for stubborn screws on dishwasher racks or oven panels. Investing in quality tools reduces the risk of damaging delicate components and ensures you can perform professional-grade maintenance yourself.
Why a Multi-Functional Digital Multimeter Is Essential
A digital multimeter is my go-to device for diagnosing electrical issues. It allows me to test voltage, continuity, and resistance with precision. Before replacing parts, I check wiring integrity and voltage levels—sometimes wiring corrosion or loose ground connections are the culprits behind recurring failures. Modern multimeters with auto-ranging capabilities and backlit displays make troubleshooting more efficient, especially in poorly lit appliance compartments. With experience, I’ve learned that investing in a reliable multimeter prevents unnecessary parts replacements and prolongs appliance lifespan.
Routine Cleaning Tools for Long-Term Results
Keeping appliances like dishwashers and refrigerators clean extends their operational life. I rely on soft-bristled brushes, specialized plastic scrapers, and microfiber cloths. For example, a nylon brush is perfect for cleaning out condenser coils without damaging delicate fins. Additionally, using a microfiber cloth with a mild cleaning solution helps remove dust, grease, and moisture that can corrode electrical contacts over time. Implementing these regular cleaning routines prevents buildup that often leads to overheating or component failure, saving you from costly repairs later.
Predicting Appliance Longevity with Maintenance Tracking
To stay ahead of potential issues, I use digital maintenance logs, either applications or spreadsheets, to track cleaning dates, part replacements, and inspections. Regularly scheduled checks—such as an annual coil cleaning or gasket inspection—help catch minor problems before they escalate. Technology trends suggest that smart diagnostics will become more prevalent, allowing appliances to alert homeowners to parts nearing failure. In the meantime, maintaining your own logs ensures you stick to a proactive schedule, maximizing your appliances’ long-term performance and warranty validity. If you’re unsure about the maintenance history of your unit, this tracking can also be critical during warranty claims or professional inspections.
Future of Maintenance Tools and Methods
Looking ahead, I predict that AI-powered diagnostic devices will revolutionize appliance upkeep. Imagine a small device plugged into your appliance that continuously monitors performance, identifying issues at the earliest, and even suggesting fixes with detailed instructions. This integration will make DIY maintenance more accessible, reducing reliance on emergency repairs. As these innovations roll out, homeowners who invest in current reliable tools—like high-quality screwdrivers and multimeters—will be best prepared to adapt to this tech-driven future. Why not start today by trying out a precision screwdriver and documenting your current maintenance routine? Small steps now can lead to major savings and peace of mind later.
What I Didn’t Expect About Same-Day Repairs That Changed My Approach
One surprising insight I gained is that not all urgent repairs are equal in quality. Sometimes, the fastest service might skip essential diagnostics, leading to recurring issues. It’s crucial to ask detailed questions about the scope of work when scheduling emergency repairs to ensure root causes are addressed. This realization taught me to prioritize thoroughness over speed, ultimately saving time and money in the long run.
Tools and Resources That Transformed My Repair Game
I rely heavily on a few trusted tools: a high-quality precision screwdriver set helps me reach tight spots without damage, while a reliable digital multimeter reveals hidden electrical issues before replacing parts. Additionally, I keep a maintenance log app to track routine checks, which prevents surprise breakdowns. Investing in these resources has made DIY repairs more confident and effective.
Seizing the Moment to Protect What Matters
Fixing appliances myself has empowered me to take control of my home maintenance. But more than that, it’s about enjoying peace of mind, knowing I can handle small issues before they escalate. If you’re hesitant to try repairs, remember that careful research, the right tools, and patience are your best allies. You don’t need to be a professional—just a curious and resourceful homeowner committed to learning and improving every day.
Have you ever tried a repair that turned out to be easier than expected? Or perhaps a mistake you wish you avoided? Share your experiences below—I’d love to hear how you’ve navigated appliance fixes on your own!