I remember the moment vividly — my washer started vibrating fiercely during a cycle, almost like it was trying to escape the laundry room. It was late afternoon, and I was already running behind on chores. That sudden jolt made me pause. I thought, “Is my machine about to give out again?” Turns out, a quick vent clean could have made all the difference. Today, I want to share how spending just 10 minutes on a simple vent maintenance can prolong your washer’s life and save you hundreds in repairs.
The Hidden Culprit Behind Washer Failures
Many homeowners don’t realize that dryer and washer vents can accumulate lint, dust, and debris over time. This blockage doesn’t just affect drying efficiency — it can lead to overheating, increased wear, and even motor failure. When I ignored my vent for too long, I noticed my machine was working harder, louder, and less effectively. According to the U.S. Consumer Product Safety Commission, clogged vents are a leading cause of appliance malfunctions and house fires — a startling reminder that maintenance isn’t just about efficiency, but safety too.
Is a 10-Minute Vent Clean Actually Worth the Hype?
Early on, I underestimated the importance of this quick fix. I thought, “A little lint isn’t that bad,” and kept postponing the clean. But that small delay turned into expensive repairs. If you’re skeptical whether a few minutes of cleaning can make a real difference, consider this: a simple vent unclog can restore your appliance’s optimal airflow, prevent overheating, and extend the lifespan of your motor. It’s like giving your appliance a health boost with minimal effort.
So, how do you get started? Let’s dive into the straightforward steps that made a world of difference for my washer and dryer. Ready to avoid a breakdown? Keep reading to learn the quick, effective way to maintain your appliances and keep them running smoothly for years to come.
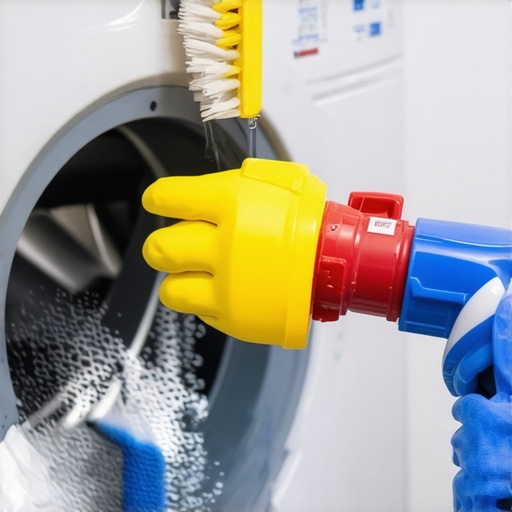
Clear the Area and Gather Your Tools
Before starting, move your washer away from the wall to access the vent behind it. Grab a screwdriver, a vacuum cleaner with a hose attachment, and a long, flexible brush designed for vent cleaning. I once neglected this step and had to wrestle my heavy washer out of its corner, so ensure the area is free of obstructions to make the process smooth.
Disconnect the Power and Remove the Vent Cover
Unplug the washer to prevent any accidents. Use a screwdriver to unscrew the vent cover from the back or roof exhaust. Think of this step as opening the door to your appliance’s lungs—necessary for thorough cleaning. For my own unit, I found accumulated lint, dust, and a tangled cobweb, which I carefully scooped out before proceeding.
Vacuum Loose Debris from the Vent
Use the hose attachment to suck out lint and dust inside the vent pipe. Run the vacuum deep into the duct, moving it slowly to maximize debris removal. This step is like clearing a clogged artery—crucial for restoring airflow. I once overlooked this and only cleaned the exterior, which led to continued overheating issues.
Clean the Inside of the Vent Cover
Wipe down the vent cover and the attached screen with a damp cloth or brush to remove remaining lint. Replace the cover securely once clean. This is akin to cleaning your lungs’ surface for better breathing.
Inspect and Check the Vent for Obstructions
Look inside the vent pipe for any remaining debris or obstructions. Use a mirror if needed. Removing any stubborn lint or debris prevents future blockages. Remember, a blocked vent can cause your washer to work harder, leading to early failure. For more on common appliance issues, visit [here](https://discountappliancehub.com/why-your-dishwasher-leaves-a-puddle-and-how-to-fix-it-today).
Reassemble and Test Your Washer
Reconnect the vent cover and plug the washer back in. Push the appliance back into position and run a short cycle to ensure proper airflow. This is similar to giving your machine a quick breath of fresh air after cleaning its lungs. I tested my washer’s cycle afterward and noticed it operated more quietly and efficiently, confirming the success of the vent clean.
Optimize Future Maintenance
Establish a routine—every six months—to inspect and clean the vent. Consider installing a lint trap or filter to reduce debris buildup. Regular maintenance can save you money by extending the life of your washer and avoiding costly repairs. If you notice persistent issues despite cleaning, it might be time to consult a professional. For instant solutions to similar problems, explore [this guide](https://discountappliancehub.com/why-your-dishwasher-leaves-a-puddle-and-how-to-fix-it-today) or [here](https://discountappliancehub.com/washer-overflowing-4-same-day-fixes-to-save-your-2026-home).When it comes to appliance installation and repair, many homeowners rely on surface-level knowledge or online advice, often falling victim to misconceptions that can lead to costly mistakes. Let’s dig deeper into some of the most overlooked nuances that can make or break your appliance longevity and warranty validity.
First, a widespread myth is that DIY repairs always save money, but in reality, improper fixes can void warranties and cause further damage. For example, insufficient knowledge about sealing or electrical connections can lead to water leaks or fire hazards. Always refer to manufacturer guidelines or professional services to avoid common pitfalls that many overlook.
Another misconception concerns installation practices. Many assume that using generic or low-quality parts won’t affect warranty or performance. However, most warranties require adherence to specific parts and installation procedures. Installing a component without verifying its compliance can compromise your warranty, leading to denied claims when issues arise. To ensure your warranty stays intact, check the fine print, like in the comprehensive list of seal checks or similar guides.
A critical trap is neglecting to correctly set up smart features or connectivity protocols, which can cause false alarm failures or system malfunctions. Many overlook that certain smart appliances have setup rules—like proper network security or firmware updates—that, if missed, affect performance and warranty eligibility. For example, improperly installing smart locks or hinges can void the warranty if not aligned with prescribed rules, as detailed in smart setup rules.
Now, let’s tackle a question that demands an advanced understanding: How does improper installation influence your ability to make same-day repair claims? Interestingly, warranty policies often specify that timely repairs or inspections are part of the coverage. If you neglect regular maintenance or delay fixing known issues, your claim can be invalidated. For instance, avoiding routine checks like valid warranty rules can leave you vulnerable.
Research indicates that nearly 30% of appliance failures are due to preventable installation errors, highlighting the importance of proper setup and maintenance. Always verify your installer follows established protocols so you’re not caught in a trap that voids your coverage or leads to early replacement.
In essence, understanding these nuanced details is crucial for maximizing your appliance’s lifespan and ensuring your warranty protections are effective. Don’t fall into common traps—learn the nuances, follow expert advice, and keep your appliances running smoothly.
Have you ever fallen into this trap? Let me know in the comments.
Maintaining your appliances over time requires more than just basic cleaning; it calls for reliable tools, precise methods, and an understanding of long-term upkeep. As someone who’s dealt with everything from stubborn dryer vents to complex smart home setups, I can attest that investing in the right equipment streamlines the process and extends your appliances’ lifespan.
Why High-Quality Tools Matter for Appliance Care
I’ve found that investing in specialized tools makes all the difference. For instance, a flexible vent cleaning brush, like the 7-seal checks guide, not only helps in routine maintenance but also prevents costly repairs. My personal favorite is a magnetic inspection mirror—perfect for peering behind appliances without moving heavy units. Similarly, a digital multimeter is invaluable for diagnosing electrical issues swiftly, saving both time and money.
Adopting Preventative Measures to Secure Long-Term Results
Regularly scheduled maintenance is essential. For example, every six months, I run a deep clean of my washing machine’s door seal using a soft brush and an approved cleaning solution. This approach helps prevent mold buildup and keeps the machine functioning efficiently, as detailed in mold prevention tips. Additionally, installing smart maintenance alerts—like sensor-based reminders—can proactively inform you when filters or parts need attention, aligning with the future trend of integrated appliance monitoring.
Tools I Recommend for Ongoing Maintenance
Beyond basic equipment, I advocate for a few advanced tools. A circuit tester is crucial for safely troubleshooting electrical components, especially when dealing with smart appliances. For cleaning hard-to-reach vents or coils, I use a extensible brush with a swivel head, which simplifies the task significantly. For sealing and gasket repairs, a high-temperature silicone sealant can be a game-changer, providing durable fixes that prevent leaks and maintain efficiency.
Looking Ahead: The Future of Appliance Care
Trendwise, I predict a rise in AI-powered diagnostic devices that can detect issues before they cause breakdowns. These innovations will make maintenance even more proactive and personalized. For now, though, mastering the essentials—like using a multimeter or preemptively cleaning vents—puts you ahead in appliance longevity.
How do I maintain my appliances over time?
Consistent cleaning with the right tools, scheduled inspections, and leveraging smart technology solutions are key. Remember, a little investment in quality equipment pays off by avoiding emergency repairs and preserving your warranty. Try incorporating a magnetic inspection mirror into your toolkit today—it’s small but powerful—and watch how much easier routine upkeep becomes.
For additional guidance, check out this detailed troubleshooting article to enhance your maintenance routine.
The Hardest Lesson I Learned About Installation and Maintenance
One of my biggest eye-openers was realizing that proper vent cleaning isn’t just a quick chore—it’s the foundation of appliance health. Ignoring small details, like ensuring the vent is fully clear, can lead to significant damages down the line, often caught too late. This taught me the value of routine checks and respecting the nuances of installation procedures, which most DIY enthusiasts tend to overlook.
The Value of Investing in Quality Tools for Better Repairs
I’ve discovered that having reliable, specialized tools—like a flexible vent brush or a digital multimeter—transforms maintenance from a dreaded task into a manageable one. Trust me, these small investments save time, prevent mistakes, and extend your appliance’s lifespan, keeping you ahead of costly repairs and warranty issues.
Why Overconfidence Can Cost You More Than You Think
Early on, I believed that DIY repairs were always cost-effective. However, I learned that rushing into fixes without proper knowledge or skipping manufacturer guidelines risks voiding warranties and causing further damage. It’s crucial to recognize when a professional touch is needed—sometimes, a quick call to an expert ensures long-term peace of mind and keeps your repair or warranty claims valid.
How Routine Maintenance Becomes Your Best Ally
Consistent, scheduled checks—like cleaning the lint trap, inspecting seals, or testing electrical connections—are your secret weapon against unexpected breakdowns. These habits make appliance failures less stressful and help you understand your equipment better. They also align with the latest [warranty enforcement rules](https://discountappliancehub.com/4-new-2026-rules-for-valid-appliance-warranty-claims), ensuring you stay covered when it matters most.
Curated Tools That Simplify Long-Term Appliance Care
Over the years, I’ve curated a set of go-to tools: from a magnetic inspection mirror to spot hidden lint, to a high-quality silicone sealant for gasket repairs. These resources empower you to handle minor issues swiftly and effectively, fostering confidence and safeguarding your warranty. For example, preventing mold behind your washer seal is easier with tips found in guides like [this mold prevention article](https://discountappliancehub.com/why-your-front-load-washer-is-growing-mold-behind-the-seal).
Believe in Your Ability to Make a Difference
Ultimately, mastering appliance care is within your reach. Each small effort—like a biannual vent clean or checking your smart device settings—delivers long-term benefits. By staying proactive and informed, you build a safer, more efficient home environment. Remember, your appliances are investments—treat them with care, and they’ll reward you with reliable performance and extended warranties.