
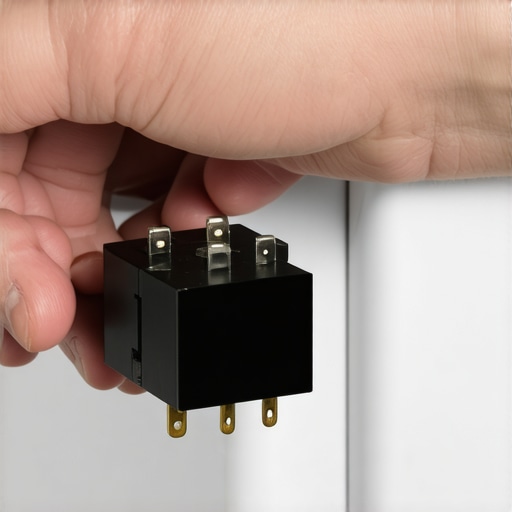
I stood there at midnight, barefoot on the cold tile, listening to that rhythmic click… click… click… coming from behind my fridge. My heart sank. The milk was warm, the ice cream was a soup of sugar and regret, and I was already mentally calculating how many shifts I would need to pull to afford a new compressor. I have been there—staring at a dead appliance while your wallet cries for mercy. But before you panic and search for what to expect from a repair expert, I want to show you the one tiny part that is likely the real villain. Today, we are going to fix your warm refrigerator for the price of a takeout pizza using the starter relay trick.
Stop Throwing Away Your Hard-Earned Cash on New Fridges
It kills me when I see neighbors hauling a perfectly good stainless steel fridge to the curb just because it stopped cooling. Most people assume a warm fridge means the compressor is toasted. I made that exact same mistake years ago—I actually paid a guy to haul away a three-year-old unit because I did not know how to test the basic components myself. It turns out, according to data from the Association of Home Appliance Manufacturers, many refrigerator failures are actually minor electrical issues rather than mechanical death. The starter relay is the gatekeeper; if it fails, your compressor never gets the signal to start, and your food starts sweating. Usually, it is a $15 to $20 part that takes ten minutes to swap. Have you ever felt like your appliance was designed to fail the moment the manufacturer warranty expired? Drop a comment below if you have ever suspected your fridge was just acting up to spite you.
Is this cheap fix actually too good to be true?
I get it. You are skeptical. You are thinking, if it is that easy, why does not everyone do it? The truth is, most big-box stores would rather sell you a new $2,500 smart model than tell you about a plug-and-play part. If you are currently dealing with a unit that will not stay cold, you might even find that a clogged capillary tube or a bad relay is all that stands between you and a working kitchen. We are going to bypass the expert fees today and get your kitchen back to 37 degrees. This trick saved me twice last year, and I am betting it will save you too.
Pull the plug before you do anything else
Safety is not just a suggestion; it is a necessity when you are messing with high-voltage components. I once made the mistake of working on a dryer without disconnecting the power, and let me tell you, that jolt is something you never forget. Before you even think about moving that fridge, ensure it is completely disconnected from the wall. If you are worried about the legalities or your service agreement, take a quick look at the wear and tear clauses that might void your warranty before you crack open any panels. Once the power is dead, scoot the unit away from the wall. This is usually when you find out why your fridge is leaking water on the floor—it is often just years of dust and gunk blocking the natural flow of things. Use this time to vacuum the coils, as a clean machine is a happy machine.
Get behind the unit and find the black box
On the back of your refrigerator, near the bottom, you will see a large, heavy metal dome. That is the compressor, the heart of the cooling system. Attached to the side of it, usually tucked under a plastic cover, is a small device about the size of a matchbox. This is the starter relay. Think of it as the spark plug for your fridge; it provides the high-energy kick needed to get the compressor motor spinning. If your fridge is clicking but not cooling, the relay is likely trying to fire but failing. This is far more common than the clogged capillary tube making your fridge run constantly, which is a much more expensive mechanical headache. Remove the clip or screw holding the plastic cover in place, and carefully pull the relay off the three metal pins protruding from the compressor side.
Give the relay a shake to hear the failure
Here is the secret diagnostic trick that pros use. Once you have the relay in your hand, hold it up to your ear and give it a good shake. If it sounds like a box of broken glass or a maraca, it is dead. The internal ceramic disk has shattered, preventing the electrical connection from completing. If it is silent, the problem might be deeper, possibly requiring the capacitor test that saves your ac compressor or fridge unit. I remember helping my brother-in-law with his ‘dead’ GE unit last July. He was ready to drop two grand on a new French-door model. We pulled the relay, heard that tell-tale rattle, and I drove him to a local parts shop. We had it cooling again before his beer got warm. It was messy—we found a decade’s worth of pet hair back there—but the fix itself was incredibly simple.
Match your part and plug it in
Do not just buy any relay. You need to match the part number printed on the side of the old casing. You can find these on major online retailers or at a local appliance parts warehouse for less than the price of a decent lunch. When you get the new one, simply line up the holes with the pins on the compressor and press it on firmly. Reattach the wires exactly as they were on the old unit. If you are ever unsure about the installation process, referring to an expert guide to appliance repair and installation today can give you that extra boost of confidence. Once it is seated and the cover is back on, plug the fridge in. You should hear a satisfying hum almost immediately. This tiny component is the difference between a functional kitchen and a total disaster, and knowing how to swap it yourself ensures you are always in control of your home maintenance.
The authorized service trap you need to watch for
Most homeowners believe that ‘factory authorized’ service is the gold standard for every repair. I used to think so too, until I realized that these services are often bound by corporate scripts that prioritize part replacement over actual repair. While what to expect from same-day appliance repair experts usually includes a quick diagnostic, an independent technician with twenty years of experience might actually find the loose solder joint that the ‘authorized’ guy is forced to ignore in favor of selling you a $600 board. According to a report by the Federal Trade Commission (FTC) on ‘Nixing the Fix,’ manufacturers often use restrictive warranty terms to steer consumers toward their own expensive repair networks, sometimes even when a simpler, third-party fix is safer and more durable. Don’t be afraid to seek a second opinion outside the big-box ecosystem.
Can a single loose wire ruin your new control board?
I have seen it happen a dozen times. A DIYer successfully replaces a part, only for the unit to fry again two weeks later. The hidden nuance that most people miss is electrical noise and grounding. If your home has even slight voltage fluctuations, the grounding error that makes your smart stove controls glitch can also destroy a brand-new refrigerator relay or control module. It is not enough to just swap the part; you have to ensure the environment that killed the first part is corrected. This is the ‘Oops’ factor that leads to endless cycles of ‘defective’ replacement parts when the real villain is your wall outlet or a loose neutral wire in the junction box.
How your maintenance records save your warranty
Everyone loves to skip the ‘Maintenance’ section of the manual. We treat refrigerators like furniture—set it and forget it. However, if you ever need to file a high-dollar claim, the reason your warranty claim was denied is almost always ‘owner neglect.’ I once saw a claim for a failed compressor rejected because the owner couldn’t prove they had cleaned the condenser coils in three years. To protect yourself, you must learn how to prove periodic maintenance to keep your warranty valid. Keep a simple logbook or a folder of photos showing you vacuuming those coils or checking the gaskets. It sounds tedious, but that five-minute task is the difference between a free repair and a $2,000 bill. If you are hiring someone, make sure you are scheduling your appliance repair for same-day service in 2025 with a company that provides a detailed, itemized receipt. Have you ever fallen into this trap where a simple lack of paperwork cost you a fortune? Let me know in the comments.It is not just about the one-off fix; it is about adopting a philosophy of proactive ownership. If you want to avoid calling for affordable same-day appliance fixes with warranty benefits every time a light flickers, you need a basic diagnostic kit that goes beyond a simple screwdriver. I personally never troubleshoot without my Fluke 116 multimeter. It is specifically designed for HVAC and appliance work because it handles microamps—a necessity for testing the flame sensors or thermistors that modern fridges rely on. When you are performing the refrigerator thermostat test every diyier should know, having a tool that provides a decimal-point accurate resistance reading is the difference between a calculated repair and a shot-in-the-dark guess. I also highly recommend a 24-inch flexible condenser coil brush. Vacuuming helps, but these specialized brushes agitate the dust that ‘felts’ deep inside the cooling fins, which is what actually chokes the compressor and leads to premature failure.
The toolkit that turns a homeowner into a pro
Beyond the basic meter, you should invest in a set of nut drivers. Most appliance manufacturers, especially Whirlpool and Samsung, use 1/4-inch and 5/16-inch hex head screws for almost every panel. Looking toward the future, I predict we will see a massive shift toward predictive maintenance modules. We are already seeing the early stages of this with how to ensure reliable appliance installation in 2025, where smart sensors can alert your phone to a temperature drift before your milk even has a chance to spoil. But until your kitchen is fully automated, you remain the primary diagnostic engine. According to the National Electrical Manufacturers Association (NEMA) technical standard WD 6, ensuring your wall outlet maintains a specific ‘blade retention’ force is vital; a loose plug creates arcing that can fry a new relay in seconds. If your fridge plug slides out of the wall with zero resistance, replace that outlet immediately to save your electronics.
How do I keep my fridge running smoothly after a repair?
Consistency is the secret sauce to appliance longevity. Every month, perform the ‘dollar bill test’ on your door gaskets. Close the door on a crisp bill; if it pulls out without any drag, your seal is failing. This simple check is the precursor to the door gasket fix that cuts refrigerator energy bills. Furthermore, always prioritize maximizing your appliance warranty during emergency repairs by choosing Original Equipment Manufacturer (OEM) parts over ‘universal’ alternatives. Generic parts often omit the internal thermal fuses that prevent a stalled compressor from starting a fire.  If you find that the mechanical side of things is handled but the unit still feels off, scheduling your appliance repair for same-day service in 2025 ensures a professional can check your refrigerant pressures—something a DIYer shouldn’t touch without an EPA 608 certification. My final advanced tip: install a dedicated appliance surge protector. Unlike standard power strips, these are rated for the high-inductive loads of a starting motor and can shield your expensive control board from grid spikes. Go check your fridge plug right now; if it is dusty, loose, or plugged into a cheap extension cord, you are risking a major breakdown.
The Hardest Lesson I Learned About Fridge Failures
Over a decade of DIY repairs, the most painful realization I had was how much money I wasted on ‘pro’ diagnostics that took five minutes. I once paid a $150 service fee just for a technician to tell me my compressor was dead, only to find out later it was just a $12 relay. Now, I always do the ‘rattle test’ first. Another insight most people overlook is how to challenge a warranty claim rejection for your fridge. If you have done your own repairs, keep the old parts and receipts; being able to show you used OEM components is often the only way to win an appeal. I have also seen why third-party warranty companies deny legitimate claims—it is almost always because the homeowner could not prove they performed basic maintenance like coil cleaning.
The Gear That Separates Amateurs From Pros
You do not need a truck full of tools, but you do need precision. My essential kit includes a digital multimeter capable of testing capacitance and a specialized coil brush. If you are ever in doubt about the technical steps, I highly recommend keeping an expert guide to appliance repair and installation today open on your tablet while you work. For those who realize the job is beyond a simple relay swap, searching for affordable same-day appliance fixes with warranty benefits is the smartest move to protect your groceries. #IMAGE_PLACEHOLDER_E# I personally trust Fluke for my meters and always buy ‘Hard Start’ kits for older fridges that need an extra boost.
Stop Fearing Your Kitchen Appliances and Start Fixing Them
The clicking sound of a failing relay is not a signal to go shopping for a new $3,000 unit; it is an invitation to learn how your home actually works. Whether you are handling the swap yourself or scheduling your appliance repair for same-day service in 2025, your goal should be longevity and efficiency. Taking twenty minutes to swap a starter relay today could buy you another five years of life for your refrigerator. Have you ever felt intimidated by a repair only to find out the solution was a simple plug-and-play part? Let me know in the comments below!