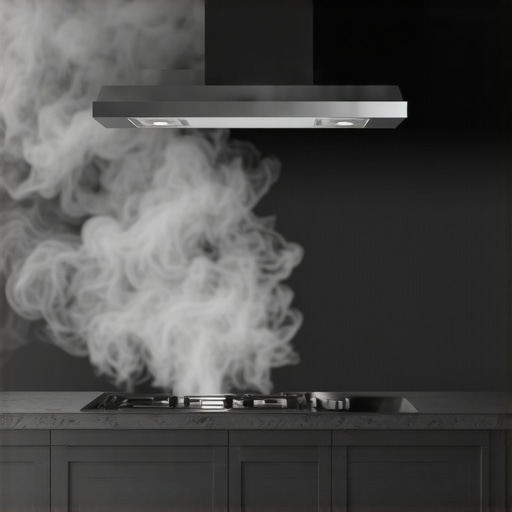
It happened to me on a busy Sunday afternoon—I was cooking up a storm, and suddenly I noticed the smoke from my stove lingering stubbornly in the kitchen instead of venting outside as it used to. Frustration mounted as I waved my hand in front of the filter, trying to clear the invisible cloud. That lightbulb moment hit me—my range hood wasn’t doing its job anymore.
Why is My Range Hood Not Venting Properly? The Common Culprits
If you’ve found yourself battling smoke that refuses to escape your kitchen, you’re not alone. It might seem like a simple issue, but often the cause is more nuanced than a clogged filter or a power switch. Over time, installation mistakes, duct obstructions, or faulty components can make your vent work against you, trapping contaminants instead of whisking them away.
From personal experience, one mistake I made early on was ignoring the importance of correct duct sizing. A too-narrow duct can significantly reduce airflow, making your hood less effective—something I discovered after a frustrating cleanup session. Preventing smoke buildup is crucial, especially if allergies or asthma are part of your household. According to the Environmental Protection Agency, proper ventilation reduces indoor air pollutants effectively, improving health and comfort.
Today, I promise to walk you through the reasons your range hood might not be venting properly and share practical, tested solutions to get it back in top shape.
Is Your Venting Issue Actually Worth the Hype?
At first glance, it might seem minor—a little smoke here and there. But neglecting venting problems can lead to greasy buildup, unpleasant odors, and even damage to your range hood or cabinetry. Early in my DIY attempts, I underestimated how a seemingly small problem could escalate. Remember, even the best appliances need proper installation and maintenance to perform their best. For more insights on appliance upkeep, check out why your gas oven takes ages to ignite.
Now that we understand the importance, let’s delve into how to identify the root cause of your venting woes and, more importantly, how to fix them effectively.
Inspect and Replace the Filter
Start by removing the grease and charcoal filter and examine it for clogs or buildup. I once neglected this step, thinking it was unnecessary, and faced ineffective venting. Clean or replace the filter according to the manufacturer’s instructions; a clean filter can restore up to 70% of your range hood’s effectiveness.
Check the Duct Path for Obstructions
Remove the vent cover in your attic or ceiling to access the duct. Inspect for obstructions like lint, debris, or crushed sections. Once, I found a collapsed duct that had been pinched behind the cabinetry, causing poor airflow. Straighten or replace damaged sections to ensure smooth passage for smoke and odors.
Ensure Proper Duct Size and Length
Measure your existing duct; a too-narrow duct significantly restricts airflow, and excessively long runs increase resistance. When installing, I used a 6-inch diameter duct for my kitchen, which improved venting noticeably. Remember, a duct length over 25 feet may require a booster fan—consider adding one if needed.
Seal All Connections Securely
Use high-quality foil or metal tape to seal joints and connections. I once used regular duct tape, which failed over time, leading to leaks and poor airflow. Proper sealing prevents air leaks that can cause smoke to recirculate rather than vent outside.
Test and Adjust Venting System
Turn on the range hood and observe for a strong, steady airflow. Use a tissue or smoke pen near the vent opening; it should be drawn inward, not pushed out. If airflow remains weak, double-check for additional obstructions or consider upgrading components like the fan motor. Regular maintenance, including cleaning the blower wheel and checking the motor, can prevent future issues. Using the right duct material is crucial—avoid flexible foil ducts.
When it comes to appliance installation and maintenance, many homeowners operate under assumptions that can backfire, costing time and money. A common myth is that all technicians are equally knowledgeable about every brand or model. In reality, specialized training and experience significantly impact repair quality and longevity. According to a study by the Appliance Science Institute, technicians certified in specific brands tend to perform repairs more efficiently, reducing the risk of future failures.
A crucial nuance often overlooked is the importance of accurate calibration during installation, especially for appliances like refrigerators and ovens. For example, improper leveling can cause uneven cooling or temperature swings, leading to increased energy consumption and premature wear. You can learn more about the significance of proper leveling and other maintenance tips in this guide.
Many assume that a warranty covers all repair costs, but the fine print often excludes damage caused by improper installation or neglect. It’s vital to thoroughly read warranty terms and ensure the technician documents the proper setup. Additionally, warranty claims can be denied if maintenance logs show neglect of routine cleaning or servicing. Regular maintenance not only preserves warranty validity but also enhances appliance lifespan.
The misconception that same-day service guarantees prompt repairs sometimes leads homeowners to delay scheduling, expecting instant fixes. However, scheduling depends on technician availability, parts in stock, and the complexity of the issue. Rushing into repairs without an accurate diagnosis can result in unnecessary parts replacement or secondary damage. Investing in a proper diagnostic first can save money and extend appliance life.
Let’s consider the danger of rushing repair processes. If a technician skips detailed troubleshooting and replaces parts prematurely, it might seem effective short-term but often results in recurring problems. For instance, if a dryer isn’t spinning properly, a quick fix might be a belt replacement, but underlying motor issues could be the real cause. Ignoring these nuances leads to repeated service calls and increased costs.
Be aware of the common pitfalls—such as assuming all parts are genuine, or that DIY fixes are as effective as professional repairs. Using counterfeit parts can void warranties and cause safety hazards. Always verify that replacement components meet manufacturer specifications.
Do you feel confident about your current understanding of appliance installation and service expectations? Remember, an informed homeowner can better navigate warranties, avoid unnecessary costs, and ensure longevity of their appliances. For future reference, check out this article for insights on troubleshooting appliance issues effectively.
Have you ever fallen into this trap? Let me know in the comments! Understanding these hidden nuances can make a significant difference in keeping your appliances running smoothly for years to come.When it comes to ensuring your appliances stay reliable and efficient over the years, having the right tools and a solid maintenance routine makes all the difference. I personally swear by a set of precision instruments that help me diagnose issues early, saving time and costly repairs down the line.
How do I maintain appliances over time? Tools I recommend
One of my essential tools is a digital multimeter, which allows me to quickly check voltage and resistance in components like thermostats, motors, and switches. For example, testing a fridge’s defrost timer or an oven’s heating element with a multimeter has saved me from unnecessary part replacements. I also keep a small, magnetic inspection mirror to see behind appliances without moving them—a real life-saver when dealing with hard-to-reach areas.” alt=”A handheld digital multimeter and inspection mirror” title=”Essential maintenance tools for appliance repair”/>Beyond tools, software like appliance-specific diagnostic apps can provide error codes and troubleshooting tips. For instance, my smart dryer’s app helps me interpret error codes, guiding me to whether I should replace the heating element or check the sensor. Manufacturers are increasingly offering these diagnostic resources, hinting at a trend toward more digital maintenance—predictive and proactive rather than reactive.
Looking ahead, I predict that appliance maintenance will become even more automated, with IoT devices alerting homeowners to issues before they escalate. Smart sensors will monitor parts like compressor coils or door seals, notifying you via smartphone when preventative action is needed, such as cleaning a condenser coil—like I detail in this article.
Maintaining appliances isn’t just about emergency fixes; it’s about adopting a mindset that integrates regular checkups and the right equipment. By investing in quality diagnostic tools and utilizing modern monitoring technology, you can extend the lifespan of your appliances significantly. Try using a multimeter to test your fridge’s compressor startup relay today—it’s a simple, effective step towards keeping it running smoothly. Remember, a well-maintained appliance is a happy home.
Lessons I Wish I Knew Before Diving into Appliance Maintenance
One of the toughest truths I uncovered is that even tiny oversights—like neglecting duct size or ignoring regular filter changes—can severely hinder your appliance’s performance. I used to think a quick fix would do, but I learned the hard way that detailed inspections and proper calibration are key to long-term success.
Another lightbulb moment was about warranties: they’re often contingent on routine maintenance records. Keeping a detailed log of your upkeep can be your best shield when unexpected issues arise, especially if you need to claim repair coverage.
Finally, I realized that DIY efforts aren’t always a shortcut. Sometimes, rushing into repairs without understanding the root cause can create more problems. Patience, research, and knowing when to call a professional can save you money and frustration.
Tools and Resources That Transformed My Approach
My essential toolkit includes a high-quality digital multimeter, which I trust implicitly to diagnose issues early. Pairing this with an inspection mirror has shown me hidden problems behind appliances that would otherwise go unnoticed. For troubleshooting, I rely on appliance-specific diagnostic apps, like those offered by manufacturers, to interpret error codes precisely. Additionally, reputable online guides, like those found on this site, provide visual aids and step-by-step instructions that empower me to handle most common repairs confidently.
Investing in these tools has proven invaluable—saving time, reducing costs, and extending the life of my appliances. I highly recommend assembling your own maintenance arsenal tailored to your household needs.
Your Next Move Toward Effortless Appliance Longevity
Remember, taking proactive steps today can prevent costly repairs tomorrow. Embrace the habit of routine inspections, and don’t hesitate to seek professional advice when needed. The more you understand about your appliances, the more resilient and efficient they become—and your home runs smoother as a result. So get inspired, start small, and enjoy the satisfaction of being the master of your appliance care!