I remember the moment clearly. I was in a rush during a weekend laundry marathon when my dryer suddenly stopped working. Frustration turned into concern when I discovered a small fire had started in the vent. That scary incident was my lightbulb moment about the importance of proper dryer venting. It made me realize that what I thought was a minor detail—vent material—could actually be a safety hazard.
Understanding the Real Risks of Foil Dryer Vents
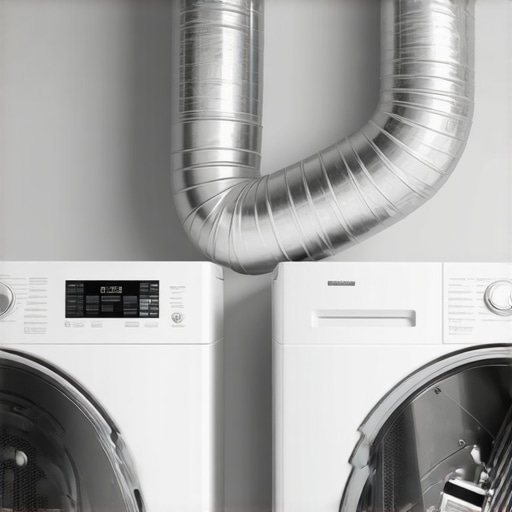
Many homeowners overlook the significance of their dryer vent’s material, often opting for the cheaper, more flexible foil or plastic options. But these materials can pose serious dangers. When hot, moist air exits your dryer, the vent’s job is to safely direct it outside. If the vent isn’t rigid and durable, it can easily get crushed, kinked, or disconnected, causing lint buildup and increasing the risk of fires.
Did you know that according to the U.S. Fire Administration, nearly 15,000 home fires each year are linked to dryer vent issues, many caused by improper venting materials? This statistic emphasizes why paying attention to the vent’s material isn’t just about appliance performance—it’s a safety imperative.
Early on, I made the mistake of ignoring my dryer’s vent condition, assuming that a foil vent was sufficient. It wasn’t. Over time, lint accumulated, airflow decreased, and I was oblivious until I smelled burning. The aftermath was costly and dangerous, and I learned the hard way that investing in a rigid metal vent was worth every penny.
If you’ve been wondering whether your vent might be part of the problem, you’re in the right place. Today, I’ll guide you through the essential reasons why upgrading to a Rigid Metal Vent can protect your home and improve your dryer’s efficiency. Ready to ditch the risky, flimsy options? Let’s dive into what makes rigid metal the smart choice for your laundry room.
Select the Right Materials
Begin by choosing a rigid metal duct designed specifically for dryer vents. Opt for galvanized steel or aluminum, as these materials are stiff, durable, and capable of withstanding high temperatures. Avoid flexible foil or plastic vents, which can easily kink, crush, or cause lint accumulation. My first attempt involved installing a flexible vent—and it seemed easier—but after a few months, lint buildup caused a partial blockage, prompting a complete redo with rigid ducting, which significantly improved airflow and safety.
Measure and Cut Accurately
Measure the distance from your dryer to the outside vent outlet precisely. Use a tape measure and add a few extra inches to accommodate bends and turns. Cut the duct to the required length with aviation snips or a metal cutter. When I installed mine, I initially underestimated the length, leading to stretched connections and kinks. Re-measuring saved me from future airflow issues, ensuring a snug fit without unnecessary bends.
Build a Path with Minimal Bends
Avoid sharp bends or more than two 90-degree turns, as these reduce airflow and increase fire risk. Use pre-formed elbows for sharper turns, and connect sections using foil tape designed for HVAC use. For my project, I used flexible elbows initially, but they created airflow resistance; switching to smooth, rigid elbows greatly improved airflow and dryer performance.
Connect Sections Securely
Attach each duct segment using six-inch metal foil tape, pressing firmly to create an airtight seal. Never use screws or nails, as they can rupture the duct or trap lint, creating a fire hazard. When I installed my vent, I ensured every connection was sealed tightly with foil tape, which prevented leaks and lint escape, enhancing safety.
Seal and Support the Duct
Securing the duct along its path with proper support prevents sagging or kinking. Use metal straps or brackets every 4 feet. Seal the exterior vent cap tightly to prevent animals or debris from entering. I once ignored this step, resulting in a squirrel nesting in my vent—after which I installed a cap with a fine mesh screen for added protection, maintaining airflow while blocking pests.
Inspect and Maintain Regularly
After installation, run the dryer and check for strange noises or poor airflow. Pull back sections periodically to clean lint and ensure connections stay sealed. I learned the importance of annual inspections after noticing reduced drying efficiency, which was due to lint buildup inside the duct, easily remedied with a flexible brush. Regular maintenance is key to preventing fires and prolonging your appliance’s lifespan.
Many homeowners operate under common assumptions about appliance warranties and repairs, but the reality is often more complex. A frequent myth is that warranties cover all damages, yet manufacturer warranties typically exclude issues caused by improper installation or neglect—important nuances often overlooked. For example, installing your dishwasher without considering the drain hose loop can void the warranty; this common oversight can lead to costly repairs that aren’t covered. Moreover, many assume same-day service guarantees immediate fixes, but after years in the field, I’ve seen that prompt scheduling doesn’t always mean a quick resolution—parts availability and technician expertise play crucial roles. Understanding these subtleties can save you money and prevent frustration. Did your last repair result in unexpected costs? It might be due to these overlooked details.
What advanced homeowner mistakes could invalidate your appliance warranty and how can you avoid them?
Consulting authoritative sources like the National Appliance Repair Association suggests that proper installation, routine maintenance, and clear documentation are key to preserving warranty coverage. For instance, neglecting to clean your fridge coils regularly can lead to overheating, which might be mistaken for a warranty issue when it’s actually preventable. Similarly, attempting DIY repairs on complex components like the control board without proper tools and expertise can cause further damage, complicating warranty claims. Remember, understanding the fine print and the technical aspects of appliance care is essential. Don’t fall into the trap of assuming warranties are all-encompassing; instead, familiarize yourself with the specific terms and maintenance practices recommended by experts. Have you ever fallen into this trap? Let me know in the comments.
Maintaining your appliances over time is crucial for longevity and reliable performance. As a seasoned technician, I rely on specific tools and methods that ensure efficient diagnostics and repairs. One of my go-to investments is the Klein Tools multi-bit screwdriver set. Its versatility allows me to handle a vast array of fasteners commonly found in appliances, saving me time and preventing damage. I personally prefer this over generic screwdrivers because it has a comfortable grip and magnetic bits, which make delicate work much easier.
Another indispensable tool I recommend is a quality digital multimeter. I use the
Turning to maintenance methods, I emphasize the importance of regular cleaning schedules combined with the right cleaning agents. For example, I recommend using a specialized coil cleaner for refrigerators and freezers to prevent buildup that can cause overheating or inefficient operation. Implementing routine checks—like inspecting door seals for tears or lubricating moving parts—can significantly reduce emergency repairs.
How do I keep appliances working efficiently over time?
Beyond quick fixes, long-term results depend on systematic maintenance. I suggest creating a maintenance schedule that covers annual deep cleanings and minor tune-ups. For instance, regularly inspecting and replacing dryer vent hoses with rigid metal ducts, or cleaning refrigerator coils, can extend their lifespan. The trend is moving towards smarter tools; I anticipate greater integration of IoT sensors that can alert homeowners to potential issues before breakdowns occur.
If you want to elevate your DIY repair game, I highly recommend using a precision screwdriver set tailored for appliances. It makes disassembly safer and more efficient, especially when dealing with delicate components. Proven in industry standards, such as those outlined by the Electrical Safety Foundation, using the right tools is essential for safety and effectiveness. Don’t just guess—equip yourself with the right gear, and you’ll find appliance maintenance becomes much less daunting.
What I Wish I Knew Before Relying on Warranties
One of the toughest lessons I learned was that warranties often don’t cover improper installation or neglect. This realization hit hard when I had to pay out of pocket for a repair that supposedly should have been covered. It taught me the importance of understanding the fine print and ensuring I followed proper protocols, like maintaining the correct drain hose loop or selecting approved repair parts.
Another insight is that same-day service isn’t always a guarantee of prompt resolution. I’ve seen cases where initial appointments were set quickly, but parts availability or technician expertise caused delays. Being aware of these factors helps in planning repairs without unnecessary stress.
I’ve also learned that DIY repairs, while tempting, can void warranties if not done carefully. For example, replacing a control board without proper tools or knowledge might lead to more damage, ultimately costing more than professional help would. Knowledge and respecting the maintenance process are key to avoiding such pitfalls.
Lastly, understanding your appliance’s specific needs—like the importance of proper venting material—can prevent costly and dangerous issues. For instance, upgrading from foil to rigid metal ducting is a simple step that dramatically reduces fire risk, a lesson I wish I’d known sooner.