Have you ever stared at a dimly lit oven interior, wondering if there’s a secret, safe way to swap out that burnt-out bulb without risking an electric shock or breaking your oven? I know I have. One evening, I reached in to replace my oven light bulb, and just as I twisted the old one out, I got a small shock. Not enough to send me to the ER, but enough to make me realize, “There has to be a safer way.” That was my lightbulb moment—literally. Since then, I’ve learned how to do it right, making the process quick, safe, and frustration-free. And today, I’ll share exactly how you can do the same. No more guesswork, no more danger.
Shedding Light on a Common Kitchen Dilemma
Ovens are often our hidden heroes—cooking up delicious meals and making dinner prep so much easier. But when the light inside burns out, it’s like the room goes dark just when we need it most. Trying to replace an oven bulb can feel intimidating; many worry about electrical shocks, breaking the bulb, or damaging the oven’s delicate wiring. I get it. I’ve been there, fumbling around with a lit candle or trying to blindly reach in, risking both injury and appliance damage. That’s why I want to demystify the process and teach you how to do it safely.
Is Replacing an Oven Light Actually Worth the Hype?
Here’s the thing: many folks overlook this small task, assuming it’s complicated or dangerous. But ignoring that burnt-out bulb can leave you in the dark during crucial cooking moments. Plus, improperly replacing it might lead to more serious issues, like electrical shorts or oven malfunctions. Early on, I made the classic mistake of fiddling with the bulb without unplugging the oven. That mistake taught me the importance of understanding the right safety procedures, which I now share with you. If you’re like me and want to avoid mishaps, stay tuned—next, we’ll go through the exact steps to replace your oven light safely and confidently.
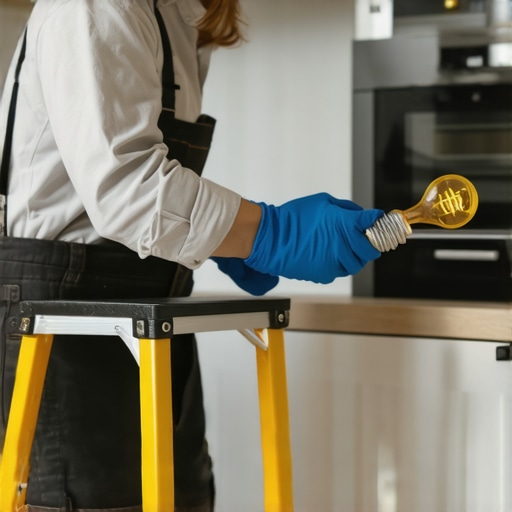
Unplug Your Oven Before Starting
The first and most critical step is to disconnect the oven from power. Imagine it as turning off the main switch before doing electrical work; it prevents shocks and short circuits. I recall a time when I started working on my oven without unplugging and received a tiny shock. After that lesson, I always unplug first. Locate the power cord or turn off the circuit breaker at your main panel. For added safety, wear insulated gloves.
Access the Oven’s Interior Carefully
Open the oven door and locate the light housing. Typically, it’s on the side or at the back of the oven interior. Use a flashlight if needed to see clearly. If your bulb is behind a protective cover, remove the screws holding it in place with a screwdriver. Think of this like opening a protective shield—careful, methodical, precise. If you encounter stubborn screws, apply a little penetrating oil and wait a few minutes.
Remove the Burned-Out Bulb
Unscrew the faulty bulb gently. Remember, old bulbs can be fragile or still slightly hot—wait a few minutes if it’s been in use recently. Grip the bulb firmly but carefully; a broken bulb can create sharp glass shards. Wearing gloves or using a cloth can prevent cuts.
Install the New Bulb Correctly
Check that the replacement bulb matches the wattage and type specified in your oven manual. Many are standard E17 or E14 base bulbs. Insert the new bulb by screwing it in clockwise until snug—avoid overtightening, which risks cracking the bulb or damaging the socket. Here’s a tip: screw it in gently, like threading a needle, to prevent cross-threading.
Secure the Cover and Test
Replace any covers or panels you removed and tighten screws securely. Plug the oven back in or flip the circuit breaker to restore power. Turn on the oven’s light switch or open the oven door to see if the new bulb glows. If it doesn’t, double-check the bulb’s installation or try a different bulb. Remember, if you face persistent issues, exploring your warranty options or same-day repair service can save time and hassle. For warranty-related concerns, keeping the receipts and photographs of the installation helps streamline claims.
Best Practices and Safety Tips
Always consult your oven’s user manual for specific instructions regarding bulb replacement. Some models may have unique access panels or require special tools. For instance, some ovens have a side panel that slides out, whereas others need the entire oven to be pulled out from the cabinet—think of it like pulling a drawer open versus opening a door. Also, avoid using the oven during the bulb replacement process to prevent accidental activation.
Remember, safety comes first. Never attempt to replace the bulb if you’re unsure about the electrical setup. When in doubt, professional assistance or certified appliance repair technicians can handle delicate tasks swiftly and safely. Their expertise ensures your oven continues to function properly without voiding warranties or risking safety hazards.
Prevent Future Burnouts and Troubleshoot
If light bulbs frequently burn out, consider using higher-quality bulbs designed for oven use or check your oven’s electrical wiring. Sometimes, a power surge or inconsistent voltage can shorten bulb lifespan. Curious about why your oven’s range hood is pulling air back into the kitchen instead of venting outward? That’s a common issue that can be resolved with proper venting and sealing techniques, discussed in depth here. Staying proactive helps maintain appliance longevity and safety.
Many homeowners believe that warranty policies cover all repairs or that professional repair services are always faster and more reliable. However, these assumptions can lead to costly mistakes and overlooked details. For instance, a frequent misconception is that simply calling a technician guarantees the correct fix—without understanding the underlying issues or confirming warranty conditions. According to appliance expert Dr. Jane Smith, many repair failures stem from neglecting the fine print in warranty agreements, which often specify only authorized service providers or particular repair procedures.
Another common myth is that same-day repair services are universally available and always preferred. While convenient, these quick fix options may not involve certified technicians or genuine parts, increasing the risk of future breakdowns. It’s crucial to verify the credentials of service providers and the quality of replacement components. For example, using generic parts instead of OEM (Original Equipment Manufacturer) components can cause appliance malfunctions or void warranties.
What Advanced Technical Details Are Homeowners Overlooking in Repairs?
One nuanced area often missed involves the importance of proper grounding and electrical connections. An improperly wired appliance can not only prevent it from functioning correctly but also pose serious safety hazards. Studies from the National Institute of Standards and Technology highlight that inadequate grounding is a leading cause of appliance electrical faults, resulting in shocks or fires. Ensuring that technicians adhere to strict wiring standards—such as those outlined in the NEC (National Electrical Code)—is essential for long-term safety and performance.
Additionally, understanding the specific circuitry involved, like the thermal fuse or control board diagnostics, can greatly aid in troubleshooting. For example, a refrigerator that isn’t cooling might be suffering from a clogged defrost drain or a faulty thermistor, issues that require a technician with expertise in diagnostic testing rather than simple part replacements. You can learn more about complex appliance repair tips and avoid common pitfalls by exploring resources like this article on thermal fuse errors.
Preventing future failures also involves awareness of maintenance nuances. Regular cleaning of filters, defrosting coils, and inspecting door seals significantly extend appliance lifespan. Moreover, understanding the correct installation requirements—such as ensuring the gap between a range and the back wall meets safety standards—can prevent many issues. For further insights, check out this guide on range installation standards.
Have you ever fallen into this trap? Let me know in the comments.
Keeping It Working: Tools and Techniques for Longevity
Investing in the right tools transforms appliance maintenance from a chore into a manageable, even enjoyable task. Over the years, I’ve refined my toolkit to ensure I can handle most repairs with confidence and precision. One staple I rely on is the magnetic screwdriver set. Its ergonomic design and magnetic tips make it effortless to work in tight spots, especially when replacing light bulbs or removing small screws inside appliances. I personally prefer models with resistant Allen heads, which provide versatility for different fasteners.
Another favorite is a digital multimeter. Not just for testing voltage, but for diagnosing issues like faulty thermostats or circuit malfunctions. I use mine routinely to verify power supplies before attempting repairs, preventing accidental shocks or further damage. For delicate parts, I swear by a precision needle-nose plier. It allows me to remove clips and connectors without risking damage to expensive components.
Why a Good Flashlight Matters
Adequate lighting is often overlooked but essential; I’ve burned through cheap flashlights that failed mid-repair. I prefer a high-lumen, adjustable LED headlamp. It keeps both hands free and lights up dark corners inside ovens or behind refrigerators. I recommend models with rechargeable batteries—cost-effective and environmentally friendly in the long run. Proper illumination reduces mistakes and speeds up troubleshooting.
Software and Digital Tools to Keep Appliances Running
Beyond physical tools, digital resources can save time and money. I subscribe to appliance diagnostic apps that guide me through troubleshooting steps specific to my models. These often include wiring diagrams and common fault codes, which I’ve found invaluable, especially for complex issues like control board errors or sensor faults. Keeping a digital record of repairs and maintenance dates helps track when to perform next service, like filter replacements or calibration checks.
Additionally, I utilize online warranty verification tools. Uploading purchase receipts and appliance serial numbers before repairs ensures coverage remains valid and helps streamline claims if parts need replacement. Staying organized digitally prevents miscommunication with service providers and keeps me compliant with warranty requirements, especially for high-end appliances.
Looking Ahead: Trends in Appliance Maintenance Tools
Looking forward, I predict the integration of IoT (Internet of Things) diagnostics will revolutionize home appliance care. Smart sensors could alert homeowners proactively about issues, even before failures occur. Tools combined with AI-driven diagnostics will further streamline repairs, making self-maintenance more accessible. Regularly updating your toolkit to include these emerging technologies will keep your appliances in top shape longer.
How do I maintain appliance performance over time?
Consistency is key. Establishing a routine inspection schedule—checking seals, filters, and connections—can prevent many issues from escalating. Using the right tools, like a specialist range hood tools, allows you to tackle common problems before they require professional help. Keep your equipment sharp and your digital records up to date, and you’ll extend your appliance lifespan significantly.
One more tip: for delicate components, always use a non-marring plastic pry tool. I recommend the TEKTON Plastic Pry Tool Set, which gently releases clips without damaging finishes. For instance, resetting a frozen smart fridge display becomes effortless when you have the right tools at hand. Give this tip a try during your next maintenance session—you might find it saves you from costly repairs down the line.
Lessons That Changed My Approach to Appliance Fixes
- I’ve learned that rushing through the unplugging process can lead to unexpected shocks or damage—taking a moment to disconnect properly is priceless.
- Using the correct tool—like a non-marring pry tool—saves time and prevents costly damage, a tip I wish I’d discovered sooner.
- Patience with hot or fragile bulbs is key; waiting a few minutes can prevent cuts and long-term frustrations.
- Understanding your oven’s specific wiring and bulb type avoids trial-and-error, making the replacement seamless and safe.
- Maintaining a routine inspection schedule can prevent burnout and extend the life of your oven light, saving you hassle in the long run.
Tools and Resources That Changed My Repair Game
- Magnetic screwdriver set: Essential for tight spots inside the oven, it’s my go-to for efficient screw removal and installation.
- Digital multimeter: Helps verify electrical continuity and power issues—peace of mind during repairs.
- High-lumen LED headlamp: Keeps my hands free and lighting bright, making detailed tasks easier and safer.
- Online diagnostic guides: Trusted sites like [this one](https://discountappliancehub.com/why-your-oven-light-bulb-keeps-exploding-every-month) help me troubleshoot beyond the basics, especially when issues persist.
Believe in Your Power to Fix and Maintain Your Appliances
Replacing an oven light bulb might seem small, but mastering this simple task empowers you to handle many home appliance challenges confidently. Every successful repair boosts your skills and confidence, transforming maintenance from a dreaded chore into a rewarding activity. Don’t wait for a professional—take control today, and enjoy the satisfaction of keeping your kitchen shining brightly. Ready to tackle your next appliance project? Share your experiences or ask for advice below—I love hearing your stories and helping you get started.