It was a morning like any other, until I opened my laundry door and realized my favorite sock was missing—well, kind of. Instead of floating freely in the drum, this sock had decided to take a detour and get lodged somewhere surprisingly tricky: the washer pump. You know that sinking feeling when you think, “Did I just ruin my machine?” That lightbulb moment, realizing something so small could cause such a headache.
I’ve been there more times than I care to admit, battling nagging little issues that seem insignificant until they become major problems. Today, I promise to share exactly how I finally solved the mystery of the stuck sock—so you won’t have to spend hours or shell out for a repair technician when it’s a simple fix you can do yourself.
Why Socks Get Stuck and Why You Should Care
Every laundry day, as I toss in my clothes, I never think about the tiny items like socks causing potential chaos. But when a sock slips past the drum and into the pump area, it can lead to drainage problems, strange noises, or even complete machine shutdowns. Understanding how this happens is key to preventing future mishaps.
The pump is designed to remove water efficiently, but small clothing items can sneak past the laundry basket barrier, especially during vigorous wash cycles. Once trapped, these items can block the pump impeller or damage internal parts, leading to costly repairs. What’s worse, trying to forcefully remove a sock without knowing what you’re doing can cause more damage.
Are you tired of dealing with mysterious drainage issues that turn out to be just a sock? Well, I was too—and that’s why I dove into the process of safely retrieving these stubborn items. For a comprehensive look at how water issues impact your washing machine’s lifespan, check out [this article](https://discountappliancehub.com/how-your-hard-water-is-secretly-destroying-your-washing-machine).
Now, let’s get into how I finally managed to get my sock free, and how you can do the same without turning your laundry room into a disaster zone.
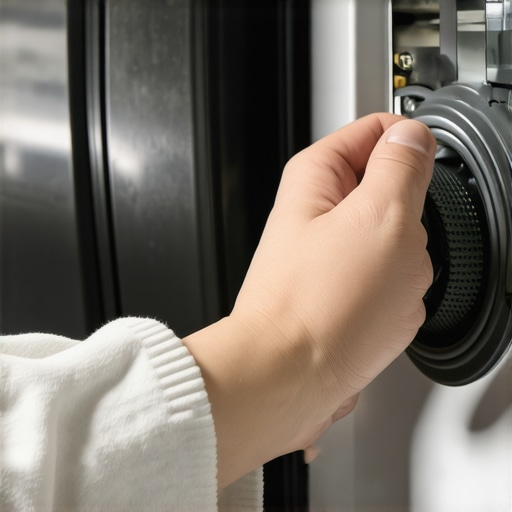
Accessing the Washer Pump Safely
First, unplug your washing machine to prevent electrical shocks. Locate the front panel or lower front access panel—most modern washers require you to remove this panel to reach internal parts. Use a screwdriver to unscrew the panel; keep the screws in a safe place for reassembly. Once removed, you’ll see the pump and hoses. I once followed this step and discovered a tangled sock blocking the pump impeller, saving myself a costly repair.
Removing and Inspecting the Pump
Before proceeding, place towels or a shallow container beneath the pump to catch any residual water. Disconnect the hoses connected to the pump, noting their positions for correct reattachment. Carefully remove the pump from its mounting bracket—some models have clips, others use screws. When I did this, I found a sock lodged tightly, and gently prying it out with needle-nose pliers prevented damage.
Extracting the Sock and Clearing Debris
With the pump out, examine the impeller for obstructions. Carefully remove any lodged sock or debris. Use a soft brush or cloth to clean the impeller and surrounding area to ensure smooth rotation. This step is crucial; a blocked impeller can cause drainage failures or strange noises. After clearing, inspect the pump for cracks or damage, replacing it if necessary. I learned that cleaning often restores function without replacing the entire pump.
Reassembling and Testing the Machine
Reconnect the hoses securely, ensuring they are snug to prevent leaks. Mount the pump back onto its bracket and replace the access panel. Plug in the washer and run a short cycle with water to verify proper drainage and operation. This hands-on approach saved me hundreds versus calling a technician—that’s why understanding these steps is vital for DIY troubleshooting. For more tips on maintaining your washing machine, visit [this comprehensive guide](https://discountappliancehub.com/why-your-washer-is-tearing-your-delicate-clothes).
When it comes to appliance repairs and services, many think they know the basics—schedule quickly, ensure warranty coverage, and choose trusted installers. But in my experience, there’s a complex layer of nuances that often go unnoticed, leading to costly pitfalls or missed opportunities for better protection. Let’s unravel some of these common misconceptions and reveal the subtle truths behind these topics.
One widespread myth is that same-day service always guarantees the best repair quality. While urgency is attractive, many customers overlook that technicians juggling multiple urgent appointments might prioritize speed over thorough diagnostics. Rushing through repairs can sometimes result in overlooked underlying issues, leading to repeat visits. According to a recent study by the Home Improvement Research Institute, quick turnarounds are often associated with less comprehensive repairs, emphasizing the importance of choosing reputable service providers who balance speed with expertise.
Another misconception pertains to warranties. Many assume that warranties cover all eventualities, but in reality, they often have fine print that can trap unsuspecting homeowners. For instance, some warranties void if non-OEM parts are used, even if these parts are of equal quality. This is why understanding warranty exclusions is crucial. A common trap is DIY repairs performed without verifying warranty conditions, which could inadvertently void coverage. To prevent this, always verify your warranty terms and keep detailed records of any professional or DIY maintenance.
Installation errors represent another overlooked nuance. Many believe that professional installation guarantees long-term performance; however, even seasoned installers can make mistakes—such as improper leveling or incorrect water line connections—that compromise appliance longevity. For example, improper leveling of dishwashers can lead to leaks and early wear. A simple step I recommend is to double-check installation instructions and ensure that your installer adheres to manufacturer specifications. For deeper insights, see how improper installation can shorten your appliance’s lifespan.
Now, a question for the advanced homeowner: How can I ensure that my appliance’s coverage isn’t compromised by minor installation or maintenance oversights?
The answer lies in proactive maintenance and thorough documentation. Keeping service records, photographs of installations, and verifying that all manufacturer guidelines are followed can create an audit trail that supports warranty claims if needed. Moreover, some experts suggest that annual tune-ups, such as cleaning condenser coils or inspecting hoses, can prevent issues that might void warranties. For instance, neglecting to clear out the drain loop in your dishwasher might not seem urgent but can lead to mold buildup and warranty issues.
Finally, a word of caution—don’t fall for the trap of relying solely on brand reputation. A premium brand with a good warranty still requires vigilant maintenance and proper installation. Sometimes, choosing a less expensive or lesser-known model, combined with diligent upkeep, yields better long-term results.
Understanding these nuances helps you navigate the often confusing landscape of appliance service and warranty coverage. Remember, being informed can save you money, time, and frustration.
Have you ever fallen into this trap? Let me know in the comments! For more tips on avoiding common appliance pitfalls, check out our guide on mold issues behind your washer’s seal or explore how your washer may harm delicate clothes to keep your appliances running smoothly.When it comes to keeping your appliances functioning smoothly over the long term, the right tools and methods can make all the difference. One indispensable item in my toolkit is a digital multimeter. I personally rely on a Fluke 117 model because of its accuracy and durability—vital for diagnosing electrical issues safely and efficiently. This device allows me to test voltages, continuity, and resistance, ensuring that components like control boards and sensors are operating within specifications. Additionally, I always keep a set of precision screwdrivers on hand; their fine tips prevent damage when removing delicate panels or fasteners. For more stubborn debris or corrosion, I prefer a rubberized cleaning brush, which gently removes grime without harming sensitive surfaces. To document my inspections and troubleshooting steps, I use a smartphone app that logs photos and notes—saving time and providing easy reference during repairs. Looking ahead, I predict that diagnostic tools will increasingly incorporate AI-driven analysis, making self-maintenance even more accessible for homeowners. To maintain your appliances effectively, regularly test critical electrical connections with your multimeter—this simple habit can prevent costly failures down the line.
How do I maintain my tools for long-term use?
Keep your digital multimeter and other precision instruments in a protective case, store them in a dry environment, and periodically calibrate them according to the manufacturer’s instructions. This approach ensures your tools remain accurate and reliable for years to come. For a comprehensive guide on troubleshooting common issues, explore our article on preventing mold buildup in washers. Consistently using quality tools not only accelerates repairs but also prevents further damage caused by improper handling. Investing time in tool maintenance and proper selection is a small effort with significant long-term benefits. As appliance technology evolves, staying equipped with the right diagnostic hardware will become even more critical, enabling efficient troubleshooting and extending appliance lifespan. To improve your maintenance routine today, try calibrating your multimeter and see how accurately it reads a known voltage source. Regular calibration and proper care of your tools ensure that whenever a problem arises, you’re ready to tackle it with confidence.
What Nobody Tells You About Small Appliance Troubles
Handling appliances often feels overwhelming until you realize how many issues are simple DIY fixes, especially when you understand the little nuances. My experience with retrieving that stubborn sock taught me that many appliance problems are just overlooked by spotty maintenance or incomplete knowledge. The real benefit lies in becoming confident in your ability to troubleshoot minor glitches, saving time and money. When I finally saw a sock lodged in the pump, I understood that sometimes, the simplest solution is just a careful inspection.
Tools and Tips That Changed My Repair Approach
Investing in a good multimeter and keeping a calibration routine turned out to be game-changers. These tools empower homeowners to diagnose electrical issues safely and accurately, often avoiding unnecessary service calls. Moreover, having a set of precision screwdrivers and rubberized brushes keeps things clean and delicate when dismantling appliances. Trusting resources like detailed online guides or manufacturer tutorials made my DIY journey smoother and less intimidating. Remember, the right tools and resources bring professional-level results to your repair efforts.
Embracing the Learning Curve for Better Appliance Care
The secret to longer appliance life is proactive care—regular maintenance, correct installation, and understanding warranty fine print. Mistakes like improper leveling or forgetting to check water hardness can silently degrade your machine’s performance. My lightbulb moment? Recognizing that DIY checks and maintenance are not just chores but investments in appliance longevity. For comprehensive guidance, exploring articles on topics like preventing mold behind washer seals or avoiding early component failure can be invaluable. Knowledge is power — especially when it keeps your home running smoothly.
The Hidden Wisdom from My Repair Journey
– The hardest lesson I learned about same-day service is that quick fixes sometimes miss underlying issues, so patience and thoroughness matter.
– Many warranties are tricky; reading the fine print about parts and DIY work can save headaches later.
– Proper installation is more critical than most think; a minor misstep can cause long-term damage.
– Regular maintenance routines—like cleaning pump filters or checking hoses—are your best defense against unexpected breakdowns.
Tools That Keep My Appliance Repairs On Point
My essential toolkit includes a trustworthy multimeter (like my go-to Fluke 117), a set of precision screwdrivers, and a soft cleaning brush. These allow me to perform electrical tests, safely remove panels, and clean delicate parts without damage. Additionally, a smartphone app for documenting repairs helps me keep track of issues and solutions over time, minimizing guesswork during future fixes. For those committed to DIY appliance preservation, these tools are invaluable. Remember, well-maintained tools are just as important as the appliances themselves for ensuring reliable repairs.
Your Turn to Bring Confidence Into Appliance Repairs
Knowing that many appliance issues are repairable without calling service technicians should inspire you to take on the challenge. With the right tools, some patience, and a few helpful resources, you can extend your machines’ lifespan and avoid costly replacements. Don’t let common problems like a stuck sock or drainage hiccup scare you away from DIY solutions. How will you start making your home appliances last longer today? Drop your thoughts below—I’m curious about your repair stories or questions!