I remember the exact moment I discovered a tiny, overlooked spot in my dryer that was silently causing all sorts of problems. I had just finished laundry, only to find my clothes still damp, and my dryer smelling odd—like something was burning but I couldn’t see any fire. Turns out, I had missed a sneaky lint trap lurking inside the dryer’s cabinet, and that small oversight was the culprit. It’s a lightbulb moment many of us face when appliances start acting up unexpectedly.
Why This Hidden Trap Could Be Sabotaging Your Dryer’s Performance
Most of us know about cleaning the lint filter after each load, but what about the lint that escapes beyond the obvious? Internal lint buildup within the dryer cabinet can block airflow, reduce efficiency, and even pose a fire hazard. According to the U.S. Fire Administration, failure to clean dryer vents and related components is a leading cause of dryer fires—highlighting how essential proper maintenance is. But the tricky part? This hidden lint trap often goes unnoticed because it’s tucked away in areas many homeowners never access.
Ever Had Your Dryer Suddenly Stop Working or Smell Weird?
If you’re like me, early on I made the mistake of only cleaning the lint trap visible on the door and ignoring the internal parts. That oversight can lead to lint hiding inside, obstructing the venting system and causing issues like longer drying times or even damage to the motor. I’ve learned that these hidden spots are more common than you might think and can be surprisingly simple to address once you know what to look for. If you’re facing similar frustrations—clothes taking forever to dry or noticing strange smells—it’s probably time to dig a little deeper.
Ready to go beyond the superficial and truly insulate your home from fire risks or efficiency drains? In the next section, I’ll walk you through how to locate, clean, and maintain the hidden lint trap inside your dryer cabinet, saving you time, money, and peace of mind. And if you’re worried about other appliance issues, I’ve linked a few expert tips along the way—like troubleshooting noisy freezers or fixing dryer belts—so you’re well-equipped for more than just lint problems.
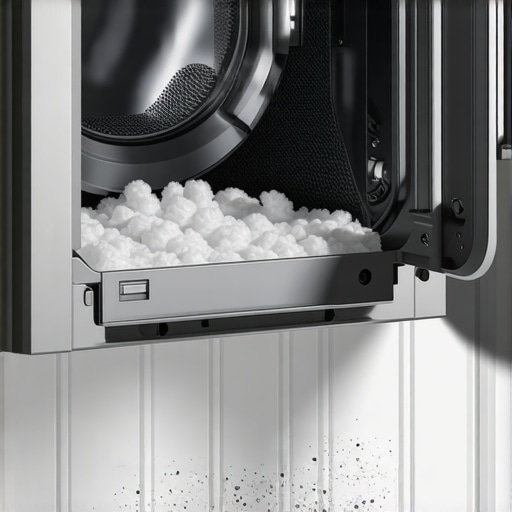
Locate the Dryer Cabinet Panel and Unscrew It
Begin by unplugging your dryer to ensure safety. Using a screwdriver, remove the screws securing the rear or bottom panel of your dryer cabinet—think of it as opening a safe door to hidden treasures. A personal story: I once loosened my dryer’s back panel without checking the manual, resulting in a minor dent and a lingering frustration. Now, I always consult the diagram or manual first to avoid mishaps.
Identify the Hidden Lint Trap Within the Cabinet
Once inside, look for a small, often overlooked lint trap or filter slot—typically near the blower wheel or behind a panel. It may resemble a tiny filter or screen and is generally designed to catch lint escaping the primary lint filter. In my case, I found this inside a narrow slot, covered with a bit of fluff and dust. Remember, this part might be tucked away in a corner, so take your time and use a flashlight for better visibility. For a visual guide, check this detailed explanation on hidden filters.
Remove and Clean the Internal Lint Trap
Carefully pull out the lint trap or screen, inspecting for accumulated lint, dust, and debris. Use a vacuum with a crevice tool to extract stubborn lint around the opening. For more thorough cleaning, rinse the lint trap with warm water and mild soap. Dry it completely before reinserting; a wet trap can cause mold or odor. This process is simple but impactful: I once cleaned mine and immediately noticed my dryer drying faster, saving energy and reducing fire risk.
Reassemble the Dryer and Test Operation
After cleaning, reattach the panel securely with the screws. Plug the dryer back into the outlet. Turn it on and run a short cycle to ensure proper airflow and noise levels. Keep an eye out for an improvement in drying times or strange smells. If the dryer still underperforms, consider checking other components like the belt tensioner or thermal fuse, which you can find more about here. Regular maintenance of this hidden lint trap can extend the life of your appliance and improve safety.When it comes to appliance installation and repair, many homeowners believe that following the standard instructions suffices for long-term reliability. However, in my experience, the devil truly is in the details. One common myth is that a professional’s quick fix or same-day service guarantees a permanent solution, but that’s often a trap waiting to trip you up. For instance, many overlook the importance of checking the grounding connections or the orientation of internal components, which can cause recurring issues or void warranties. According to experts from the Appliance Repair Association, these seemingly minor oversights are behind a significant percentage of repeat visits and catastrophic failures.
A frequent misconception is that warranties fully cover any damage or malfunction, but the fine print often excludes wear-and-tear, improper installation, or non-standard parts. Rushing into repairs without understanding what your warranty actually covers can lead to costly out-of-pocket expenses. For instance, manufacturer warranties typically exclude damages caused by improper setup or neglect—so it’s crucial to confirm that your installation adheres to the manufacturer’s specifications.
Another nuance involves the installation environment. Many assume that placing an appliance in any available corner works equally well, but ventilation, accessibility, and proximity to power sources influence performance and longevity. For example, improper leveling of a refrigerator can cause uneven door seals and ice buildup, which can be avoided with precise adjustments—something many overlook. You can learn more about proper leveling techniques and avoid this common mistake by reviewing our detailed guide.
Have you ever fallen into this trap? Let me know in the comments. Now, let’s address a sophisticated question that even seasoned DIYers ask: How does an improper drainage loop setup affect appliance longevity, specifically in dishwashers? Proper drainage not only prevents water backflow but also reduces pressure on internal seals and motors, extending the lifespan of your appliance. An incorrectly installed drainage loop can cause dirty water recirculation, leading to mold, bad odors, and even electrical issues. For an in-depth explanation, check our article on drainage loop errors.
Getting these nuances right requires more than just surface knowledge. It involves understanding how each component interacts within the broader system, and how small oversights can cascade into major problems. Keep these insights in mind, and you’ll not only save money but also extend the lifespan of your appliances significantly. Want to dive deeper into specific repair mistakes that void your warranty? Browse our related articles for expert advice.
How do I maintain my appliances over time?
Consistency is key when it comes to appliance longevity. I rely on a set of specialized tools to ensure my repairs and maintenance are precise and effective. For instance, a high-quality multi-bit screwdriver set allows me to handle most screws found in various appliances without damaging delicate components. I personally prefer those with insulated handles—such as the Wiha Ergonomic Multi-Tool—to increase safety and grip during prolonged use. Additionally, a digital multimeter helps me troubleshoot electrical issues accurately, saving time and preventing unnecessary part replacements. I also use a handheld vacuum with a narrow crevice attachment to clear out lint, dust, and debris from internal parts, keeping airflow optimal and reducing fire hazards. I train myself to keep these tools organized in a durable compartmentalized toolbox, which I take with me on every repair job.
Looking forward, I predict that smart diagnostic devices and appliance-specific apps will become mainstream, enabling even DIY enthusiasts to identify problems remotely or with minimal effort. Imagine using an app that scans your appliance’s model and suggests tailored maintenance routines or detects early signs of failure based on sensor data, much like what smart thermostats already do.
Tools I recommend for long-term appliance care
One tool I swear by is the precision screwdriver set. I’ve found that having the correct screwdriver tip—be it Phillips, flathead, Torx, or security Torx—is essential to avoid stripping screws, especially in delicate components like microwave control panels or refrigerator door locks. For electrical troubleshooting, a non-contact voltage tester comes in handy; it’s quick to use and provides instant safety confirmation before working on live circuits. I’ve also integrated a small, portable ultrasonic cleaner into my toolkit, which helps dissolve grease buildup in small parts such as pump impellers or water inlet valves, extending their lifespan.
Don’t overlook the importance of a reliable flashlight—preferably LED with adjustable brightness—to inspect tight spaces thoroughly. And for cleaning lint build-up deep inside dryers or washing machines, a flexible brush attachment can make all the difference. Such meticulous maintenance can drastically reduce the chances of unexpected breakdowns or fire risks, as outlined in the article about hidden filters.
Remember, mastery over your tools yields better results and keeps your appliances dependable for years. Especially when tackling complex or hard-to-reach areas, these equipment choices can save you hours and prevent costly repairs. Ready to elevate your maintenance game? Try incorporating an ultrasonic cleaner for your next deep clean—it’s a game-changer!
The Hard-Won Truth About Overconfidence in Repairs
One of my biggest lessons came early when I assumed I had tackled every lint issue, only to find my dryer still underperforming. It taught me that even seemingly obvious maintenance steps can hide crucial details, and overlooking these can lead to recurring problems. Persistent issues often stem from neglecting those unseen spots that no manual highlights—like internal lint traps—emphasizing the need for thoroughness in appliance care.
Tools and Resources I Can’t Live Without
Over time, I’ve curated a set of tools that revolutionize appliance maintenance. A high-precision screwdriver set, like the specialized screwdriver kit, ensures I won’t strip delicate screws. An ultrasonic cleaner is a game-changer for internal parts, and a reliable multimeter helps troubleshoot electrical faults. These tools make complex tasks manageable, saving me time and preventing costly mistakes.
Take Control: Your Next Step in Appliance Care
Remember, tackling appliance maintenance isn’t just about fixing problems—it’s about empowering yourself to preserve your home’s efficiency and safety. Regularly inspecting hidden lint traps, understanding the nuances of installation, and investing in quality tools can dramatically extend your appliances’ lifespan. Don’t wait for a breakdown to act—embrace proactive maintenance today and enjoy the peace of mind that comes with it.