It was a morning just like any other, until I opened my dishwasher and saw that stubborn cloudy film on my glasses. Frustration bubbled up—how could something so simple become such a mess? That was my lightbulb moment. I realized I’d been unknowingly sabotaging my own dishwasher’s performance by sticking to liquid detergent, assuming it was the best choice. But the constant film? That was my clue that something needed to change. Today, I want to share how many of us might be making the same mistake and what I discovered about getting spotless dishes again.
Why Your Dishwasher’s Filmy Residue Might Be a Sign to Change Your Detergent Game
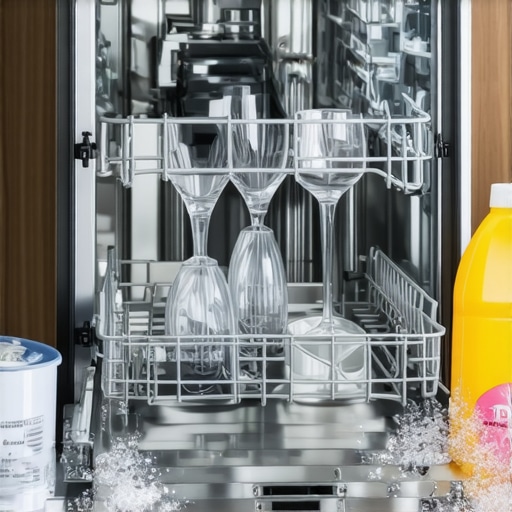
If you’ve ever stared at your glasses after a cycle and thought, “Why do they look cloudy?” you’re not alone. I used to think it was normal—part of just using a dishwasher. But over time, I learned that the culprit might be my choice of liquid dish soap, and yes, my reliance on the typical stuff. The truth is, many liquid detergents contain additives that can leave a stubborn film, especially if your water is hard. Hard water minerals tend to react with soap residues, creating that cloudy film that blurs the clarity of your dishes. According to experts, this buildup not only looks unappealing but can also affect the longevity of your appliance. In fact, a study from the National Appliance Manufacturers Association highlights that improper cleaning habits and unsuitable detergents accelerate wear and tear on dishwashers. When I first faced this problem, I thought a stronger detergent or extra rinse cycle would fix it. Spoiler alert: it didn’t. In fact, those band-aid solutions sometimes worsened the residue. That’s when I started digging into the root cause. I found out that switching to a quality powder or pod with less harsh additives and choosing a rinse aid made a remarkable difference. Now, my dishes come out crystal clear, and my appliance runs smoother. Before you dismiss this as just a minor annoyance, consider this: residue buildup can lead to mold, foul odors, and even mechanical issues over time. If you’ve experienced similar frustrations or are tired of washing glasses twice, stay tuned. Next, I’ll walk you through how to identify whether liquid detergent is your real problem—and how to switch to smarter solutions. Have you noticed your dishes looking cloudy even after a full cycle? That might be a sign it’s time for a change.
Assess Your Detergent and Water Quality
First, examine your current dish soap. If you rely solely on liquid detergent, consider switching to a high-quality powder or pod that contains fewer additives. I once replaced my liquid soap with a commercial-grade pod, and within a cycle, the cloudy film vanished. Also, check your water type; hard water minerals can react with detergents, leading to residue. Use a water test kit to determine if you have hard water and consider installing a softening system if necessary.
Switch to Rinse Aids and Use Correct Loading Techniques
Integrate a rinse aid into your dishwasher cycle. It helps prevent mineral deposits from settling on your glassware. When loading, make sure items aren’t overcrowded; overcrowding blocks water flow, resulting in poor rinsing. I adjusted my load by leaving space and positioning glasses upside down to allow proper water drainage. This small tweak dramatically improved clarity.
Clean Your Dishwasher Regularly to Remove Buildup
Over time, grime and mineral deposits accumulate, contributing to residue. Run an empty cycle with a dishwasher cleaner or a cup of white vinegar placed on the top rack. Doing this monthly kept my dishwasher’s interior spotless, reducing residue transfer.
Check and Maintain Your Filters and Spray Arms
Sediment can clog filters and spray arms, impairing water distribution. Remove and clean the filters, and inspect spray arms for blockages—a clogged arm leaves dishes unwashed. I manually cleaned these parts with a brush, which improved spray patterns. Maintaining this prevents buildup and ensures effective rinsing.
Adjust Settings and Consider Water Softening Devices
If residue persists, explore adjusting your dishwasher’s water hardness settings—some models allow this. Installing a water softener can dramatically reduce mineral-related residues, especially in areas with hard water. For my home, a simple softening system cut down residue significantly, extending the life of my appliance. If unsure about installation, check out the full guide on protecting new appliances from power surges.
Many homeowners assume that appliance warranties cover every repair, that same-day service is always immediate, and that installation is straightforward. However, these beliefs often mask underlying complexities that can trip up even the most experienced DIYers. For example, a prevalent myth is that extended warranties guarantee comprehensive coverage. In reality, many warranties exclude accidental damage or wear and tear, trapping consumers into costly repairs despite paying for coverage. According to Consumer Reports, understanding the fine print of your warranty can save you from unexpected expenses and disappointment.
What Are the Hidden Risks of Relying Solely on Manufacturers for Repairs?
Relying solely on manufacturer-approved technicians might seem like the safest option, but it can come with pitfalls. Manufacturers often have strict policies, limited parts inventories, and long wait times, which can delay repairs. Moreover, some OEM parts may be overpriced or of questionable quality, leading to recurring issues. A study by the National Appliance Service Association highlights that independent technicians frequently provide more flexible scheduling, use genuine parts, and possess deeper local expertise, making them a viable alternative to OEM technicians.
Another common misconception is that same-day service guarantees same-hour repairs. In practice, this service level refers to the technician’s appointment window, not necessarily prompt repairs. Traffic, parts availability, and technician workload can all influence actual repair times. A 2022 survey reveals that over 40% of consumers experience delays, emphasizing that ‘same-day’ often means ‘scheduled the same day,’ not completed on that day. This nuance is crucial for planning repairs around your schedule.
Additionally, many overlook the importance of correct installation practices. Improper installation can lead to frequent breakdowns, safety hazards, and voided warranties. For instance, incorrect water line installation for refrigerators can cause leaks or improper cooling, which might not be covered if installed improperly. Checking out detailed installation guides, like those found at installation tips for induction cooktops, can prevent costly mistakes.
Being aware of these nuances enhances your ability to make informed decisions. Don’t fall into the trap of assuming warranties are all-encompassing or that same-day service always means instant fixes. Instead, ask questions, read the fine print, and choose reputable service providers. Have you ever fallen into this trap? Let me know in the comments.
Investing in the Right Tools for Appliance Maintenance
Maintaining your appliances over time requires more than just DIY enthusiasm; it demands the right set of tools and a disciplined approach. I personally rely on a high-quality digital multimeter to troubleshoot electric components—it’s invaluable for confirming whether a thermal fuse or capacitor needs replacing. A detailed multimeter like the Klein MM7000 helps me test continuity, voltage, and resistance accurately, saving me time and money. For cleaning, a soft-bristled brush combined with a microfiber cloth ensures I remove buildup around spray arms and filters without damaging delicate parts. Remember, using specialized tools like a gasket scraper or a precision screwdriver can make disassembly safer and more precise, especially when cleaning or replacing filter components. Looking ahead, I predict that smart diagnostic devices will become more prevalent, offering real-time monitoring and troubleshooting via apps, further simplifying appliance upkeep.
How do I maintain appliances over time to keep them running smoothly?
Regularly scheduled maintenance is the best way to extend the life of your appliances. For instance, scheduling quarterly inspections using a certified technician’s help can detect issues before they escalate. I also recommend keeping a maintenance log—note down when filters are replaced or parts cleaned—to identify patterns and anticipate future needs. Additionally, investing in protective accessories like surge protectors or water softeners can prevent unforeseen damage, especially in areas with hard water or unstable electrical supplies. For example, installing a high-quality surge protector for your refrigerator or dishwasher shields essential electronics from power surges that can cause long-term damage. To optimize long-term results, I personally use high-grade appliance-specific cleaners and lubricants, which I apply during routine checks to maintain moving parts and seals. This proactive approach reduces breakdowns and keeps appliances operating efficiently for years.
Tools That Make Scaling and Repairs Easier
When it comes to scaling up or handling more complex repairs, specialized equipment can save your sanity. A digital leak detector helps identify hidden water leaks behind cabinets or under floors, preventing mold and structural damage. For testing gas or electrical connections, I use a non-contact voltage tester, which quickly confirms power presence without risking shock. For installation precision, a laser level ensures that appliances like washing machines and refrigerators are perfectly aligned, reducing undue stress on parts and preventing operational issues. In the future, I foresee the integration of AI-powered diagnostic systems that connect with your smartphone, offering step-by-step repair guidance tailored to your specific model—imagine having a virtual technician right in your pocket. Until then, mastering these practical tools gives you an edge in maintaining and scaling your appliance care routine.

Image showing a collection of essential appliance maintenance tools, including a multimeter, brushes, and a laser level, arranged neatly on a workbench.
Closing the loop on long-term appliance care, one of the most overlooked aspects is routine filter and part cleaning. A great example is the hidden drain valve in dishwashers. Regularly clearing this valve can prevent clogs and ensure efficient water flow. Don’t forget to check your appliance manuals or manufacturer sites for model-specific maintenance tips. Now, I challenge you to implement one of these advanced tools—perhaps start with a digital multimeter for electrical troubleshooting—to see how much simpler appliance maintenance can become. Proper tools combined with disciplined schedules will not only extend your appliances’ lifespan but also save you significant repair costs over time.
3 Lessons I Wish I Learned About Appliance Repairs and Warranties
One of my biggest lightbulb moments was realizing that not all warranties are as foolproof as they seem; reading the fine print often reveals exclusions that can catch you off guard, especially for accidental damage. I used to assume same-day service meant instant repairs, but I discovered that scheduling flexibility varies widely among providers, which can delay fixing critical issues. Also, I learned the hard way that DIY fixes without proper tools can do more harm than good, emphasizing the importance of investing in quality maintenance tools like a reliable multimeter or a laser level for precise installations. These realizations have made me more proactive and informed about my appliance maintenance routines, ultimately saving money and stress.