

I’ll never forget the sound of my refrigerator running for three days straight without a single break. It was a low, desperate hum that I eventually just tuned out until I realized my kale was limp and the freezer floor looked like a skating rink. I made the classic rookie mistake—I took a hairdryer to the back panel to melt the ice, nearly melting the plastic liner in the process. It was a messy, wet disaster that could have been avoided if I’d just checked the timer. Most people think a warm fridge means a dead compressor, but more often than not, it’s just a system that’s stuck in cooling mode because the defrost cycle never kicked in. [image_placeholder_1]
The Day I Almost Threw Away a Perfectly Good Refrigerator
We’ve all been there—fretting over whether to call for same-day appliance repair or just start shopping for a new unit. I was convinced my fridge was a goner. The coils were so choked with frost that air couldn’t move, yet the motor kept spinning, trying in vain to reach a temperature it could never achieve. According to experts at Consumer Reports, nearly 20% of refrigerator failures are actually related to defrost components rather than the cooling system itself. This means thousands of people are trashing appliances that just need a simple, inexpensive part. When the defrost timer fails, it’s like a clock that stops at 3 PM and never hits the alarm. Your heater never turns on, the frost builds up into solid ice, and eventually, your fridge becomes an insulated box of warm air. I’m going to help you skip the panic I felt and show you how to take control of your kitchen’s most important appliance. We are going to look at the thermostat tests and mechanical checks that save you hundreds in labor.
Is a $20 Part Actually Worth All This Hype?
You might be skeptical. How can a little plastic component the size of a deck of cards be the reason your milk spoiled? I felt the same way until I saw the mechanical gears inside a dismantled timer. It is a precision dance, and when it fails, the whole show stops. If you’re worried about messing up, remember that warranty-backed appliance services are always an option if you get stuck, but checking the timer is something almost anyone can do with a flathead screwdriver. Have you ever opened your freezer only to find the back wall bulging with ice? It’s a frustrating sight, but it’s exactly what we’re going to tackle right now. Before you go out and sign up for expensive extended protection plans, let’s see if we can get that ticking clock back in sync. It’s about more than just saving money; it’s about that ‘I fixed it’ feeling that comes from outsmarting a machine that was ready to quit on you. Let’s dive into how to locate that elusive timer and how to force it into a defrost cycle manually to see if it’s truly the villain in our story.I remember the first time I went hunting for the timer on my old side-by-side unit. I was on my hands and knees, squinting through a flashlight beam, only to find the access hole was hidden behind a thick layer of dust and a long-lost grape that had basically turned into a fossil. It wasn’t pretty, but finding that component is the first step to stopping the cycle of why your refrigerator compressor is running 24 hours a day. Most timers are either tucked behind the bottom kickplate or inside the control housing near the temperature knobs. If you don’t find it there, check the back panel near the bottom. It usually looks like a small plastic box with a circular dial in the center.
Locate the Hidden Timer Before Your Food Spoils
Finding the timer is half the battle. Think of it as the brain of your defrost system. If the brain is asleep, the body just keeps cooling until it chokes on its own frost. When I found mine, I realized it hadn’t moved in days. This is the most common reason for the freezer ice build-up that is killing your efficiency. Once you have visual contact, you’ll see a small notch or screw head in the middle of the dial. This is your interface with the machine’s internal clock. 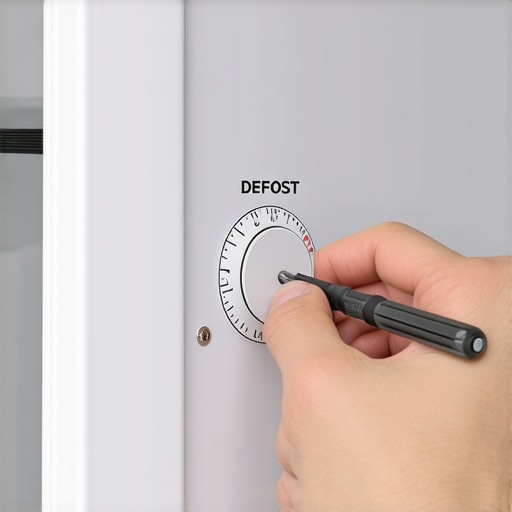
Check the Kickplate and Control Housing First
To get started, grab a flathead screwdriver. You need to turn that dial clockwise very slowly. You’ll hear small, light clicks as you rotate it—these are the internal gears turning. What you are looking for is one loud, distinct ‘CRACK’ or ‘SNAP.’ That sound indicates you have manually forced the fridge out of its cooling mode and into the defrost mode. The moment you hear that loud click, the compressor and all the fans should instantly go silent. If they don’t, you might be looking at a more complex issue requiring an expert guide to appliance repair and installation today to diagnose a stuck relay on the main board.
The Single Screwdriver Turn That Tests Everything
After you hear that snap and the fridge goes quiet, wait about ten to fifteen minutes. This is the ‘wait and see’ phase that separates the pros from the amateurs. Go to the freezer and listen closely. If the timer and defrost heater are working, you should hear a faint hissing or dripping sound. That’s the ice on the coils meeting the red-hot heater element. This is essentially the emergency fix for a fridge that suddenly stopped cooling because it clears the path for airflow. If you hear nothing and the back wall stays freezing cold, your heater or thermostat is likely dead. However, if the fridge eventually kicks back on by itself after about 30 minutes, your timer is actually healthy, and your problem lies elsewhere. If it stays stuck in silence forever, you’ve found your villain: a dead timer motor that can’t advance the cycle. This simple test is the best way to determine if you need to get an emergency fridge repair before your food spoils or if a twenty-dollar part from the local hardware store will solve your weekend headache.
But here is where the ‘experts’ and the DIYers often clash. Everyone tells you that same-day appliance repair is the gold standard, but in my experience, the fastest technician isn’t always the one you want touching your high-end compressor. The nuance most people miss is that a ‘quick’ fix often ignores the underlying cause of the failure, like a clogged capillary tube that will just burn out your new part in a month. This is the ‘Oops’ factor: treating the symptom instead of the disease. While you’re frantically searching for affordable same-day appliance fixes, you might be overlooking the fact that some technicians use ‘universal’ parts that can actually jeopardize your manufacturer’s coverage.
Why Rushing for a Quick Fix Might Kill Your Warranty
Most homeowners assume that as long as a professional does the work, their investment is safe. That’s a common mistake. If that professional isn’t certified by your specific brand, you might be falling straight into the fine print that voids your fridge protection plan. I’ve seen cases where a simple fan replacement by a non-authorized tech resulted in a denied claim for a $800 compressor later that year. According to a report by the National Home Service Contract Association (NHSCA), a significant percentage of warranty claims are rejected not because the machine didn’t fail, but because of ‘unauthorized tampering’ or a lack of maintenance records. It’s not just about getting the machine running; it’s about maximizing your appliance warranty during emergency repairs by playing by the rules.

What Happens if You Don’t Have Your Maintenance Receipts?
Here is the advanced mistake even veteran DIYers make: they do the maintenance but don’t document it. If you clean your own coils or clear your own drains, keep a log. Warranty providers often view a lack of professional service records as ‘negligence.’ This is why I always tell people that the maintenance receipt you must save for future claims is more valuable than the repair itself. Before you allow anyone to pull your fridge out from the wall, ensure they are providing a detailed invoice that matches the requirements of your warranty-backed appliance services. If they can’t provide that, they aren’t the right pros for the job. Have you ever fallen into this trap where a ‘simple’ repair ended up costing you your entire warranty? Let me know in the comments. We need to be smarter than the contracts we sign, especially when manufacturer extended plans are on the line. It’s about building a paper trail that proves you’re a responsible owner, not just someone looking for a shortcut.
Since I learned the hard way about documentation, I’ve shifted my focus from reacting to preventing. If you want to avoid the stress of hunting for same-day appliance repair, you need a toolkit that goes beyond a kitchen junk drawer. Personally, I never touch a fridge without my Fluke 117 multimeter. It’s an industry standard for a reason: when you’re testing a defrost heater, you need precision, not a ‘maybe.’ If that heater doesn’t show continuity, you’ve found your culprit without spending a dime on a technician. I also swear by a 36-inch flexible coil brush. Vacuum attachments are fine for the front, but they can’t reach the back where the real heat-trapping dust lives. This simple cleaning is actually the refrigerator coil trick that slashes your electric bill and extends the compressor’s life by years.
The Three Tools That Save Me Thousands
Beyond the meter and the brush, the most underrated tool is a basic spirit level. Most people ignore the tilt of their machine, but an unlevel fridge is often why your refrigerator is leaking water on the floor. If the unit leans forward, the defrost water doesn’t hit the drain pan correctly. It’s the same logic I use for laundry; in fact, the one screwdriver turn that levels a rattling washer is the same principle that keeps your fridge from vibrating against the cabinets. 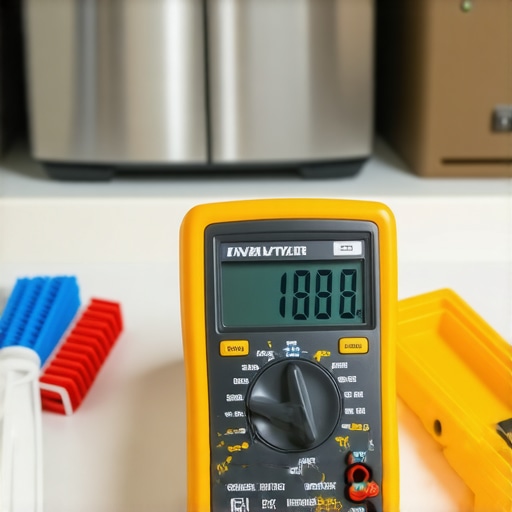
How can I maintain my kitchen appliances for the next decade?
Long-term results come from consistency, not just ‘firefighting’ when things break. I follow the technical standards set by the Association of Home Appliance Manufacturers (AHAM), which suggests that biannual coil cleanings and gasket inspections are the baseline for modern efficiency. I’ve seen fridges last 20 years just because the owner didn’t let the compressor overheat. As we look toward the future, I expect to see more ‘predictive maintenance’ sensors built into high-end units, but until then, we are the first line of defense. Before you even think about reliable appliance installation in 2025 for a replacement, try becoming an expert on your current unit. Use an expert guide to appliance repair and installation today to map out your own maintenance schedule. Remember to keep a folder—physical or digital—with every manual and receipt, because the document most people forget before calling service is usually the one that saves their warranty. My challenge to you: pull your fridge out this weekend, check those coils, and test your heater’s resistance. It’s the only way to truly know your machine is healthy.
What Most Techs Won’t Tell You About Your Fridge’s Lifespan
I’ve spent years tinkering with compressors and control boards, and the biggest ‘aha!’ moment wasn’t a technical one. It was realizing that most appliances don’t die—they’re neglected to death. If you can hear your fridge breathing, you’re already ahead of most owners who wait for silence to start caring. Manual testing is a superpower that most people ignore. While others wait days for scheduling your appliance repair for same-day service in 2025, you can diagnose a simple twenty-dollar timer in ten minutes. Maintenance isn’t just a chore; it’s a financial insurance policy. Keeping those coils clean and the timers ticking is literally like putting money back into your pocket every month by preventing component burnout before it even starts.
The Gear That Actually Earns Its Spot in My Toolbox
If you’re building a kit to handle these issues, don’t skimp on the basics. I personally rely on the Fluke 117 multimeter because I need to trust the reading when I’m checking if a heater is dead or just resting. For those hard-to-reach spots, a high-quality 36-inch flexible coil brush is non-negotiable for airflow. I also recommend keeping a digital copy of your specific model’s service manual via sites like ManualsLib; it’s saved me more times than I can count. When things get complicated, I turn to the expert guide to appliance repair and installation today to ensure I’m not missing a brand-specific quirk. These tools help you maximize your appliance warranty during emergency repairs by ensuring you don’t perform sloppy ‘guesswork’ that looks like unauthorized tampering to an inspector.
Take Back Control of Your Kitchen This Weekend
Repairing your own home isn’t just about saving cash; it’s about the confidence that comes with knowing exactly how your world works. Whether you’re doing a simple fix yourself or calling in same-day appliance repair to protect your major investment, you are the CEO of your household. Don’t let a mechanical ticking clock or a confusing warranty contract intimidate you. You now have the knowledge to troubleshoot the most common failure point in modern refrigeration and the documentation skills to keep your coverage intact. Have you ever managed to fix a major appliance with just a single screwdriver turn? Let me know your biggest DIY win in the comments below!