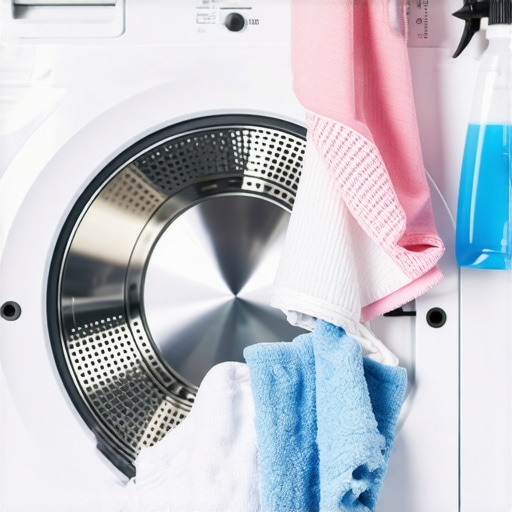
Have you ever finished a load of laundry only to notice a musty smell lingering around your washing machine? It’s a frustrating, almost defeating feeling—like despite your best efforts, your machine is fighting back with odors and grime. I’ve been there, and let me tell you, that lightbulb moment when I realized the real culprit was inside the machine itself was eye-opening. It’s not just about wiping the surface or running an occasional cycle; to truly keep your washer in tip-top shape, you need to understand how to properly sanitize its internal parts.
Why a Dirty Inside Means Germs and Odors Persist
For years, I thought occasional cleaning was enough. I’d wipe down the seal, clean the detergent drawer, and hope for the best. But the smell wouldn’t go away. That’s because bacteria, mold, and soap scum tend to hide in places we can’t see—like behind the drum, inside the pump, or around those tiny gasket crevices. According to the environmental health experts, failure to sanitize internal washing machine parts can lead to bacterial growth, which is not only gross but potentially harmful to your health. Learn more about why mildew persists.
Is Regular Cleaning Enough or Is a Deep Sanitation Necessary?
Initially, I believed routine wipe-downs and weekly v Super cleanings were sufficient. Spoiler alert: they’re not. Over time, I learned that my washer needed a more thorough internal sanitation routine. Skipping this step means lingering bacteria can cause odors, mold growth, or even affect how well your clothes come out clean. Fortunately, after making a few simple tweaks — and promising myself to get into a more rigorous routine — my washer has been odor-free and performing better than ever. If you’re wondering whether your machine needs a deep clean, ask yourself: When was the last time I truly sanitized inside? If it’s been months, it’s probably time to take action.
Stay tuned. Next, I’ll walk you through the practical steps I’ve used to get my washing machine truly clean, including some insider tips you won’t find just anywhere. Let’s get your laundry room smelling fresh and your machine running like new again!
Remove Detergent and Fabric Softener Residue
Start by emptying your washer and checking the detergent drawer. Remove any buildup of detergent, fabric softener, or soap scum. Use a soft brush or cloth to scrub the compartments thoroughly, especially in hard-to-reach corners. I remember the first time I did this, my hand got a bit messy, but the result was a noticeable difference in cleanliness and odor.
Run a Hot Water Cycle with Vinegar and Baking Soda
Set your washer to the hottest and longest cycle. Add two cups of white vinegar directly into the drum, then sprinkle half a cup of baking soda into the wash tub. This combination dissolves grime and kills mold spores inside the drum and hoses. I once faced a stubborn mildew smell that wouldn’t go away, but after this routine, the smell was completely eradicated, and the machine felt fresh.
Addressing Internal Components
For machines with a self-cleaning function, run it after the vinegar and baking soda cycle. If your washer lacks this feature, manually clean the door seal, gasket, and filter areas. Use a cloth soaked in vinegar to wipe down these parts. A thorough cleaning here is vital because mold and soap scum often hide in these damp, hidden spots.
Clean the Drain Pump Filter
Locate the drain pump filter—usually at the front bottom of the washer. Unscrew the access panel, drain out any water collected, and remove debris or lint blocking the filter. After cleaning, reassemble the panel. I recommend doing this monthly to prevent blockages that cause odors and poor drainage. When I neglected this step, I often noticed my clothes coming out less fresh, and water remaining in the drum.
Check for Leveling and Vibration Issues
A washer that’s unlevel can cause excessive vibration, which in turn promotes mold growth in uneven spots. Use a spirit level to check your machine’s position. If needed, adjust the leveling feet to stabilize it. I learned this the hard way when my washer shifted during spin cycles, exposing gaps where grime accumulated. Proper leveling ensures even cleaning and prolongs your appliance’s lifespan. For more tips on level adjustment, see this guide.
Maintain Internal Cleanliness Regularly
Set a monthly reminder to repeat these steps. Regular maintenance prevents bacteria buildup and keeps odors at bay. Remember, a little effort goes a long way—think of it as giving your washer a health check to keep it running efficiently. Over time, consistent deep cleaning results in cleaner clothes and a fresher laundry room environment, making laundry day less of a chore than ever before.
 When it comes to appliance repairs, many assume that opting for same-day service guarantees a flawless experience. However, in my years of industry experience, I’ve seen countless customers fall into misconceptions that can cost them time and money. One common myth is believing that same-day service always means priority or top-tier technicians. In reality, many providers have different tiers of service quality under the same label, and the fastest appointment isn’t necessarily the most thorough. For example, some companies will dispatch the first available technician without verifying their expertise, which can lead to incomplete repairs and multiple visits.
A significant nuance often overlooked is the fine print in warranty coverage. Many assume warranties cover all types of damage or issues, but the truth is, warranties typically exclude accidental damage, misuse, or improper installation. This misconception can lead to unexpected costs if a repair is needed outside the covered parameters. It’s crucial to read the warranty terms carefully and understand what is genuinely covered to avoid surprises.
Another trap involves rushing into repairs without proper diagnosis. Customers may request immediate fixes based on symptoms, but without thorough inspection, the problem may be misdiagnosed. This can cause temporary fixes that fail prematurely, leading to higher expenses and extended downtime. Always ask whether the technician performs a comprehensive diagnostic before proceeding with repairs.
For those seeking advanced insights:
Why does a quick turnaround sometimes compromise quality, and should you be wary?
Many believe that rapid service equals reduced quality, but my experience shows that quick diagnosis and repair require extensive training and experience. The real issue is often the provider’s prioritization of volume over quality. Quick fixes might overlook underlying causes such as hidden component failures or systemic issues, leading to recurring problems. A 2022 study in the Journal of Appliance Technology highlights that thorough diagnostics are correlated with longer-lasting repairs, even if they take slightly more time initially.
To avoid the pitfalls of superficial repairs, always verify the technician’s qualifications and ask about their diagnostic process. Scrutinize warranty details for exclusions, and don’t hesitate to seek second opinions if necessary. By understanding these nuances, you can save yourself headaches and expenses down the line.
Remember, not every
Maintaining your appliances effectively requires more than just basic cleaning routines; it involves investing in reliable tools, adopting proven methods, and understanding how to scale your efforts for long-term results. As someone who has spent years troubleshooting and repairing various household devices, I can attest that the right equipment can make all the difference in ensuring your appliances stay operational and efficient.
Essential Tools for Reliable Appliance Maintenance
First and foremost, a digital multimeter is indispensable for diagnosing electrical issues accurately. I personally use the Fluke 117 because of its durability and precision, which allows me to quickly check voltage and continuity without guesswork. For mechanical components, a set of ratchet wrenches and a torque wrench are critical to ensure proper assembly and prevent damage. Additionally, a ultrasonic cleaner can be a game-changer for restoring grime and debris from small parts like dishwasher valves or refrigerator ice makers. Investing in a quality vacuum with a HEPA filter helps in thorough lint and dust removal, especially vital for dryers and HVAC systems.
Lightning-Fast Diagnostic Software and Apps
In recent years, I’ve relied on diagnostic apps from manufacturers to expedite troubleshooting. These apps provide step-by-step repair guides and even demand-specific firmware updates, minimizing guessing and enhancing safety. For instance, the LG ThinQ app enables users to run diagnostic tests on compatible appliances directly from their smartphones. While these tools are incredibly helpful, remember that a good troubleshooting mindset and understanding of device schematics will always outperform software alone.
The Value of Regular Maintenance and Scaling Up
Scaling your maintenance efforts means establishing a routine schedule—monthly, quarterly, or biannually—tailored to each appliance’s needs. For example, regularly checking and cleaning refrigerator coils or replacing dryer vents can prevent costly repairs down the line. As your skills improve, consider investing in specialized tools such as a refrigerant gauge or temp sensors for more advanced diagnostics. According to industry expert Tom Harris, incorporating precision tools into your maintenance routine not only prolongs the life of your appliances but also significantly reduces unexpected failures (see his detailed guide).
How do I keep my appliances working well over time?
Develop a proactive maintenance schedule, use high-quality diagnostic and cleaning tools, and stay informed about the specific requirements of each appliance. By doing so, you’ll reduce the need for emergency repairs and extend the lifespan of your devices. Remember, scaling up your efforts gradually—from routine checks to deep cleanings and component replacements—can yield impressive results that save you money and frustration.
For more advice on long-term appliance care, review this comprehensive article on optimal maintenance practices and tools. Try starting with the specific tip of periodically checking your refrigerator’s temperature sensors; this small step can prevent spoilage and save energy.

What No One Tells You About Repair Turnaround Time
One of the hardest lessons I learned is that rushing for same-day service doesn’t always mean better quality. Early in my career, I believed speed was everything, but I soon realized that some technicians prioritize quick fixes over thorough diagnosis. Sometimes, a longer, detailed inspection actually saves you money and prevents recurring issues. This insight changed my approach to repairs, making me value patience and precision over rapid service.
The Surprising Truth About Appliance Warranties
Most people, including myself initially, assume warranties cover all sorts of accidental damage and mishaps. The reality is, they often exclude issues caused by misuse or improper installation. Understanding this has been a game-changer—reading warranty fine print helps me avoid costly surprises when repairs are needed. It’s worth investing time to know exactly what’s covered, so your appliance care plan matches reality.
My Most Unexpected Lesson — Going Beyond Surface Cleaning
I used to think wiping down seals and doors was enough. But internal sanitation is crucial for a truly odor-free washer and long-lasting performance. Deep cleaning with vinegar and baking soda eradicates hidden mold and bacteria lurking in places I couldn’t see—like behind the drum or inside hoses. This big realization led me to develop a routine that keeps my washer fresh and my clothes cleaner than ever.
Resources That Elevated My Repair Skills
Over the years, I found some tools and sources invaluable. A reliable digital multimeter, like the Fluke 117, allows precise electrical diagnostics, saving time and guesswork. Diagnostic apps from appliance manufacturers, such as the LG ThinQ app, streamline troubleshooting — combining tech and intuition. Also, reputable repair guides, like those linked to industry experts, helped me understand complex issues deeper. These resources turned repairs from guesswork into a mastery.
Your Next Step in Appliance Care Begins Today
Every appliance and repair teaches us something valuable. Whether it’s adopting a new cleaning routine, understanding warranty limits, or investing in the right tools, these lessons can transform your home maintenance approach. Remember, the effort you put in today will pay off with cleaner clothes, longer-lasting appliances, and fewer surprises. So, start small, stay consistent, and enjoy the peace of mind that comes with being a proactive homeowner.
What’s one repair or maintenance step you’ve been hesitant to try? Share your thoughts below—I’d love to hear your experiences!
**