It was late on a Saturday, and I was already running late for a dinner invitation. As I rushed to do a quick laundry load, I noticed an odd musty smell lingering in my clothes afterward. That unsettling realization hit me—my washing machine, the appliance I rely on daily, wasn’t just dirty on the surface. Its hidden drum was hiding mold and bacteria, lurking behind seals and in places I never cleaned properly. I’d ignored this problem for too long, thinking I was doing enough with a quick wash and regular maintenance. It was a classic case of neglect catching up with me.
But here’s the thing: if your washing machine’s hidden drum isn’t sanitized correctly, all that laundry bacteria, mold, and grime can transfer onto your clothes, skin, and even cause unpleasant odors that just won’t go away. Today, I promise to share with you the **best way to sanitize your washing machine’s hidden drum** — a method I’ve perfected over the years of troubleshooting and cleaning my appliances. This approach isn’t just about fresh-smelling laundry; it’s about protecting your health and extending your washer’s lifespan.
Why Proper Sanitization Matters More Than You Think
Many homeowners underestimate how much bacteria and mold can accumulate inside their washing machines, especially in the hidden drum area. This isn’t just about surface dirt; it’s about microscopic growth in places you can’t see without a thorough clean. According to a study published by the National Institutes of Health, mold and bacteria can thrive in damp environments, leading to potential health risks like allergies or respiratory issues. When you fail to sanitize properly, these microbes can linger and multiply, making your laundry cycle a breeding ground.
So, I ask you: have you ever noticed that your freshly washed clothes still smell musty, even after cleaning? If yes, you’re not alone. Many folks think that regular washing is enough, but the truth is, the hidden drum needs special attention too. Ignoring this step could be why odors persist or why your laundry seems dirtier than it should be. Trust me, a proper sanitization routine can make a *huge* difference.
- If you’re dealing with persistent odors or mold behind the seal, check out this guide on why your front load washer is growing mold behind the seal.
- Want to prevent costly repairs? Regular maintenance and proper cleaning can save you money in the long run, as explained in this article about annual tune-ups.
This makes it clear that sanitizing isn’t just about cleanliness—it’s about your health, your home, and your wallet. Now, let’s walk through the steps to get your washer’s hidden drum truly clean and sanitized, ensuring it’s safe and fresh for many loads to come.
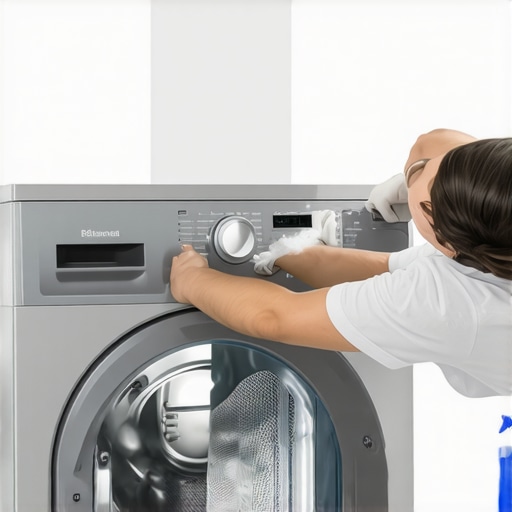
Prepare Your Supplies and Environment
Before diving in, gather a strong, bleach-free cleaner, a long-handled brush, a microfiber cloth, and some gloves. Make sure your laundry area is well-ventilated. Wear gloves to protect your skin from harsh chemicals, and open windows if possible. It’s like preparing your toolkit before fixing a stubborn leak—being ready makes the process smoother.
Run an Empty Hot Water Cycle with Bleach
Set your washing machine to the hottest water setting and select an extra-long cycle. Add two cups of liquid bleach directly into the drum or the detergent compartment. This initial step kills the majority of bacteria, mold, and odors lurking inside. Think of it as a health detox for your machine, similar to flushing out toxins from your body.
Pause the Cycle to Scrub the Drum
Once the machine starts filling and agitating, pause it. Open the lid or door carefully (if your model allows), and use a long-handled brush dipped in a mixture of hot water and a mild cleaning agent to scrub the inside surface of the drum. Pay extra attention to rubber seals and corners where grime hides. This is like deep cleaning behind a stubborn stain—you can’t just rinse and hope it’s gone.
Pro Tip: Focus on the Door Seal
Pull back the rubber gasket around the door and scrub thoroughly. Mold and detergent residue love to build up here, leading to foul odors and potential health issues. For best results, use an old toothbrush to reach tight spots. This move is akin to cleaning the nooks and crannies of a vintage clock—small details matter.
Run a Rinse Cycle with Vinegar
Set the washer to run another hot cycle, but this time add a cup of white vinegar—no bleach—into the drum. Vinegar dissolves leftover soap scum and neutralizes odors. Think of it as rinsing away all the residues to leave behind a fresh, clean environment. I once did this after a particularly nasty mold issue, and the difference was night and day.
Wipe Down and Dry Everything
After the final rinse, wipe the drum, door, and seals with a microfiber cloth dampened with water and a mild cleaning solution. Leave the door open for a few hours to promote air drying and prevent mold re-growth. This step is like airing out a room after cleaning, ensuring all moisture is gone—mold hates dry environments.
Schedule Regular Maintenance
To keep your washer in prime condition, repeat this sanitization every month. Additionally, leave the door slightly ajar when not in use to allow air circulation. Regular attention keeps mold and bacteria at bay—much like maintaining your car’s oil to keep it running smoothly. For more tips on preventing mold behind seals, visit this guide.
Many homeowners operate under misconceptions that can cost them time and money when it comes to appliance repair, warranties, and installation. A common false belief is that all warranties provide comprehensive coverage without hidden clauses. In reality, many warranties come with fine print—especially for refurbished units—that can exclude parts or specific repair scenarios. For instance, some extended warranties appear advantageous but often contain clauses that void coverage if maintenance isn’t performed as prescribed. A thorough reading of the warranty’s fine print, such as the hidden clauses in extended warranties, can prevent surprises later.
Another prevalent myth is that same-day service is always available and guaranteed. While it sounds ideal, the reality is that immense demand, especially during peak seasons, can stretch service providers thin, leading to delays or the need for priority scheduling. Relying solely on same-day promises without understanding terms can set unrealistic expectations. Moreover, many assume that professional installation is straightforward, but improper installation can lead to immediate warranty voids or even costly damage. For example, incorrect dishwasher drain hose loops may cause backfilling issues and void warranties, highlighting the importance of proper setup—more details on this simple drain hose technique.
Beware the trap of thinking that all repair technicians are equal. Approving an unverified or non-authorized service can result in counterfeit parts, inadequate repairs, or warranty invalidation. You can spot fake online repair services by checking credentials—an essential step to protect your investment, as discussed in this guide to spotting fake repair services.
A savvy homeowner recognizes that tackling issues early with qualified professionals and understanding the nuances of warranties and service terms can save thousands. The secret is knowing which assumptions to challenge and which details demand close attention. From product installation to service expectations, a deep understanding of these nuances not only helps protect your appliances but also extends their lifespan.
How can you ensure your warranty isn’t voided by a small installation mistake?
Ensuring proper setup can be crucial. For example, installing your refrigerator too close to the wall can cause the compressor to overheat, potentially voiding the warranty. Observe the manufacturer’s clearance recommendations, like maintaining the specific distance required for the compressor’s optimal operation, which is often detailed in warranty info or installation guides. Additionally, avoid overloading appliances beyond their capacity, such as oversized loads in washers, which many overlook until the warranty claim is rejected for misuse. Regular maintenance and proper installation ensure your warranty remains valid—well worth the extra effort.
In conclusion, understanding the hidden nuances—like warranty clauses, installation pitfalls, and service limitations—can be the difference between a smooth repair process and costly setbacks. Keep informed, ask questions upfront, and educate yourself beyond the surface claims. Have you ever fallen into this trap? Let me know in the comments.
Keep Your Appliances Running Smoothly with the Right Tools
To maintain your appliances effectively over time, investing in high-quality, specialized tools is crucial. I rely on a durable digital multimeter to troubleshoot electrical issues safely—Pinpointing wiring problems or faulty sensors becomes straightforward with it. Additionally, a long-reach inspection mirror helps me examine hidden components like seals or drain loops without dismantling entire units, saving time and preventing unnecessary damage.
For cleaning, a steam cleaner proves invaluable for sanitizing stubborn mold behind seals or in crevices—especially in washers and dishwashers. I personally recommend models with adjustable pressure settings and a variety of attachments, such as the Dupray MultiJet, because versatility in steam cleaning ensures thorough sanitation without harsh chemicals. Regular use of these tools extends appliance lifespan and ensures optimal performance.
Implementing a Regular Maintenance Routine
Establishing a scheduled maintenance routine is essential. For example, performing a monthly deep clean—using a vinegar cycle in washers or a descaling solution in coffee makers—can prevent mineral buildup and mold growth. Additionally, inspecting and replacing worn door seals or gaskets saves you from costly repairs and potential warranty voids, especially if you’re aware of what’s covered under your warranty, like avoiding the mistakes outlined in extended warranty fine print.
Tools such as a heavy-duty drain snake or a flexible auger help clear stubborn clogs in dishwasher or refrigerator drains, ensuring free flow and preventing water damage. Keep a set of these at hand, along with a microbial cleaner for disinfecting drains—this combination addresses common issues proactively and maintains appliance health over years.
Where Do I Keep My Maintenance Tools?
Designate a dedicated toolbox or storage cabinet near your laundry or kitchen appliances. Organized storage ensures quick access during routine checks or emergency fixes, minimizing downtime and reducing reliance on costly professional services.
Future Outlook: Smarter Maintenance Solutions
The trend is moving towards smart diagnostic tools integrated with appliances—like Wi-Fi-enabled sensors that alert you to impending issues before failure occurs. For instance, some modern washers can send maintenance reminders directly to your phone, reducing guesswork and preventing major breakdowns. As technology advances, expect even more intuitive systems that help you monitor appliance health in real time, making upkeep simpler and more proactive.
How do I maintain appliance performance over time?
The key is consistent, preventive care—using the right tools and adhering to a scheduled routine. Regularly inspect seals, drain conditions, and electrical connections, while cleaning critical components with appropriate supplies. Remember, a little effort now prevents costly repairs later. For comprehensive maintenance tips, visit this detailed guide. Testing your appliances with a digital multimeter can diagnose issues early—try incorporating that step into your routine.
The Unspoken Truths About Appliance Care That No One Tells You
Over the years, I’ve learned that some of the most valuable insights about appliance repair, warranty, and installation come from unexpected sources—like trial, error, and those quiet moments of realization. For example, I once believed that quick fixes and superficial cleaning were enough, but a sudden leak revealed a deeper issue rooted in neglecting the hidden drum’s sanitation. That experience taught me that paying attention to detail—especially in concealed parts—can save you time, money, and frustration.
Another lesson learned was the importance of understanding warranty fine print. Initially, I assumed coverage was straightforward, but I discovered that improper installation or skipping routine maintenance could void my warranty silently. Now, I always read the small print and follow recommended procedures, like maintaining proper clearance around appliances or avoiding oversized loads that could jeopardize the warranty—saving myself from future headaches.
Also, I’ve realized that relying solely on same-day service can be a gamble. Sometimes, demand and technician availability mean delays, which emphasizes the value of preventative care. Scheduling regular maintenance, using the right tools, and staying proactive can often prevent the need for urgent repairs, keeping my appliances in top shape and ensuring my home runs smoothly.
Tools and Resources That Have Transformed My Approach to Appliance Care
My toolkit for sustaining appliances has evolved with experience. The first must-have is a high-quality digital multimeter—it’s indispensable for diagnosing electrical issues safely and accurately. Pairing this with a long-reach inspection mirror helps me peek into tight spaces behind seals or in drain sections, which often harbor mold or grime. For deep sanitation, I swear by a versatile steam cleaner, like the Dupray MultiJet, which effortlessly tackles mold and bacteria in hard-to-reach parts without harsh chemicals.
Additionally, I rely on guides from trusted sources that offer step-by-step troubleshooting tailored to specific brands and models. The detailed articles I found on appliance-specific websites have helped me avoid common pitfalls, such as misinstalling drain hoses or neglecting to check the level of my unit—small tweaks that make a big difference. Regularly updating my knowledge with these resources has kept my appliances running efficiently for years.
Keep Moving Forward: Your Next Steps in Appliance Confidence
Achieving mastery over appliance maintenance is empowering. The more you learn about proper installation, routine cleaning, and understanding warranty nuances, the less you’ll rely on expensive repairs or service calls. Remember, proactive care — like scrubbing rubber seals, running descaling cycles, and inspecting electrical connections — is your best insurance against unexpected breakdowns.
What’s one small maintenance habit you plan to adopt today to extend the life of your appliances? Share your thoughts below and start building an appliance care routine that keeps your home running smoothly. Whether it’s setting a monthly reminder for deep cleaning or investing in a quality tool kit, every step counts toward appliance longevity and peace of mind across your household.