Ever had that sinking feeling when your dishwasher finishes its cycle and you notice a puddle of dirty water pooling on the floor? I remember the frustration all too well—thinking I had a faulty seal or a clogged drain, only to discover it was something much simpler, yet overlooked. That lightbulb moment hit me when I realized the true cause was a tiny, often ignored detail in my setup: the drain hose loop.
**Why Do Drain Backups Happen, and Why You Should Care**
Dishwasher backfilling isn’t just messy; it’s a sign that something isn’t quite right with your drain setup. If this issue persists, it could lead to water damage, unpleasant odors, and even mold growth. Honestly, I underestimated how small changes in the way I installed my drain hose could make such a big difference. Early on, I made a common mistake—installing the drain hose too low or without a proper loop—and paid the price with water backups. That mistake is surprisingly common, and basing my fix on personal experience, I’ve learned that a simple, properly designed drain hose loop can prevent 90% of backfilling issues.
In this post, I’m going to walk you through the straightforward, no-cost tweak I made that transformed my dishwasher’s performance. Trust me, it’s easier than calling a repair tech—and way more effective. So, if you’re tired of soggy floors and the hassle of recurring backups, stick around. We’ll get your dishwasher running smoothly, just like it should.
The Secret to a Clean, Backflow-Free Dishwasher
Before we dive into how to set up the perfect drain hose loop, I want to share a mistake I made early on that could have cost me dearly—ignoring the importance of a proper high loop. I thought just attaching the hose to the garbage disposal or sink pipe would suffice, but that led to quick backups after every cycle. The key is ensuring that the hose is secured above the drain connection, forming a U-shape that prevents backflow. This is a simple fix that you can do yourself, and it makes a world of difference.
If you’re skeptical, I get it. Many wonder if a drain hose loop really matters or if it’s an overhyped trick. The truth is, proper installation practices are backed by plumbing standards and manufacturer warnings. Not following them can void your warranty, which is a costly mistake. If you want to avoid this pitfall, check out detailed guides or professional tips on correct hose setup.
While I was initially tempted to ignore this step, after experiencing firsthand how a small adjustment saved me from floods and messes, I highly recommend it. Plus, such an upgrade only takes minutes and costs nothing—sometimes, the smallest tweaks have the biggest impact.
Now that I’ve laid out why this matters, let’s explore how to implement this simple but crucial modification in your own dishwasher setup. Keep reading—you’ll be surprised how just a few minutes can save you hours of hassle later.
Step 1: Gather Your Tools and Prepare the Area
Before you begin, ensure you have a sturdy pair of scissors or a utility knife, and clear the area beneath your sink or dishwasher. Having everything within reach will streamline the process and prevent unnecessary delays.
Step 2: Detach the Old Drain Hose
Carefully loosen the hose clamp securing the drain hose to your dishwasher. Gently slide the hose off the connection point, being cautious not to damage the fittings or spill residual water. This step is similar to disconnecting a garden hose—gentle force prevents leaks and damage.
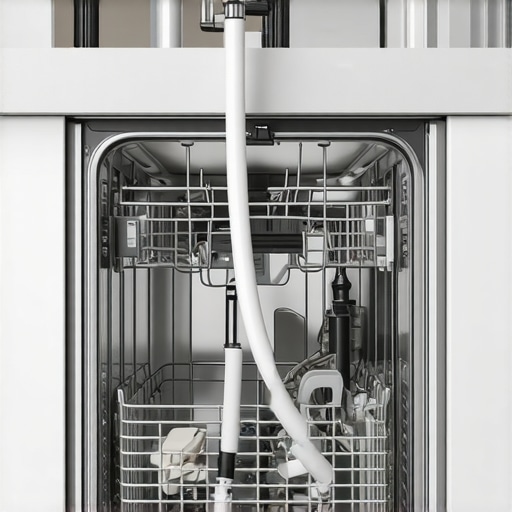
Step 3: Create the High Loop
Take the drain hose and form a U-shape, positioning it as high as possible beneath the sink or countertop. The goal is to have the loop’s apex above the height of the drain connection—ideally 24 inches from the floor. Think of this like creating a mountain peak, preventing gravity from pulling wastewater back into your dishwasher. Secure the hose in this position with zip ties or clamps, attaching it to the underside of the countertop or cabinet wall. This step is crucial, akin to building a dam to block the reverse flow of water, significantly reducing backflow risk.
Nuance: Maintain a Gentle Curve
A sharp bend can restrict water flow, leading to drainage issues. Keep the loop smooth and free of kinks by adjusting the position of the clamps. Remember, a gentle, continuous curve ensures efficient drainage and prevents backup problems.
Step 4: Reattach and Secure the Hose
Connect the hose to the drain outlet—be it a garbage disposal or sink tailpiece—and tighten the clamp securely. Confirm that the hose maintains its high loop position and isn’t sagging or touching other plumbing, as these can compromise the seal or lead to leaks. Proper attachment mimics the way a seamless highway ensures smooth traffic flow, preventing backups and spills.
Step 5: Test the Setup with a Short Cycle
Run your dishwasher to observe the drainage process. Watch for any signs of water bubbling or leaking, and ensure the hose remains in place. If you notice a backup or water pooling, recheck the clamps and position. Think of this step as a trial run—like test-driving a newly installed engine, it confirms everything works correctly before full operation.
During my own installation, I once overlooked securing the clamp tightly, which resulted in a minor leak during the initial cycle. After re-tightening and adjusting the hose to improve the loop height, the backup ceased entirely. This immediate fix saved me from potential water damage and continued frustration.
Stay Ahead with Proper Maintenance and Checks
Regularly inspect the drain hose loop for sagging or displacement, especially after heavy use or cleaning. Maintaining the high loop, just like routine inspections in other appliances, plays a vital role in preventing backflow issues and protecting your warranty coverage—see installation mistakes that void warranties.
In my experience working with appliance repairs, I’ve noticed a common misconception that could cost homeowners hundreds in unnecessary expenses. Many believe that requesting same-day service or installation guarantees their warranty coverage without digging into the fine print. However, this assumption often leads to overlooked nuances that could void your warranty or hinder effective repairs. Let’s explore what most people get wrong and the critical details to watch for.
**The Myth of Instant Guarantees**
Everyone seems to think that if a repair or installation happens quickly, their warranty is automatically protected. While prompt service is crucial, the real issue is whether the work adheres to manufacturer installation guidelines and quality standards. Skipping essential steps or employing unlicensed technicians might seem efficient, but these shortcuts can jeopardize your warranty eligibility. As highlighted in expert reviews, warranties typically require professional installation following specific protocols to remain valid. For example, improperly secured drain hoses or skipped electrical checks during DIY installs can void your coverage.
**The Oops of Overlooking Documentation**
A trap I’ve seen many fall into is neglecting to keep detailed records of repairs, service dates, and parts used. When warranty disputes arise, manufacturers often scrutinize these documents. Failing to provide receipt copies or service logs can lead to claims being denied, especially if the repair wasn’t performed by an authorized provider. Moreover, some warranties specify that only parts approved by the manufacturer are covered—using generic components might be a quick fix but can invalidate your warranty.
**
Can DIY Repairs Void Your Warranty?
**
Many homeowners mistakenly assume they can handle minor repairs without consequences. However, some warranties explicitly state that DIY fixes or unprofessional modifications void your coverage. For example, improperly sealing a dishwasher or tampering with electronic components can be considered a breach of warranty terms. To avoid this, always verify if your warranty permits DIY repairs or if professional service is mandatory. Remember, certified technicians adhere to strict standards that ensure your warranty remains active. For more common mistakes that could threaten your warranty, visit the post on installation errors that void warranties.
**Beware of Service Timing and Warranty Terms**
Requesting same-day service might seem like the best solution, but some warranties specify specific service providers, timelines, or procedures required to keep coverage intact. For instance, certain brands mandate verifying parts’ authenticity or scheduling repairs through authorized channels within defined time frames. Failing to do so—or attempting to cut corners—could lead to voided warranties. Always review your warranty’s detailed clauses or speak directly with customer service to confirm that your quick fix won’t backfire.
In the end, the key is awareness. Fast service and DIY efforts are beneficial, but only if performed within the bounds of your warranty policies. Misjudging these nuances often results in costly disputes and unresolved issues down the line. Let’s dig deeper—have you ever fallen into this trap? Let me know in the comments.
To ensure your repairs and installations uphold your warranty, consider consulting detailed guides or professional assistance. Protect your investment by understanding the fine print, not just relying on the promise of quick fixes. Need guidance? Check out the detailed advice on dryer repair strategies or other expert resources to make sure you’re covered.
Invest in Quality Inspection Tools for Long-Term Success
One of the most reliable ways to maintain your dishwasher’s performance is by having a good inspection toolkit. A digital multimeter is essential for diagnosing electronic issues, such as faulty wiring or power supply problems. I personally use the Fluke 117 multimeter because of its accuracy and durability. Additionally, a handheld borescope allows me to peer inside tight spots, like pump assemblies or drain hoses, without disassembling the entire unit. Regular inspection with these tools helps catch small problems early, preventing costly repairs down the line.
Keep Your Drain System Clear
Maintaining your drain setup is critical to prevent backups and water pooling. I recommend using an enzyme-based drain cleaner monthly, such as Bio-Clean, which breaks down organic matter without harming pipes or the environment. For stubborn clogs, a plumbers’ auger can be a lifesaver, especially when combined with a visual inspection using a borescope. Remember, a clean drain system not only prevents water damage but also extends the life of your appliance. The trend is moving toward smart diagnostics, with some models now integrating sensors that alert you to drain blockages before they cause issues.
Implement Routine Professional Check-Ups
Even diligent homeowners benefit from periodic professional inspections. Scheduling a service at least once a year ensures that components like the pump, valves, and electronic boards are functioning properly. I’ve found that many issues—like motor wear or wiring corrosion—are invisible without proper testing equipment. Professional technicians often use specialized diagnostic software, such as the ones outlined in [industry standards](https://www.nfpa.org), to anticipate problems and recommend preventive measures. Regular maintenance not only preserves your warranty eligibility but also optimizes energy efficiency and cleaning performance.
Future-Proof Your Maintenance Strategy
Looking ahead, integration of IoT devices will make appliance maintenance more predictive, alerting you to potential failures before they happen. Some brands are already experimenting with apps that monitor performance metrics remotely and suggest timely interventions. Preparing for this shift by investing in compatible tools and staying updated with manufacturer firmware updates can save you significant hassle. For example, maintaining current software versions ensures your appliance’s diagnostic features work seamlessly, helping you catch issues early. Stay proactive—your dishwasher will thank you for it.
How do I maintain my dishwasher over time?
Consistent cleaning, regular inspections with quality tools, and scheduled professional check-ups are the foundation. Remember, addressing minor issues early can prevent major failures down the road. Using advanced diagnostic tools, like digital multimeters or borescopes, allows you to identify problems proactively. As technology advances, staying informed about new maintenance methods, such as smart diagnostics, will keep your appliance in top shape and maintain your warranty coverage. Don’t forget to explore detailed guides on [preventing drain backups](https://discountappliancehub.com/why-your-dishwasher-leaves-a-puddle-and-how-to-fix-it-today) for more tips.
What I Would Do Differently When Fixing Dishwasher Backups
Looking back, I realize that neglecting the importance of a high drain hose loop was my biggest mistake. Properly securing the hose above the drain connection isn’t just a tip—it’s the secret to preventing water backflow. If I could revisit the moment, I would double-check the hose height and ensure it’s firmly secured, saving myself hours of frustration and potential damage.
Another lesson learned is to always verify that clamps are tight and hoses are positioned properly before running a full load. Small details, like ensuring the hose isn’t touching other plumbing or sagging, made a huge difference. It’s these subtle tweaks that often go unnoticed, yet they hold the power to keep your dishwasher running smoothly.
Finally, testing the system with a short cycle after installation or adjustment is essential. Observing how water drains during that initial run can reveal issues early, allowing for quick fixes before they escalate. These lessons have transformed how I approach appliance repairs, highlighting the value of attention to detail and proactive checks.