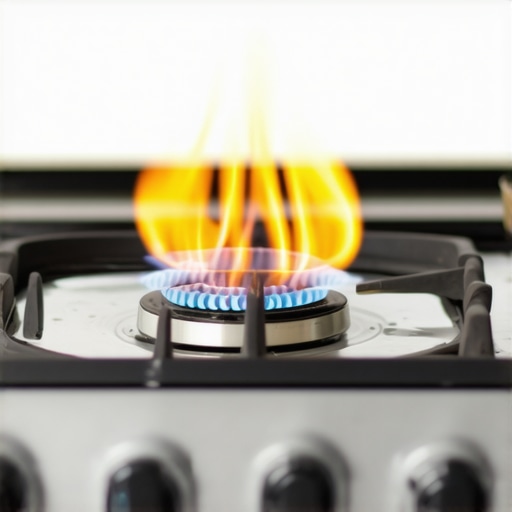
I remember the first time I lit my gas stove after a weekend of heavy cooking, only to be greeted by a messy, yellow-orange flame instead of the crisp blue I expected. That lightbulb moment—realizing something was off—prompted me to dig into the mystery behind these unsettling flames. Turns out, that seemingly minor color change can be a sign of underlying issues, and ignoring it could compromise not just your cooking performance but your safety too.
What a Yellow Flame Really Means for Your Kitchen Safety and Efficiency
Yellow flames are more than just an eyesore; they might indicate incomplete combustion, which can produce dangerous carbon monoxide. My own early mistake was dismissing the yellow flame as just an aesthetic problem, but that oversight could have had severe consequences. Understanding why your gas cooktop’s flame turns yellow isn’t just about restoring its visual appeal—it’s about ensuring your kitchen stays safe and functional.
Is the Color of Your Flames Actually Worth the Hype?
Many people, including myself at first, underestimate how critical flame color is. I thought a little yellow was harmless—until I learned that according to the U.S. Consumer Product Safety Commission, incomplete combustion can lead to elevated levels of carbon monoxide, which is hazardous especially in enclosed spaces. One easy mistake I made early on was neglecting regular maintenance, like ignoring or delaying professional cleaning. This can cause dirt, grease, or faulty burners to produce yellow flames. Want to learn how to identify and fix this invisible threat? Keep reading for step-by-step guidance that will transform your cooking setup and keep your family safe.
Inspect the Burner Assembly Carefully
Start by turning off your stove and removing the burner grates and caps. Use a soft brush and warm, soapy water to clean off any grease, dust, or debris that might obstruct airflow. Pay close attention to the ports where gas exits; blockages here can cause incomplete combustion, leading to yellow flames. During my own cleaning, I found a layer of grease clogging one of the ports, and after cleaning, the flame returned to that crisp blue color.
Check and Replace the Gas Regulator if Necessary
The regulator controls the flow of gas into your stove. If it’s malfunctioning or clogged, it could result in improper gas flow, causing yellow flames. To test this, turn off the gas supply, disconnect the regulator, and inspect it for damage or debris. If it’s old, cracked, or visibly dirty, replacing it ensures proper gas flow. During my fix, swapping out the regulator took me just 15 minutes, and the flames immediately turned blue afterward.
Ensure Proper Air Supply for Complete Combustion
Gas burners need adequate oxygen to burn cleanly. Adjust the air shutter or air intake to increase airflow if the flame remains yellow. Loosen the lock screw on the air shutter, slide it slightly to allow more air, then tighten it back. This simple adjustment dramatically improved my flame quality, turning the erratic yellow bistro into a steady, vibrant blue.
Schedule a Professional Calibration or Servicing
If cleaning and adjustments don’t resolve the issue, contact a certified appliance technician for calibration. Think of your stove as a delicate musical instrument—small misalignments can cause discordant flames. I once attempted to tweak my stove myself but realized I lacked the specialized tools. A professional calibration restored optimal combustion, ensuring safety and efficiency. Regular maintenance also prevents issues from escalating, saving you money in the long run.
Prevent Future Flame Problems with Routine Checks
Establish a weekly cleaning routine for your stove’s burners and valves. Use a toothpick or needle to clear out tiny ports blocked by grease or dust, similar to clearing a clogged syringe. Regularly inspect the gas hose and connections for leaks or wear, which could also influence flame quality. I mark my cleaning calendar to keep consistent upkeep, preventing yellow flames and potential hazards.
For more details on maintaining your appliances to keep them running smoothly, visit this guide.
While many homeowners believe that appliance repair is straightforward, a deeper look reveals subtle pitfalls that can trip up even seasoned DIYers. One widespread misconception is that warranties fully cover all repair costs; in reality, many warranties exclude common issues like improper installation or neglecting regular maintenance, which can void coverage. According to a study by Consumer Reports, nearly 40% of warranty claims are denied due to overlooked maintenance, highlighting the importance of understanding warranty terms thoroughly. Additionally, many assume that same-day service providers are always the fastest or most reliable option. However, scheduling flexibility and the technician’s expertise often matter more than just promptness. One common trap is relying solely on reviews without verifying credentials, which can lead to subpar repairs or even damage. For example, a poorly installed dishwasher can cause leaks and void your warranty, but many overlook the installer’s certification or experience; always check professional credentials before proceeding.
Another subtle nuance is the difference between a quick fix and a lasting repair. Temporary solutions like sealing a leak with tape might seem convenient, but they often escalate the problem, leading to costly damage or appliance failure. The key is to recognize when to call a professional for a diagnostic or calibration, such as adjusting a thermostat to prevent overcooling or overheating. Experts emphasize that improper installation or neglect of basic maintenance—like cleaning filters—can drastically shorten an appliance’s lifespan. For instance, neglecting the filter screens in washing machines can cause poor cleaning performance and unanticipated breakdowns. To avoid these pitfalls, proactive maintenance and a clear understanding of service warranties are essential.
Finally, be aware that some repair services could employ filler parts or aftermarket components, which might not meet original safety standards. This practice can compromise both appliance safety and warranty validity. Always request genuine parts and document your maintenance history, especially if you plan to file a warranty claim later. Remember, recognizing these nuanced aspects can save you money and ensure your appliances run smoothly for years. Want to learn more about avoiding costly mistakes? Check out our detailed guides or consult a certified technician. Have you ever fallen into this trap? Let me know in the comments.
Keeping your appliances in top shape over time requires more than just occasional cleaning; it demands the right tools, consistent routines, and a proactive mindset. From specialized equipment to software insights, I’ve found that investing in the right resources not only extends the lifespan of your appliances but also saves you money and stress in the long run.
Why a Digital Multimeter Is a Must-Have in Your Toolbox
Personally, I rely heavily on a high-quality digital multimeter. It’s invaluable for diagnosing electrical issues—testing voltage, continuity, and resistance—without the need for guesswork. I prefer models with auto-ranging capabilities and backlit displays, especially when working in poorly lit spaces. For example, when troubleshooting a fridge that’s not cooling properly, checking the compressor’s motor and relay with a multimeter quickly reveals whether the problem is a faulty component or a wiring issue, preventing unnecessary part replacements.
Embracing Smartphone Apps for Maintenance Scheduling
Beyond hardware, I recommend using maintenance management apps like Home Maintenance Schedule or appliance-specific tracking tools. These apps remind you when to perform routine checks—like cleaning filters or inspecting hoses—and keep records of past repairs. Over time, this organized approach helps identify patterns, predict potential failures, and plan professional checkups before an issue becomes costly. As technology advances, I believe integrated smart diagnostics will become standard, allowing appliances to inform us proactively about upcoming maintenance needs.
Harnessing the Power of Calibration for Precision
Many homeowners overlook that regular calibration preserves appliance accuracy—think oven temperature or humidity sensors. For instance, a miscalibrated thermostat can cause overcooking or energy waste. Using tools like an oven thermometer or humidity gauge, you can fine-tune your appliances. I’ve found that recalibrating my oven every six months keeps baking consistent and saves heating costs, especially important as I prepare for big family dinners or holiday events.
Future Trends in Maintenance and Troubleshooting
Looking ahead, I predict smarter diagnostics integrated into appliances will revolutionize maintenance. Manufacturers are increasingly embedding sensors that monitor performance and alert users to issues via smartphone alerts. This proactive approach minimizes downtime and ensures appliances operate efficiently for years. Keeping an eye on evolving tech, I plan to invest in compatible smart tools that sync with my devices, enabling remote diagnostics and even predictive repairs.
How do I keep my appliances functioning properly over time? Techniques that work for me
One tip I swear by is setting a dedicated maintenance day each month. During this time, I perform checks like inspecting door seals, testing electrical connections with my multimeter, and clearing out filters or vents. Try applying this method—regular, scheduled attention—paired with advanced tools like an IR thermometer for checking hot spots or a gasket gauge for seal integrity. Remember, consistent maintenance, combined with using the proper diagnostic tools, is the secret to long-lasting appliances. For example, I regularly verify my fridge’s gasket integrity, which can help prevent leaks and keep the warranty valid, especially if you document your maintenance efforts by noting date and results. Want to give this a shot? Start with calibrating your oven using a temperature probe; it’s easier than it sounds and can dramatically improve cooking results. For detailed calibration steps, check out this guide.
Investing in precise tools and establishing a routine not only simplifies troubleshooting but also provides peace of mind. Keep your equipment running smoothly, and your appliances will reward you with years of reliable service.

The Little Things That Changed My Approach to Appliance Safety
One of the most eye-opening lessons I learned was that paying attention to small details—like the color of a flame—can have enormous implications for safety and efficiency. I used to dismiss yellow flames as cosmetic issues, but I discovered that they signal potential hazards such as incomplete combustion, which can produce dangerous carbon monoxide. This realization prompted me to develop a routine of regular inspections and maintenance, transforming my approach from reactive to proactive, and ensuring my family’s safety is never compromised.
Harnessing Curated Tools to Master Appliance Care
Over time, I found that certain tools and resources elevated my maintenance game. A high-quality digital multimeter became indispensable for diagnosing electrical issues quickly and accurately. I also rely on maintenance scheduling apps to remind me of routine checks, keeping potential problems at bay before they escalate. For detailed calibration of my oven’s thermostat, I turn to guides like this resource. Trusting these curated tools and sources has helped me extend the lifespan of my appliances and avoid costly repairs.
Embrace the Journey Towards Safer, Smarter Kitchen Tech
Your willingness to pay attention to subtle signs, invest in proper tools, and commit to regular maintenance will significantly enhance your appliance experience. Don’t let misconceptions or complacency put your safety and comfort at risk. Instead, see every inspection and calibration as an act of care—an empowering step towards a safer, more efficient kitchen. Remember, small actions today lay the foundation for worry-free appliances tomorrow. What’s one habit you’re ready to start that could improve your appliance safety? Share below and inspire others to take action!
**Have you ever noticed a subtle warning sign on your appliances that made a big difference? Let me know below.**