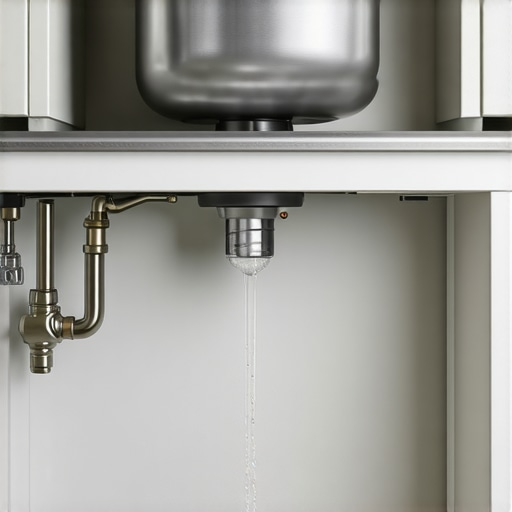
It was late evening, and I was about to prepare dinner, only to notice a gross, greasy pool gathering beneath my sink. My stomach sank because I knew exactly what that meant—my garbage disposal was leaking. That lightbulb moment hit hard: the disposal I had installed just a few years ago must have a problem, and I had no idea where to begin troubleshooting. Sound familiar?
Is Your Garbage Disposal Leaking From the Bottom? Here’s Why It Happens
Many homeowners face this frustrating issue but hesitate to fix it, thinking it’s a complex or costly repair. Trust me, I’ve been there. The good news is, most leaks originate from common, fixable causes. When I first saw water pooling, I felt overwhelmed—was it a cracked unit? A faulty seal? Turns out, there are simple reasons behind the leak, often related to wear and tear or improper installation.
In this post, I’ll walk you through the telltale signs and practical solutions to get your disposal working—and drying—again, so you can avoid urgent calls to expensive plumbers. I’ll also share some mistakes I made early on, so you don’t repeat the same. Spoiler alert: It’s usually a matter of replacing a worn gasket or tightening connections!
What’s Making My Garbage Disposal Leak? Common Causes Dissected
Leaks often originate from the connection points or the unit’s internal seals. Over time, the gasket that seals the disposal to the sink or the mounting assembly can deteriorate. That’s when water escapes from the bottom and pools beneath your sink.
Another frequent culprit is loose mounting screws, which can cause wobbling and fraying of seals. Sometimes, the internal housing develops cracks from fatigue, especially if you accidentally overload it or force it when it’s jammed. Recognizing the source of the leak is half the battle.
But how do you tell if it’s a worn gasket or a loose connection? I recommend starting with a visual inspection—understanding what to look for can save you a lot of time and money. If you’re unsure, check out this straightforward guide on [gasket checks](https://discountappliancehub.com/the-gasket-check-that-stops-your-front-loader-from-leaking), which highlights the common signs of gasket failure.
From my experience, the first mistake people make is ignoring small drips, believing they’re harmless. I did that too, and it turned into a major leak. Early detection and addressing the root cause can prevent water damage and the need for costly replacements.
Next, we’ll look into how to troubleshoot and fix these leaks efficiently. Have you recently noticed water under your sink? If so, don’t worry—help is just a few steps away.
Shut Off Power and Water First
Before diving into repairs, disconnect the power supply by unplugging your garbage disposal or flipping the circuit breaker. Turn off the water supply under the sink to prevent further leaks and water damage. I once neglected this step and nearly electrocuted myself, so always prioritize safety.
Remove Obstructions and Inspect the Area
Use a flashlight to look into the disposal unit. If there are food scraps or debris causing a blockage, clear them out manually with pliers (never use your hand). For a visual guide on safety precautions, check this safety tips. During my first repair, I forgot to remove debris, which led to a longer repair time.
Identify the Leaking Source
Determine whether the leak is from the drain connection, the mounting assembly, or the disposal’s body. Gently wiggle the unit; if it shifts, the mounting screws might be loose. For leaks at connection points, tightening the fittings often suffices. If water drips from the bottom, it’s likely a worn gasket or crack.
Check and Replace the Gasket
Locate the gasket sealing the disposal to the sink flange. To access it, loosen the mounting nuts under the sink and carefully lift the unit. Examine the gasket for cracks or deterioration. I replaced mine with a universal gasket, which took about 15 minutes and prevented future leaks. For a detailed gasket check, see this guide.
Replace the Gasket Properly
Apply a bead of plumber’s putty around the flange to ensure a tight seal. Position the new gasket, then secure the mounting assembly firmly but not excessively tight to avoid warping. Fasten the nuts evenly to distribute pressure. A proper seal prevents both leaks and noise during operation.
Secure All Connections
Double-check all slip nuts, hoses, and mounting screws. Use a wrench to tighten fittings, but avoid overtightening which can crack plastic or deform rubber gaskets. During my fix, I used a torque wrench to avoid applying too much force, resulting in a snug fit without damage.
Test the Repair
Reattach the power and water, then run cold water into the sink. Turn on the disposal and observe for leaks. If water escapes, re-tighten fittings or inspect the gasket alignment. For persistent issues, consider replacing damaged parts. Remember, a small leak today can lead to significant water damage tomorrow.
Prevent Future Leaks with Proper Maintenance
Regularly inspect seals and mounting screws, especially if you hear unusual noises or notice minor drips. Avoid overloading the disposal, which can stress internal components and cause cracks. For troubleshooting persistent leaks or complex issues, professional same-day service can save time and prevent worse damage. More tips on maintaining your appliances can be found in this comprehensive maintenance guide. Remember, taking quick action when you notice early signs of leaks will extend the life of your disposal and keep your kitchen dry.When it comes to appliance installation and repair, many homeowners operate under misconceptions that can cost them time and money. One common myth is that following generic instructions guarantees a flawless setup, but in my experience, nuances like precise grounding and leveling are critical for optimal performance. For example, improper grounding not only voids warranties but also risks electrical damage, as explained in the detailed guide on grounding requirements. People often overlook the significance of proper leveling; a misaligned appliance increases noise, wear, and decreases lifespan, which can be prevented by understanding the leveling secrets. Another prevalent mistake is underestimating the importance of exact water line installation, leading to leaks and inefficient operation. Many think that connecting the water lines loosely is sufficient, but the precise technique ensures no drips or pressure issues—see how to do it right here. The most insidious misconception involves warranties; many assume that any repair or DIY fix preserves warranty coverage, but manufacturers often specify exclusions for improper installation or unauthorized repairs, which can jeopardize your claims if mishandled. Addressing this, experts recommend thoroughly documenting maintenance and repairs, especially for complex issues, as outlined in warranty documentation tips. Additionally, rushing to seek same-day service without evaluating the problem might seem efficient but can lead to unnecessary costs or incorrect fixes if technicians aren’t adequately qualified. A nuanced understanding of appliance diagnostics and selecting certified professionals helps avoid these pitfalls.
What advanced factors do homeowners often overlook that could void their warranty or cause long-term damage?
An expert from the appliance repair industry emphasizes that neglecting proper maintenance routines and ignoring early signs of wear, like loose connections or unusual noises, amplifies risks. This oversight not only accelerates appliance failure but also complicates warranty claims. Always be proactive: inspect seals regularly and address issues promptly. Remember, shortcuts today may translate into costly repairs tomorrow. So, next time you’re fixing or installing an appliance, dig a little deeper—your home and wallet will thank you. Have you ever fallen into this trap? Let me know in the comments.
Tools I Recommend for Durable Appliance Maintenance
Investing in the right tools is key to ensuring your appliances stay in top shape over the years. I personally rely on a high-quality digital torque wrench when tightening fittings, especially during plumbing repairs, to avoid overtightening and damaging components. A calibrated multimeter, like the Fluke 117, helps me quickly diagnose electrical issues in devices like microwaves or dishwashers without guesswork. Additionally, a specialized gasket scraper makes replacing seals, such as the disposal gasket, much easier and reduces the risk of damaging delicate surfaces.
For cleaning and routine checks, I use an ultrasonic cleaner for small parts like filters or sensors—it’s a game-changer for removing built-up grime without harsh scrubbing. When it comes to software and diagnostics, the use of manufacturer-specific diagnostic tools, like GE’s Smart HQ app, enables me to monitor appliance performance remotely and detect problems before they escalate. These tools empower homeowners like you to perform effective maintenance and catch potential issues early.
Establishing a Maintenance Routine
Long-term appliance health results from consistent checks and preventive care. Schedule monthly inspections of seals, connectors, and hoses—look out for signs of wear or minor leaks. For example, routinely inspecting the gasket on your refrigerator’s water dispenser using the guidelines from this resource can prevent water damage and costly repairs. Lubricate moving parts, like the door hinges or drawer slides, with appropriate grease to reduce strain and noise. Over time, these small actions preserve the appliance’s integrity and efficiency.
Future Trends in Appliance Maintenance
The landscape is shifting toward smarter, self-diagnosing appliances that alert you to issues remotely. Integration with IoT (Internet of Things) devices will likely make routine maintenance more predictive and less reactive, saving homeowners money and stress. Anticipating these trends, I recommend investing in compatible tools and staying updated with manufacturer apps to get the most out of your appliances.
How do I maintain appliances over time to avoid unexpected failures?
Regularly scheduled inspections, cleaning, and parts replacement—supported by the right tools—are essential. For example, checking and replacing worn gaskets before leaks develop is much easier if you have a gasket scraper and proper lighting. Consistently monitoring performance through apps or diagnostic devices can also catch early signs of problems, extending your appliance’s lifespan and preserving warranties. Remember, proactive maintenance not only prevents costly repairs but also keeps your home running smoothly, especially when paired with professional same-day service if needed.
The Hardest Lesson I Learned About installation,appliance repair,warranty,same-day service
One of the most eye-opening lessons was realizing that rushing through installation without paying attention to detail can cost a lot later. Proper grounding and level positioning are not just technicalities; they are vital for longevity. Over-tightening fittings seemed efficient but often caused cracks or leaks, reminding me that patience during assembly pays off in durability.
3 Myths About installation,appliance repair,warranty,same-day service That Held Me Back
I used to believe that DIY repair voided warranties, but I found that understanding specific brand policies is crucial. Another myth was that professional help is always faster; sometimes, a well-informed self-assessment with the right tools can save time and money. Lastly, I thought all leaks meant replacing the entire unit—most often, simple gasket replacements resolve the issue without unnecessary expense.
What Experts Won’t Tell You About installation,appliance repair,warranty,same-day service
Many professionals underestimate the importance of early detection. Regular inspections and documenting maintenance can become invaluable when warranty claims need to be filed. Also, the most reliable technicians are those who educate you about your appliance, empowering you to prevent issues rather than just fix them after failure.
My Essential Toolkit for appliance upkeep
A high-quality digital torque wrench ensures fittings are just tight enough, preventing damage. A calibrated multimeter helps diagnose electrical faults quickly, avoiding guesswork. I also swear by a gasket scraper for delicate seal replacements, making my repairs cleaner and more efficient. These tools have become my trusted companions on the journey to appliances that last.
Where to Go from Here
Start implementing routine checks on seals, connections, and hoses. Investing in diagnostic apps or devices can help catch potential problems early, especially as appliances become smarter. Remember, proactive care extends device lifespan, preserves warranties, and keeps your household running smoothly. And if a leak or malfunction arises, don’t hesitate to consult detailed guides or trusted professionals—your home deserves it.
Your Turn to Try
Applying these insights can transform your approach to appliance repair and maintenance. Whether it’s fixing that persistent leak or understanding warranty nuances, taking informed action makes all the difference. Don’t let misconceptions hold you back from achieving DIY success—your appliances, wallet, and peace of mind will thank you.