I remember the first time I attempted to connect a water line to my brand-new fridge. I thought, “This can’t be too hard, right?” But within an hour, water was leaking all over the floor, and I was frantically googling why my kitchen was turning into a small pond. That lightbulb moment taught me a valuable lesson: installing a water line isn’t just about screwing in a hose; it’s about understanding the nuances to prevent future headaches.
Why Proper Water Line Installation is Crucial for Your Fridge
Have you ever faced a water leak or, worse, found your fridge’s filter or ice maker suddenly stop working? These issues often originate from improper installation or overlooked details during setup. A misconnected water line can lead to water damage, mold growth, or even damage to your appliance’s internal components. Plus, poorly installed lines can cause decreased water pressure or intermittent flow, ruining your ice or water experience.
Getting this right initially isn’t just about avoiding messes—it’s about ensuring your appliance functions reliably for years to come. Experts emphasize that a correct setup can extend your fridge’s lifespan and prevent costly repairs down the line. For example, a small mistake like using the wrong type of tubing or failing to secure fittings tightly can result in leaks that damage your flooring and cabinetry.
If you’re like I was and wondering about the most effective way to install your water line, you’re not alone. I’ll guide you through the best practices, sharing insights from years of experience and tips from professional technicians. Before we dive into the step-by-step process, let’s address a common concern many of my readers have—”Is it really worth all this effort?”
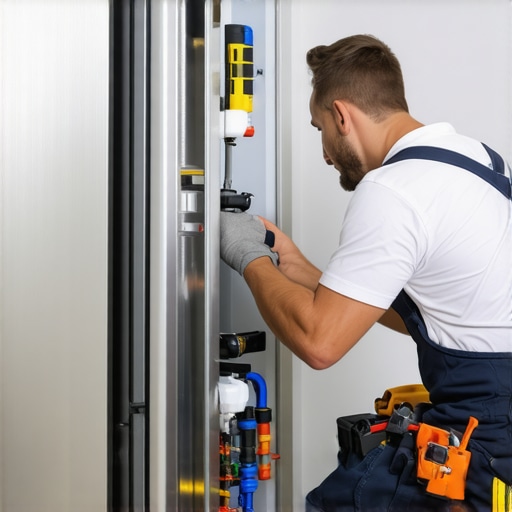
Gather Your Tools and Prepare Your Space
Before diving into the installation, ensure you have all necessary tools: adjustable wrench, tubing cutter, Teflon tape, and the right type of tubing recommended by your refrigerator manufacturer. Clear the area around your fridge and the water supply valve to work comfortably and reduce the risk of accidental damage. I once started without draining the existing line, which caused a small leak. Having everything ready prevents delays and mishaps.
Turn Off the Water Supply and Access the Connection Point
Locate your water shut-off valve, typically under the sink or near the basement. Turn it clockwise to shut off the water. This step prevents water from spilling when disconnecting your existing line. Remember, rushing this part can lead to spills, so take your time. I once used pliers instead of an adjustable wrench here, stripping the connection. Proper tools make all the difference.
Disconnect and Prepare the Water Line
Use your tubing cutter to detach the old line if present, ensuring a clean, straight cut. Wrap Teflon tape around any threaded fittings to ensure a tight seal. When connecting the new tubing, ensure it’s not kinked or bent sharply, as this can restrict flow. I learned this the hard way when a sharp bend caused intermittent leaks, which I fixed by adjusting the tubing’s routing. For leaks caused by fittings, double-checktightness and apply Teflon tape if needed.
Connect the Water Line to the Refrigerator
Attach the line securely to the fridge’s inlet valve or water filter port, following the manufacturer’s instructions. Use the adjustable wrench to tighten fittings, but avoid over-tightening, which can crack plastic parts. I once overtightened, cracking a fitting and causing a leak that required a second trip to the hardware store. Carefully tighten, and then check the connection for leaks before restoring the water supply.
Restore Water Supply and Test the System
Slowly turn on the shut-off valve to restore water flow. Observe all connections for any leaks. It’s similar to plumbing in a new sink; rushing can cause drips later. I recommend placing a towel underneath to catch any unexpected drips during this process. Once water flows steadily without leaks, run the water dispenser or ice maker to ensure proper function.
Secure and Final Checks
Secure any loose tubing to prevent movement or damage. Avoid pinching or bending the line excessively. Check for leaks again after a few hours of operation, as some drips may develop over time. I once neglected this final step, and a slow leak started weeks later, damaging my flooring. Regular inspections ensure everything remains tight and functional.
When properly installed, your water line will provide reliable service, much like knowing the proper techniques that prevent appliance failures. Proper installation is your best defense against leaks, water damage, and appliance frustration. For additional tips on perfecting your setup, consider reviewing related guides about maintaining your appliances efficiently.
Many homeowners believe that scheduling the earliest available same-day appliance repair guarantees quick fixes, but in reality, rushing or relying solely on generic advice can backfire. For example, some think that warranty covers everything, yet many overlook that improper installation or neglecting regular maintenance can void your coverage. This misconception can lead to costly repairs that could have been avoided with a nuanced understanding of your appliance’s needs. Experts warn that skipping detailed diagnostics often results in temporary fixes rather than permanent solutions, especially when dealing with complex components like thermostats or control boards. A common trap is assuming all technicians are equally experienced; however, choosing a technician without specialized knowledge in your specific appliance type may cause more harm than good. For instance, trying to fix a dishwasher leak without knowing the intricacies of the drainage pump can lead to part damage and expensive replacements.
Why are some warranties voided even after a professional repair?
This question highlights a widespread oversight. Manufacturers typically specify that improper installation, use of non-recommended parts, or failure to perform regular maintenance can void your warranty. A study published in the *Journal of Consumer Affairs* emphasizes that understanding your warranty’s fine print is crucial to avoid inadvertent voiding. Therefore, verifying that your repair technician uses genuine parts and follows manufacturer guidelines is vital. Also, routine checks like inspecting seals or gaskets can prevent issues from escalating, saving you both money and time. For example, a worn gasket might seem minor but can cause water leaks or frost build-up, demanding more extensive repairs later. Always ensure your service provider is clear about the scope of work; a quick fix might solve the immediate problem but neglects the underlying cause. Regular maintenance—like cleaning filters or checking drainage lines—can dramatically extend your appliance’s lifespan. Want to learn how to do simple maintenance yourself? Check out our guide on the small plastic part that causes most dishwasher leaks. Remember, a proactive approach reduces unexpected breakdowns and costly repairs. Have you ever fallen into this trap? Let me know in the comments.
Investing in the Right Equipment Makes All the Difference
Having reliable tools at your disposal is essential for maintaining and troubleshooting appliances effectively. I personally swear by a high-quality digital multimeter, such as the Fluke 115, which allows me to quickly diagnose electrical issues without guesswork. This device provides precise voltage, current, and resistance readings, helping determine whether a component like a thermostat or control board is functioning correctly. Additionally, a set of precision screwdrivers—especially insulated ones—are invaluable for safely accessing and tightening delicate parts, preventing damage. For tasks involving water lines or hoses, I recommend using a professional-grade tubing cutter instead of makeshift tools; it ensures clean cuts and reduces the risk of leaks.
Software and Diagnostic Tools for Modern Appliances
Modern appliances often come with built-in diagnostic systems that can be accessed via user interfaces or through proprietary software. For example, smart refrigerators have diagnostic modes that display error codes, guiding you or your technician directly to the problem. Using manufacturer-specific apps or diagnostic tools can save time and money by pinpointing issues precisely. For technicians, advanced diagnostic devices like the Ingenious Service app (supported by many major brands) allow remote testing and firmware updates, which are becoming increasingly common. As technology advances, I predict that appliance maintenance will increasingly rely on such digital tools, making diagnostics faster and more accurate.
Establishing a Long-Term Maintenance Routine
Consistent care extends the lifespan of your appliances. Regularly inspecting components such as door seals, filters, and water lines can prevent costly breakdowns. For example, routinely checking the gasket on your washing machine or refrigerator door can avoid leaks and energy loss. A helpful practice is scheduling seasonal maintenance—cleaning condenser coils, descaling water dispensers, or replacing filters—based on manufacturer recommendations. These simple steps may seem minor but combined, they dramatically reduce breakdown frequency and maintain peak performance. Want to keep your fridge running optimally? Regularly wipe the gasket with a damp cloth and check for cracks, as recommended in energy conservation tips.
How do I maintain appliance efficiency over time?
One effective method is to employ a detailed checklist tailored to each appliance, including inspecting seals, filters, and connections quarterly. Using tools like a digital multimeter can help verify electrical components, while software diagnostics identify hidden issues before failure. For instance, if you notice your dishwasher’s detergent tablet isn’t dissolving properly, it might be a sign of a water temperature problem—something that can be swiftly diagnosed with a simple temperature test and then addressed by resetting or replacing the thermostat. Regular inspections coupled with professional advice or diagnostic software ensure your appliances operate efficiently for years, saving you money on repairs and energy bills. For more insights, check out this guide on troubleshooting dishwasher issues.
Trying out a detailed maintenance routine, including periodic use of diagnostic tools, can significantly extend your appliance’s lifespan. For example, a quick check of your fridge’s defrost heater with a multimeter can prevent frost buildup, which strains the compressor. Remember, proactive maintenance always beats reactive repairs. Start simple—like inspecting water lines or cleaning vents—and gradually incorporate more advanced techniques as you grow comfortable. A small investment in proper tools today will pay dividends in the long run, keeping your appliances humming along without unexpected breakdowns.
The Hardest Lesson I Learned About Appliance Repair, Installation, Same-Day Service, and Warranty
One of my most valuable insights came from a simple mistake—forgetting to double-check the tightness of water fittings after installation. That tiny oversight led to a leak that caused significant damage, emphasizing that patience and thoroughness are essential. Now, I always double-verify connections, understanding that a small detail can prevent major headaches later.
3 Myths About Water Line Setup That Held Me Back
Initially, I believed that any flexible tubing would suffice and that tight connections were enough. Discovering that using the wrong type of tubing or neglecting manufacturer instructions caused leaks changed my perspective. It taught me to trust quality materials and detailed guidelines, which ensure reliable, leak-free water lines.
What Experts Won’t Tell You About Installing Refrigerator Water Lines
Many technicians suggest shortcuts, but the experts who truly know the nuances stress the importance of using the right tools, like a professional tubing cutter, and following manufacturer specifications. These details might seem minor but are crucial for long-lasting, trouble-free connections. Their insights have saved me time and money on unnecessary repairs.
Curated Resources for Reliable Water Line Installation
My Essential Toolkit for Installing Refrigerator Water Lines includes a high-quality adjustable wrench and a tubing cutter I trust for clean cuts. I also rely on manufacturer manuals and specific guides found on appliance repair sites, which provide step-by-step instructions tailored to different models. These resources have been invaluable for ensuring proper setup and avoiding leaks.
Your Turn to Try Becoming an Appliance Repair Hero
Properly installing your fridge’s water line might seem daunting at first, but with attention to detail and the right tools, you can prevent costly damage and extend your appliance’s life. Remember, patience and knowledge are your best allies in this process. Are you ready to tackle this challenge and feel confident in your skills? Share your experiences or ask questions below!
.