The other day, I stood in my kitchen, exhausted and frustrated, as my microwave refused to heat my leftovers. It had been working perfectly just yesterday, then suddenly, nothing. I tried hitting buttons, unplugging it, even flipping the circuit breaker. Still nothing. That sinking feeling crept in—was it time to replace the whole unit? I didn’t want to shell out hundreds for a new microwave over a minor glitch.
Then it hit me—maybe something as simple as a door switch was at fault. You see, I had always dismissed door switches as minor components, but after digging into some DIY repair guides, I realized they play a crucial role in the microwave’s operation. If the switch isn’t signaling properly that the door is closed, the microwave won’t power on or heat.
**Discovering the Root Cause**
Imagine my surprise when I tested the door switch with a multimeter. Sure enough, it wasn’t closing the circuit as it should. A faulty switch could be the reason my microwave was dead silent and unresponsive. And here’s the good news—this is a repair I could handle myself, saving time and money.
Many folks overlook such small parts, rushing to buy new appliances when often, a simple door switch replacement can do the trick. Plus, it’s a quick fix that doesn’t require specialized tools. But before rushing into repairs, I want to share some common pitfalls and tips to ensure this fix is right for you.
**Is Replacing a Door Switch Actually Worth It?**
You might be skeptical. I get it. Who wants to mess around inside a microwave? Especially considering the high-voltage components involved. But here’s a fact—according to appliance repair experts, many microwave failures stem from door switch issues, and these are among the most straightforward repairs.
Early on, I made the mistake of assuming that if my microwave wasn’t heating, it was a fuse or magnetron problem. That assumption led me down a costly path of testing and replacing parts that were actually fine. Learning to diagnose the actual culprit saved me a lot of frustration. If you’re facing similar issues, don’t guess—you might just be staring at a simple fix.
In this post, we’ll explore exactly how to identify a faulty door switch, how to replace it safely, and when it’s best to call in a professional. Ready to bring your microwave back to life? Let’s get started!
Disconnect Power and Prepare
Before starting, unplug your microwave from the wall outlet to eliminate any risk of electric shock. Use a screwdriver to remove the screws holding the microwave’s outer panel, typically located at the back or sides. Keep screws organized for reassembly. I once neglected this step and accidentally dropped a screw into the microwave, causing a short that took extra time to fix.
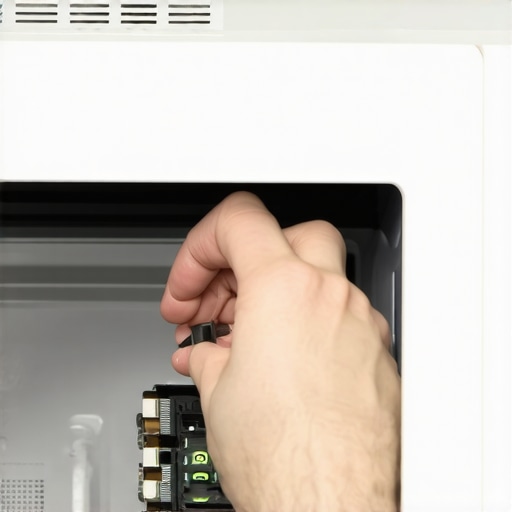
Access the Door Switch Assembly
Carefully slide off or unscrew the outer casing to expose the internal components. Locate the door switch, usually near the latch mechanism. Take note of the switch’s wiring and positions. Remember, different models vary; consulting your microwave’s manual can save time. While doing this, I realized my model’s switch was hidden behind a panel, so I had to remove additional screws, extending the repair time but preventing damage.
Test the Faulty Switch
Use a multimeter set to continuity mode to test the switch. Disconnect the wiring terminals from the switch. Place the probes on the switch terminals and press or release the door latch. A good switch will show continuity only when the door is closed. My multimeter confirmed the switch was dead, preventing the microwave from activating. Testing this avoided unnecessary replacement of other parts.
Remove and Replace the Switch
Unscrew or unclip the faulty switch from its mounting. Disconnect the wiring harness carefully. Install the new switch in the same position, securing it firmly. Reconnect the wiring as per original configuration. During my replacement, I double-checked the wiring to ensure no loose connections, which could cause future issues. If you’re unsure, refer to model-specific diagrams available online or in the manual.
Reassemble and Test
Replace any panels or covers, securing all screws tightly. Plug the microwave back into the outlet. Test the door latch by closing the door and pressing the start button. The microwave should power on and heat as expected. I tested multiple times to confirm success. If it still doesn’t work, recheck wiring connections or consider consulting a professional to ensure safety and functionality. For more troubleshooting techniques, you might find insights at this guide.
 Many homeowners assume that requesting same-day appliance repair guarantees quick, hassle-free fixes, but that’s a misconception. In reality, *not all same-day services are created equal*; some providers promise rapid appointments but struggle with scheduling delays, especially during peak seasons. Furthermore, consumers often believe that warranty coverage is a safety net for any failure, yet many overlook the fine print—such as coverage exclusions for improper installation or non-OEM parts—which can void warranties unexpectedly.
A common myth is that all installers follow best practices, but subpar installation can lead to issues down the line, like inefficient operation or even safety hazards. For instance, improperly leveled washing machines can cause excessive vibration and early breakdowns. Don’t fall into the trap of rushing through installation without verifying the technician’s credentials or adhering to manufacturer guidelines.
Let’s examine an advanced issue: *Is your warranty still valid if your appliance was installed by a third-party company?* According to industry experts, warranties often require professional installation that complies with specific standards. Skipping this step can lead to costly repairs that aren’t covered—meaning the investment in a warranty becomes meaningless if the initial setup was flawed.
Moreover, many miss the nuances of appliance warranties relating to smart features. For example, warranty coverage can become void if software updates are applied improperly or if third-party accessories interfere with device operation. Always review your warranty policy or consult the manufacturer directly to understand what actions might void your coverage.
On the topic of repair timing, be wary of providers that offer immediate service but lack transparency about parts availability or tech expertise. An engineer arriving within hours isn’t helpful if they lack experience with your specific model. This ‘flash’ approach may lead to temporary fixes rather than long-term solutions.
I recommend checking comprehensive guides on appointment scheduling and warranty conditions—like this detailed [warranty transfer guide](https://discountappliancehub.com/the-warranty-trap-of-using-non-oem-replacement-parts)—to avoid costly misunderstandings. Understanding these nuances can save you time, money, and frustration.
Have you ever fallen into this trap? Let me know in the comments.Maintaining your home appliances over time requires more than just initial setup; it demands specific tools and methods to ensure longevity and optimal performance. One of my go-to tools is a quality multimeter, which I use not only to test switches and wiring but also to diagnose complex electrical issues quickly. Investing in a reliable multimeter like the Fluke 115 allows me to accurately measure voltage, continuity, and resistance, helping me identify faults before they escalate. This proactive approach has saved me significant money and hassle, especially with high-demand appliances like refrigerators and washing machines.
Another tool I swear by is a digital level, which I use to ensure appliances are perfectly aligned during installation or releveling. Proper leveling prevents unnecessary wear and tear, extending the life of components and maintaining energy efficiency. For example, correctly leveling your washer using a digital level can prevent unbalanced vibrations that cause premature drum bearing failures.
In addition to physical tools, software solutions such as appliance-specific diagnostic apps have become increasingly valuable. These apps can troubleshoot common problems, guide repairs, and even connect you directly with manufacturer support. For instance, smart refrigerators with Wi-Fi capabilities can be diagnosed remotely, saving you the wait for a technician by prompting simple fixes like software updates or component resets.
Looking toward the future, I predict that integrating IoT (Internet of Things) sensors with maintenance tools will become standard. These smart sensors will continuously monitor appliance health, alerting homeowners to issues before they become costly repairs or failures. Imagine receiving a notification that your refrigerator’s compressor is nearing its end of life, allowing you to plan replacements proactively.
**How do I maintain appliances over time?** Regular cleaning and inspection are key. For instance, cleaning your refrigerator’s condenser coils every six months can drastically improve efficiency and reduce strain on the compressor, preventing early breakdowns. Also, periodically testing electrical connections with a multimeter ensures safe operation. For example, a loose or corroded connection can lead to intermittent failures, which can be diagnosed early.
Ensure you check out detailed guides on specific maintenance routines—like maintaining your washer’s suspension system or leveling your dishwasher properly—to stay ahead of potential problems. Regularly updating your diagnostic tools and adopting smart monitoring systems will help you catch issues early, saving money and extending the lifespan of your appliances. For additional insights on troubleshooting and maintenance, consider exploring resources like [this comprehensive guide](https://discountappliancehub.com/why-your-washer-is-tearing-your-delicate-clothes).
What The Toughest Repair Taught Me About Staying Ahead
One of the most valuable lessons I learned was the importance of thorough diagnosis before jumping into repairs. Rushing to replace parts without testing can lead to unnecessary expenses and prolonged downtime. Patience and proper testing, like using a multimeter on a door switch, reveal the real culprit. This insight has kept my repairs efficient and cost-effective, reminding me that sometimes, the simplest solution is hidden in plain sight.
How Knowing When to Call a Pro Saved My Equipment—and My Peace
I once tried to fix my microwave’s door latch myself, only to realize I lacked the proper tools and safety knowledge. Recognizing when a problem exceeds my skill set prevented potential injuries and further damage. This experience underscored the value of knowing your limits, and that professional technicians are often crucial for complex or high-voltage appliances. Respecting this line not only keeps you safe but ensures your appliances are repaired correctly the first time.
The Single Most Unexpected Thing That Saved Me Money
Discovering that some repairs, like replacing a door switch, are surprisingly straightforward empowered me to handle small issues myself. However, I also learned that investing in quality diagnostic tools, such as a reliable multimeter, pays dividends over time. By diagnosing issues accurately, I avoided unnecessary replacements, saving hundreds. This approach turned a potential expense into an opportunity for hands-on learning and cost savings, proving that a little knowledge and the right tools can turn appliance repair into a rewarding DIY experience.
Curated Recommendations for Smarter Appliance Care
- Multimeter Like Fluke 115: A trustworthy tool that provides precise measurements, essential for safe and accurate troubleshooting, trusted by pros and amateurs alike.
- Repair Guides from Discount Appliance Hub: Comprehensive, model-specific instructions help you avoid common pitfalls and ensure safe repairs.
- Extended Warranty Plans: Protect your investment and gain peace of mind, especially for high-value smart appliances, by choosing plans that fit your needs.
- App-Based Diagnostic Tools: Smartphone apps that connect with smart appliances, offering real-time troubleshooting and reducing repair times—making maintenance less daunting.
Take Control and Keep Your Appliances Running Longer
Mastering basic repairs and maintenance can transform how you care for your home. Start small, learn continuously, and don’t hesitate to seek professional help when needed. Whether it’s replacing a door switch or adjusting your washer’s level, each step builds confidence and saves money. Remember, your appliances are an investment—protect them with knowledge, proper tools, and a proactive mindset. Ready to become the home repair hero? Share your experiences or questions below, and let’s learn together!
,