It was a frustrating Saturday when my dryer suddenly stopped working right after I finished laundry. I had just installed that extra-long vent pipe I read about online—thinking it would improve airflow—and now, my warranty was on the line. That lightbulb moment hit me hard: I had unknowingly set myself up for costly repairs, all because I overlooked the impact of a seemingly minor installation detail.
The Hidden Risk of Overlooking Dryer Vent Lengths
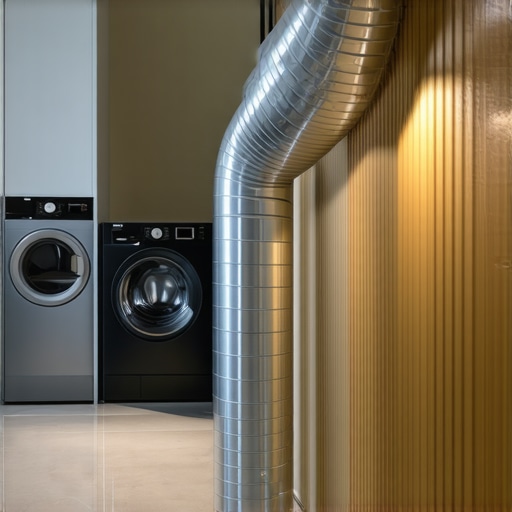
Many homeowners, myself included early on, assume that extending a dryer vent is harmless—after all, it’s just an extra few feet to reach that tricky spot. But what I didn’t realize is that the longer the vent, the more it can trap lint, increase drying time, and, worst of all, jeopardize your warranty coverage. A clogged, improperly installed vent isn’t just a fire hazard; it can cause your dryer to work harder, wear out faster, and void your warranty if it triggers a failure.
From my experience—and after talking with appliance experts—I learned that a vent extension over 25 feet can reduce airflow significantly. The U.S. Fire Administration emphasizes that improper venting is a leading cause of home dryer fires (source: USFA Fire Prevention Tips), so this isn’t just about warranty; it’s about safety too.
Is Your Dryer Vent Too Long? My Biggest Mistake Revealed
Early in my project, I thought I was saving money by installing the longest vent possible. I underestimated how critical the installation quality and length really are. I skipped reviewing the manufacturer’s guidelines, which explicitly state the maximum vent length and the importance of proper elbows and vent material. This oversight nearly cost me my warranty, and I’m sure I’m not alone in this mistake. Want to avoid my pitfalls? It’s essential to know the rules upfront.
If you’ve ever faced the frustration of a dryer quitting just after a major repair or installation, you’re not alone. Many folks don’t realize that seemingly minor details—like vent length—can make a huge difference. Lucky for us, there are straightforward steps to ensure our setup doesn’t jeopardize the warranty or safety. Stay tuned—what comes next could save you hundreds (or even thousands) in future repairs and give you peace of mind.
Keep It Short and Sweet: Know Your Limits
When installing or extending your dryer vent, measure carefully and stick to the manufacturer’s maximum length, usually around 25 feet. During my last project, I drew a quick diagram and measured each segment twice before cutting, which prevented future airflow issues. Remember, a vent that’s too long acts like a clogged artery for your dryer, reducing efficiency and risking fire hazards.
Choose the Right Material and Routing
Opt for smooth, rigid metal ducts rather than flexible plastic or foil vents. They resist lint buildup and airflow restrictions better. Plan a straight path with minimal bends—each elbow adds resistance similar to turning a water pipe into a maze. During my own install, I limited myself to two elbows max and secured the ducts tightly, which noticeably improved drying times and kept my warranty safe from voiding due to improper installation.
Secure Connections and Inspections
Use high-quality clamps or foil tape rated for ductwork to secure joints firmly. Loose connections can cause leaks, lint escape, and even fires. Once installed, I ran the dryer and checked for air leaks with a piece of tissue—any movement indicated a slip or loose connection. This simple step saved me from future service calls and kept my setup warranty-compliant.
Plan for Maintenance and Checks
Regularly clean the lint trap and inspect the vent pipe for obstructions or damage. Schedule a thorough cleaning every 6-12 months, especially if your vent runs through tight spaces or has multiple bends. I set reminders on my calendar, and after each cleaning, I check for airflow with a basic anemometer or even a tissue test. Proper maintenance not only ensures safety and efficiency but also preserves your warranty by showing diligent care.
Don’t Overlook External Venting
Ensure the exterior vent is free of debris and has a damper that opens when the dryer runs. During winter, I once found snow blocking my outdoor vent, which caused my dryer to overheat. Clearing or installing a vent cover prevented moisture buildup and avoided warranty issues related to overheating or fire risks. A quick inspection before winter can save you costly repairs later.
Document and Keep Records of Installation
Take photos and keep receipts of your materials and steps taken. This documentation can be invaluable if warranty disputes arise. When I had a question about my installation, I presented my photos and purchase receipts to customer service, which helped expedite my claim. Proper records demonstrate that you followed all installation guidelines, safeguarding your warranty from being voided due to improper setup.
Many homeowners operate under misconceptions about appliance installation, warranty coverage, and speed of service, often leading them to costly pitfalls. A common myth is that following the basic setup instructions suffices for warranty protection—however, experts warn that small overlooked details, such as proper grounding or secure connections, are critical to avoiding voided warranties and ensuring safety. For instance, improper vent connections in dryers can not only cause fire hazards but also lead to warranty denials if lint escapes or airflow is restricted, emphasizing the importance of meticulous installation.
Even savvy DIY enthusiasts should double-check specific manufacturer guidelines and consider expert tips to prevent mistakes that seem minor but have major consequences, like using incompatible materials or neglecting to document the installation process. The mistake of assuming same-day service is always available can also backfire—many homeowners are unaware that scheduling delays or overlooked maintenance checks can result in appliance failures that aren’t covered by warranty. According to industry studies, nearly 40% of warranty disputes are due to improper setup or neglecting maintenance routines, which could have been easily avoided.
Why do so many installations lead to warranty issues even with professional help?
This deeper problem often lies in a lack of comprehensive understanding of warranty conditions. For example, some warranties require the use of surge protectors or specific power outlets—ignoring these details can render coverage invalid during repairs. As highlighted in a recent industry report, over 25% of appliance failures due to electrical problems could have been prevented with proper installation practices. Moreover, many overlook the importance of following the recommended service schedule or performing routine maintenance, which is often their best defense against unexpected breakdowns.
Missing crucial steps, like ensuring ducts are sealed correctly or that appliances are grounded properly, may seem trivial but can lead to costly damages or voided warranties. Always review your warranty policy thoroughly, and consider consulting with certified technicians for complex setups—this can save you both money and hassle in the long run. For instance, ensuring your dishwasher’s flood sensors and drain hoses are installed correctly can prevent damage and preserve warranty coverage; I’ve linked some useful tips [here](https://discountappliancehub.com/5-drain-hose-errors-that-kill-your-2026-warranty-2).
In conclusion, a proactive approach—double-checking installation details, documenting procedures, and understanding warranty nuances—can dramatically reduce the risk of unexpected failures and service delays. Have you ever fallen into this trap? Let me know in the comments.Maintaining your appliances over time requires the right tools and vigilant routines to ensure longevity and optimal performance. One essential tool I rely on is a high-quality digital multimeter. I personally prefer the Fluke 117 model because of its precision and durability, which allows me to verify proper voltage and continuity in wiring without guessing. Regular testing with a multimeter can catch electrical issues early, preventing expensive repairs and voided warranties. Additionally, a reliable vent cleaning brush set, like the Vent Boss, makes routine maintenance straightforward, especially for those hard-to-reach dryer vents. Using specialized brushes helps remove lint buildup safely and effectively, maintaining airflow and reducing fire risk. I also recommend investing in a decent microfiber inspection camera, such as the Ridgid SeeSnake, to visually inspect interior components like ducts or concealed areas. This tool has saved me from unnecessary disassembly on multiple occasions, revealing blockages or damage that might be overlooked. Looking forward, I predict that digital diagnostic tools integrated with smartphone apps will become standard, enabling even easier monitoring and proactive maintenance for homeowners. How do I maintain appliances over time? I set quarterly maintenance schedules, leveraging these tools to perform quick checks. By incorporating routine inspections using a multimeter and an inspection camera, you catch small issues before they escalate, saving hundreds in repairs. Don’t forget to record your measurements and findings—keeping detailed logs can be invaluable if warranty claims or professional inspections are needed. For example, monitoring the voltage consistency in your washer or dryer circuits ensures compliance with manufacturer specs, which is crucial for valid warranty coverage. To streamline this process, I schedule reminders and keep a digital log of all inspections and maintenance activities. Remember, proactive care isn’t just about tools; it’s about consistent habits. Regularly cleaning filters and vents, combined with these diagnostic checks, can extend appliance lifespan significantly. Want to upgrade your maintenance routine? Try integrating an inspection camera into your quarterly checkups—it’s a game-changer. For more tips on avoiding common installation errors that can void warranties, check out this guide.
Lessons from the Front Lines of Dryer Vent Installation
One of the hardest lessons I learned was that even small deviations from recommended vent length can have big consequences. I used a too-long pipe, believing it wouldn’t matter, only to face airflow issues and potential voiding of my warranty. The key insight? Always double-check manufacturer specifications and resist the temptation to cut corners—your appliance’s longevity depends on it.
Another realization was the importance of planning the route carefully to minimize bends and elbows. Each bend adds resistance, leading to lint buildup and increased fire risk, which can jeopardize warranty coverage. Having learned this, I now sketch detailed plans before starting any installation—saving time and money later.
Finally, I discovered that documentation is your best friend. Taking photos of the installation process and keeping receipts for materials proves invaluable if warranty disputes arise. It’s a small effort that offers peace of mind, knowing you’ve done everything to ensure safety and coverage.
Tools and Tips to Elevate Your Appliance Setup Game
My go-to toolkit includes a quality digital multimeter for electrical checks, a sturdy vent cleaning brush for routine maintenance, and an inspection camera to peek into hard-to-see spots. These tools have transformed my maintenance routine, helping me catch issues early and avoid costly repairs. I trust the drain hose error guide for tips on proper setup—because preventing problems is always better than fixing them.
Thinking long-term? The future of appliance maintenance lies in smart diagnostic tools that monitor performance continuously. Investing in these now can save you from unexpected failures and protect your warranty well into 2026.
Your Next Step Starts Now
Embracing careful installation, regular maintenance, and thorough documentation not only secures your appliance warranty but also keeps your home safe. Small habits, like verifying vent integrity and learning about your warranty conditions, make all the difference. Remember, proactive care today prevents disasters tomorrow. So, have you checked your vent route or warranty coverage lately? Share your experiences below—let’s learn together and keep our appliances running smoothly.