
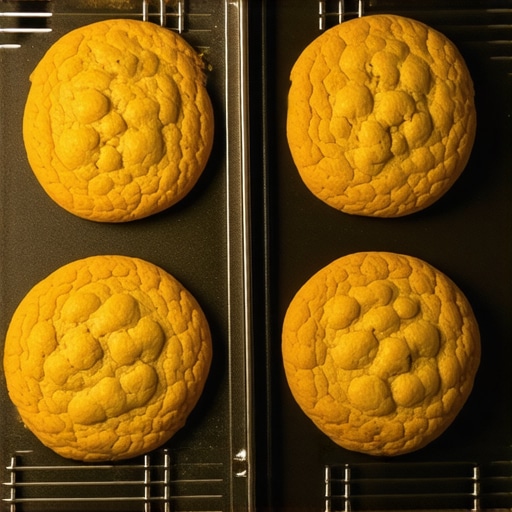
I remember the Great Chocolate Cake Disaster of 2018 like it was yesterday. I had spent three hours prepping for my niece’s birthday, only to pull a tray out of the oven that looked like a science experiment. The left side of the cake was a beautiful, springy cocoa dream; the right side was a charred, blackened brick that smelled like regret. I felt like a failure as a baker, but then I realized the truth. My oven was lying to me. It wasn’t my recipe or my mixing technique—it was an internal temperature war happening right behind that glass door. If you have ever felt the sting of a half-baked lasagna or a tray of cookies that vary from doughy to burnt in a six-inch span, I am here to tell you that you aren’t crazy. Your oven has a ‘hot side,’ and today we are going to figure out exactly why it’s behaving like a moody teenager. [image-placeholder]
Stop Blaming Your Baking Sheets for the Burnt Edges
Usually, when one side of our food cooks faster, our first instinct is to blame the pan or rotate the tray every five minutes like a nervous parent. But the real culprit is often hidden. In my early days, I made the classic mistake of thinking I just needed heavier bakeware. I spent a fortune on ‘professional-grade’ sheets, only to find the same lopsided results. The reality is that why your oven temperature is suddenly inaccurate usually comes down to airflow and heating element health, not the weight of your cookie sheet. Most residential electric ovens use two elements and a fan (if it’s convection), and when one of those components starts to lag, the heat distribution becomes a chaotic mess. According to the Association of Home Appliance Manufacturers (AHAM), standard residential ovens are designed to operate within a specific ‘swing’ of temperatures, but when that swing hits 30 or 40 degrees on just one side of the cavity, your soufflé doesn’t stand a chance. We are going to look at everything from why your oven temperature sensor needs a calibrated adjustment to the simple physics of how you’re stacking your racks. Have you noticed your oven treats the back-left corner like a blast furnace while the front-right stays lukewarm?
Is My Oven Just Cheap or Actually Failing Me?
It is the question every frustrated home cook asks eventually. The truth is that even high-end models can suffer from ‘hot spots’ if they weren’t leveled correctly or if the insulation has started to settle. Sometimes, it’s a matter of the proper clearance needed to prevent oven overheating, which can trap air in pockets you didn’t even know existed. I’ve seen folks nearly give up on cooking entirely, thinking they need a total kitchen renovation, when a simple expert guide to appliance repair and installation today would have pointed out a failing door gasket or a slipped rack. We are going to dive into the mechanical reasons behind this lopsided heat so you can stop babysitting your timer and start trusting your kitchen again.
Find the Hot Spots with the White Bread Trick
If you want to stop the guessing game, you have to visualize the heat. I call this the ‘Toast Map’ phase. It is a low-tech solution for a high-tech frustration. Buy a loaf of the cheapest white bread you can find and line your oven rack with slices, edge to edge. Set the oven to 350°F and watch them through the glass. After about 10 minutes, pull the rack out. Those dark, charred corners are your ‘blast zones,’ and those pale, soft slices are your ‘dead zones.’ This physical map is your blueprint for pan placement. It’s also the first thing you should show when inquiring about what to expect from same-day appliance repair experts, as it proves the variance is mechanical and not just your imagination. 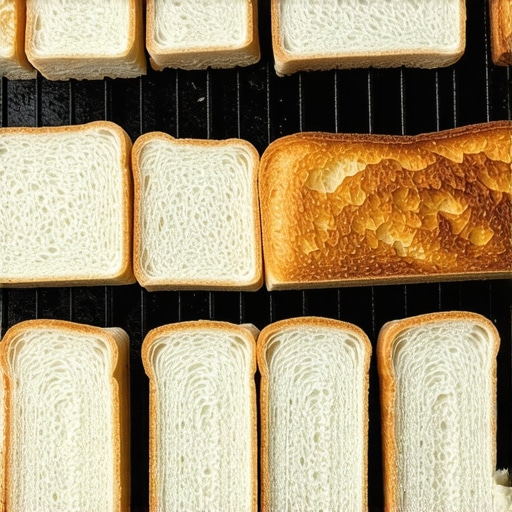
What the Burn Pattern Tells You
A concentrated burn in one corner usually suggests a failing heating element or a misaligned convection fan. If the toast is consistently darker in the back, your oven may be losing heat through a faulty door seal at the front. If you notice the heat is wildy inconsistent across the entire rack, it is time to investigate why your oven temperature sensor needs a calibrated adjustment. This sensor is a thin metal probe, usually in the back corner. If it’s touching the wall or covered in years of baked-on grease, it’s going to give the control board bad data. It’s like trying to check the weather while standing next to a space heater—the sensor is only as good as the air it can actually touch.
Level the Playing Field for Your Pans
I learned the importance of leveling the hard way. I was obsessed with French macarons—those finicky little cookies that require absolute precision. One afternoon, my left-side cookies had perfect ‘feet,’ while the right side looked like melted plastic. I checked the temp, the humidity, and even my folding technique. Finally, I put a carpenter’s level on the oven rack. The right side was dipped by nearly half an inch. The heat was pooling in the high corner while the cold air settled in the dip. Following an expert guide to appliance repair and installation today, I adjusted the leveling legs and saw immediate results. Don’t forget to ensure the anti-tip bracket every range installation needs is still secure when you move the unit to adjust those feet.
Stop Choking Your Oven Airflow
Think of your oven like a wind tunnel. If you use oversized baking sheets that touch the side walls, you are effectively cutting the oven in half. The heat gets trapped underneath the pan, causing the bottom of your food to burn while the top stays raw. Always leave at least two inches of space around all sides of your bakeware. Furthermore, if you’ve shoved your range too close to the rear wall, you might be violating the proper clearance needed to prevent oven overheating. This can cause the internal electronics to overheat and the airflow to stagnate, leading to those permanent ‘hot spots’ that ruin your Sunday roast.
Beyond the physical layout of your oven, there is a legal and mechanical layer most people ignore until it’s too late. While we’ve been talking about toast maps and leveling legs, I’ve found that the biggest headache isn’t just a burnt cookie—it’s the realization that your warranty might not actually cover the fix for that failing heating element. Most homeowners assume that a warranty is a blanket of protection that covers any glitch for the first year. I’m here to tell you that’s a dangerous myth. In my years of troubleshooting kitchens, I’ve seen more claims denied than approved because of simple paperwork errors or DIY shortcuts that seemed harmless at the time. If you don’t know the one maintenance record that saves your appliance warranty claim, you are basically paying for a piece of paper that won’t help when your control board fries.
Why Your Warranty Isn’t the Safety Net You Think It Is
Everyone says the manufacturer is obligated to fix a defective unit, but in my experience, the burden of proof is entirely on you. A study by Consumer Reports indicates that while one in five appliances will fail in the first five years, the ‘fine print’ regarding professional installation often leaves homeowners paying out of pocket for repairs they thought were covered. If you installed that range yourself and didn’t follow the local electrical code to the letter, you might be facing the reason your warranty claim was denied before a technician even steps into your house. Manufacturers are increasingly looking for ‘improper installation’ as a way to avoid high-cost repairs on modern, sensor-heavy units. This is why learning how to ensure reliable appliance installation in 2025 is more about legal protection than just getting the oven to turn on.

Can My Installation Choices Actually Void the Manufacturer’s Coverage?
The short answer is a resounding yes. The ‘oops’ factor here is usually the box. Most people toss the packaging and the little plastic bag of documents immediately. However, the warranty document you must save before discarding the box often contains the specific service codes and proof-of-purchase requirements that third-party repair teams need to bill the manufacturer instead of you. Furthermore, many people fall into the trap of ‘same-day service’ promises that end up being anything but. You might find affordable same-day appliance fixes with warranty benefits, but you have to be careful that the technician is actually authorized by your brand. If an unauthorized repairman opens that back panel, your remaining warranty is often vaporized instantly. I always tell my readers to double-check their technician’s credentials before they let a screwdriver touch a screw.
The Secret to Keeping Your Protection Valid
If you want to stay ahead of the game, you need to treat your appliance like a car. You wouldn’t expect a car warranty to cover a seized engine if you never changed the oil. In the kitchen, this means keeping a log. Knowing how to prove periodic maintenance to keep your warranty valid—like cleaning the cooling fans and checking the door gaskets—is your best defense. When you can show a technician a log of when you last calibrated the temp sensor, it proves you aren’t the cause of the failure. This level of diligence allows you to maximize your appliance warranty during emergency repairs without the stress of a surprise $400 bill. Have you ever fallen into this trap or had a warranty claim rejected for a silly reason? Let me know in the comments.
I used to think my eyes and a basic thermometer were enough to diagnose a failing oven, but I was wrong. I finally bit the bullet and invested in a smartphone-compatible thermal imaging camera. This single tool changed my perspective on kitchen maintenance forever. Instead of guessing why the left side of my tray was burning, I could see the exact ‘thermal bloom’ escaping through a degraded door gasket. Having this kind of specific, visual data is your best friend when you are navigating the wear and tear clauses that might void your warranty. If you can prove to a service technician that a component is failing due to a manufacturing defect rather than simple neglect, you gain a massive advantage in any claim dispute.
Upgrade Your Diagnostic Kit with Thermal Tech
Beyond fancy cameras, I keep a dedicated ‘Kitchen Vitality’ folder on my phone. It is not just for recipes; it is where I store high-resolution photos of every model sticker and the original wiring setup. This level of documentation is crucial because how to ensure reliable appliance installation in 2025 often comes down to verifying that a sub-contractor did not skip the grounding wire or use a generic power cord. I have found that even a slightly loose connection can lead to the control board solder joint that kills your range, turning a ten-dollar wiring fix into a total control board replacement that costs hundreds.

Why Your Electrical Panel is Secretly Sabotaging Your Baking
I believe the future of our kitchens lies in ‘predictive telemetry,’ a trend where your appliances will eventually email you a diagnostic report before a part even fails. Until then, we have to be our own advocates. I strongly suggest you check your electrical panel today. According to the National Electrical Code (NEC) Section 210.52, most major kitchen appliances require dedicated circuits. If your range is sharing juice with a heavy-duty dishwasher or a powerful microwave on the same line, you are asking for voltage drops that mess with sensitive digital sensors. It is a simple physical check that can save your electronics from a slow, painful death. Using an expert guide to appliance repair and installation today to verify your home’s setup is up to code can prevent those phantom ‘error codes’ that haunt modern smart ovens.
How do I keep my oven calibrated for the long haul?
Maintenance is not a one-time event; it is a rhythm. Every six months, I perform a ‘re-zeroing’ of my digital controls. Most modern ovens allow you to offset the temperature by up to 35 degrees through the deep settings menu. If my independent probe tells me the oven is consistently 10 degrees cold, I adjust the offset right then. I also make it a point to inspect the heating elements for ‘blistering.’ If you see a spot on the metal element that looks like a bubbling scab or a discolored bulge, it is about to fail. Spotting this early allows you to look into scheduling your appliance repair for same-day service in 2025 before you are stuck with a raw dinner on a busy weeknight. You want to be the proactive homeowner who catches the glitch early, rather than the one begging for an emergency holiday visit.
I’ve spent years analyzing why some ovens thrive while others die young, and the most significant lesson I’ve learned is that a manufacturer’s warranty isn’t a gift—it is a contract you have to defend with data. One massive lightbulb moment occurred when I realized that most homeowners lose their protection because they treat their kitchen like a set-and-forget zone rather than a precision environment. You need to be proactive, ensuring you have warranty-backed appliance services you can rely on before a major failure happens. I’ve seen claims vanish into thin air because a DIYer didn’t realize that documenting a simple cleaning could be the difference between a free repair and a $500 bill.
The Hard Truth About Protecting Your Investment
Here are the reflections that changed how I manage my own kitchen:
- Documentation is your best defense: If you don’t have the one maintenance record that saves your appliance warranty claim, you are essentially flying blind. I keep a physical log of every time I level the racks or recalibrate the sensor.
- DIY is a double-edged sword: While I love a good home fix, I’ve learned that opening the control panel myself can void a five-year protection plan. I now only perform external maintenance.
- Installation is the foundation: Most ‘hot spots’ are actually caused by poor leveling during the initial setup. Getting it right the first time is why I always emphasize how to ensure reliable appliance installation in 2025 as the most important step in a kitchen renovation.
[image-placeholder]
Tools That Actually Tell the Truth About Your Oven
You cannot fix what you cannot measure. Beyond the white bread ‘toast map,’ I recommend building a small diagnostic kit. I personally trust an independent digital probe thermometer over the oven’s built-in display every single time. Most built-in sensors are calibrated to the average of the whole cavity, not the specific spot where your cake is sitting. I also suggest keeping the warranty document you must save before discarding the box in a dedicated digital folder. These tools, combined with a simple carpenter’s level, will solve 90% of the baking issues you encounter without needing a professional technician.
Take Back Your Sunday Roast
It is time to stop letting a moody heating element dictate the quality of your meals. When you understand the physics of airflow and the legalities of your warranty, you stop being a victim of your appliances and start being their master. Whether it is a simple leveling adjustment or an expert guide to appliance repair and installation today, the power to achieve perfectly even browning is in your hands. Don’t be afraid to poke around, measure the gaps, and demand the performance you paid for. What is the most frustrating ‘half-burnt, half-raw’ meal you’ve ever had to serve? Let me know in the comments below!