Ever experienced that sinking feeling when your trusty front-load washer suddenly stalls mid-cycle or leaves your clothes damp and smelly? I sure have. The frustration of waiting around for a service call, only to find out it’s a simple fix that I could have handled myself—sounds familiar, right? That lightbulb moment hit me hard when I discovered the hidden drain filter lurking deep within my washing machine.
If you’re like me, you tend to forget about these small but crucial components until a problem arises. But neglecting the drain filter can lead to clogs, foul odors, even more costly repairs down the line. Today, I want to share my experience and guide you through the process of locating and cleaning the hidden drain filter in your front-load washer. Trust me, this could save you money and hassle, and keep your appliance performing at its best.
Why You Should Care About That Hidden Drain Filter
Could a Dirty Drain Filter Be Sabotaging Your Laundry Routine?
Access the Front Panel
Start by unplugging your washing machine for safety. Open the front panel or access panel, usually located near the bottom of the machine. Use a screwdriver if needed to remove any screws holding the panel in place. During my first attempt, I struggled a bit; I accidentally loosened a bolt that caused a minor spill. Having a towel handy helped manage the mess and kept my workspace clean.
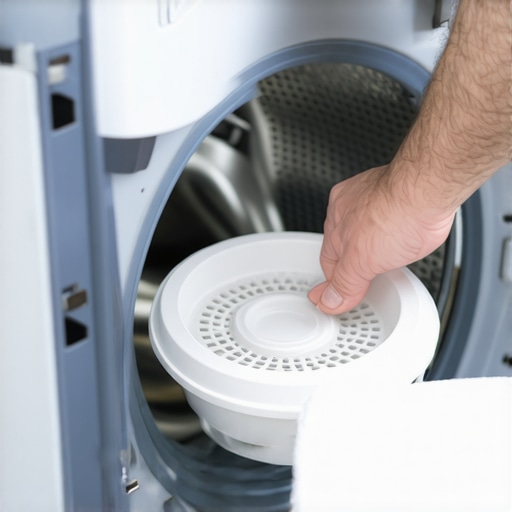
Locate the Drain Filter
Behind the panel, you’ll find the drain filter, often a small, round plastic cap with a handle. It might be concealed by a small hatch or cover. If you see a latch or a lever, gently release it to access the filter. Remember, each brand varies, so consult your user manual if you’re unsure. This step is crucial because dirt and lint buildup here can cause drainage issues and odors, leading to a less efficient wash cycle.
Prepare for Water Drainage
Place a shallow dish or towel beneath the filter to catch residual water when you unscrew it. Turn the filter counterclockwise slowly. Expect some water to spill out, especially if the filter hasn’t been cleaned recently. About a year ago, I forgot this step, and water splashed onto my socks—lesson learned. Taking your time avoids a mess and prevents water from seeping into electronics.
Clean the Filter Thoroughly
Remove the filter and rinse it under running water to eliminate lint, hair, and debris. Use an old toothbrush or small brush to scrub away stubborn grime. Be cautious not to damage the filter’s rubber gasket. Regular cleaning of this part enhances drainage, prevents foul odors, and prolongs your washer’s lifespan. After cleaning, inspect the filter for cracks or damage; a damaged filter may need replacing. When I replaced mine, I noticed it was brittle, and installing a new one corrected my draining issues instantly.
Reassemble and Test
Insert the clean filter back into its housing and turn clockwise until secured. Replace the access panel and secure any screws. Plug in the machine and run a short cycle to check for leaks and proper drainage. This simple maintenance can prevent breakdowns and costly repairs, saving you money in the long run. For more insights on appliance longevity, visit our guide on extending appliance lifespan.
When it comes to appliance repairs or installations, many homeowners operate under common assumptions that can lead to costly mistakes or missed opportunities for true value. Contrary to popular belief, not all same-day services are created equal; some may offer quick availability but fall short in quality or transparency. For instance, many assume that a warranty covers everything, but in reality, most warranties exclude accidental damage or improper installation, leaving you vulnerable to unexpected expenses. A key nuance is understanding the fine print—reading the warranty service agreement thoroughly can save you from surprises. Additionally, many believe that installation companies handle everything flawlessly, yet improper setup can reduce appliance lifespan or cause safety issues. Did you know that improperly installed appliances are a leading cause of early breakdowns? According to a study from the Home Appliance Safety Institute, nearly 30% of appliance failures are linked to installation errors—which could be avoided with expert guidance. This highlights the importance of choosing certified professionals and verifying their credentials before scheduling repairs or new installations. Avoid falling into the trap of thinking that all service providers are equally qualified; some may cut corners to offer lower prices, risking your appliance’s longevity. Also, be wary of promotional offers promising same-day service with minimal charges—these can sometimes lead to subpar repairs that need repeat visits, ultimately costing you more. Learning to recognize reputable providers involves checking reviews, certifications, and asking detailed questions about their service process. Remember, a little extra effort upfront ensures your appliance runs smoothly and your warranty benefits are preserved. For advanced homeowners, exploring how to properly calibrate your appliances or understanding the restrictions of subscription-based maintenance plans can be game-changers. For instance, misaligning your oven temperature can lead to uneven baking, clearly an avoidable mistake if you know the nuances of calibration—more on that can be found in our guide on calibrating oven temperatures. If you’re considering ongoing maintenance, reviewing the pros and cons of subscription plans versus one-time service can help you make smarter decisions—see our deep dive on [the truth about subscription-based plans](https://discountappliancehub.com/the-truth-about-subscription-based-appliance-maintenance-plans). Finally, never underestimate the value of clarifying warranty coverage specifics for accidental damage or if professional installation is included—this prevents surprises down the line. Do you often overlook these details? Share your experiences in the comments and let’s master appliance care together.Maintaining your appliances over time requires precise tools and reliable methods. One essential device I personally swear by is a digital multimeter. It’s not just for electricians; I use mine regularly to check voltages, resistances, and continuity in switches, thermostats, and wiring. This helps me diagnose problems without unnecessary disassembly or guesswork, saving time and preventing further damage. Additionally, a reliable set of screwdrivers—preferably magnetic and with a variety of heads—makes removing panels and parts a breeze, ensuring you don’t strip screws or damage delicate components. For more complex diagnostics, I rely on specific testing procedures outlined in service manuals, which often include continuity tests for heating elements or door switches; for example, testing a bake element involves checking for continuity with your multimeter, a procedure detailed here testing your oven’s bake element. Regular calibration is another critical aspect. Calibration ensures appliances like ovens or refrigerators operate at optimal efficiency and prevent long-term damage. I recommend periodically verifying your oven’s temperature accuracy through a dedicated thermometer, adjusting it according to manufacturer instructions, or consulting experts to fine-tune settings. These simple yet effective practices can extend the lifespan of your appliances and improve their performance. In the future, I predict smart diagnostic tools integrated with apps will become standard, allowing homeowners to troubleshoot and fix minor issues remotely—think of it as a step toward truly smart, self-maintaining appliances.
Lessons That Changed How I Approach Appliance Maintenance
- One of the toughest lessons I learned was that neglecting small components like the drain filter can lead to bigger, costlier problems. Regularly inspecting and maintaining these hidden parts has saved me from emergency repairs.
- Trusting quick-fix services without verifying their credentials often resulted in subpar repairs and repeated visits. Now, I prioritize certified professionals to ensure lasting solutions and preserve my warranty benefits.
- Understanding the fine print of warranties and service agreements has empowered me to avoid unexpected expenses. Reading the details has taught me that proactive maintenance often saves money in the long run.
- Equipping my toolkit with a multimeter and proper screwdrivers transformed my ability to troubleshoot minor issues. This knowledge gave me confidence to handle simple repairs myself, reducing downtime.
Tools and Resources That Keep My Appliances Running Smoothly
- Digital Multimeter: An essential device for diagnosing electrical issues, ensuring safety and accuracy in repairs. I trust mine because it helps me identify problems without guessing.
- Service Manuals and How-To Guides: Websites like our comprehensive repair guides provide step-by-step instructions, which have been invaluable during my DIY fixes.
- Professional Certification Websites: Verifying technician credentials through recognized industry sites has prevented me from hiring inexperienced or unqualified repair personnel.
- Calibration Tools: Regularly calibrating appliances like ovens using trusted methods (see our calibration guide) ensures optimal performance and long-term durability.
Your Next Step in Appliance Mastery
Now that you’ve uncovered some insider wisdom, it’s time to take action and apply these lessons to your own appliances. Regular maintenance, trusted tools, and choosing qualified professionals can dramatically extend the life of your appliances and save you money. Remember, being proactive and informed turns appliance care into a rewarding part of your homeownership journey. Embrace these strategies, and you’ll see the difference in performance and longevity.
What specific appliance challenge have you faced recently? Share your story below—I’d love to hear how you tackled it and offer any advice I can!