It happened during a busy weekend—my brand-new stove started wobbling, making the entire kitchen feel off-balance and unsafe. I vividly remember the moment I realized that the uneven stand was not just an inconvenience but a potential hazard. That lightbulb moment prompted me to dive into the best ways to fix a wobbly stove installation, and let me tell you, it’s more common than you might think. A wobbly stove isn’t just annoying; it can cause further damage over time, affect cooking performance, and even pose safety risks. So, if you’ve ever faced this frustration—trust me, you’re not alone—I promise there’s a straightforward fix that can restore your confidence in your kitchen setup.
Why a Wobbly Stove Can Be a Big Problem—and Why Fixing It Matters
A stove that isn’t sitting level isn’t just nuisancesome—it can impact everything from safety to efficiency. An uneven stove may lead to unstable pots, uneven cooking, or even hazardous situations like tipping over during use. Moreover, persistent wobbling can loosen connections or damage the countertop over time. I learned this the hard way when I ignored the wobble for too long, only to find that the uneven weight had cracked my granite surface. That was a costly mistake I avoid repeating now.
Getting your stove perfectly stable isn’t a matter of mere aesthetics; it’s about making your kitchen safer and more efficient. Plus, a level stove can actually help in extending the lifespan of your appliance. Imagine the savings if you catch a wobble early and fix it yourself! Whether you’ve installed it yourself or hired a professional, knowing how to troubleshoot and address a wobbly installation is invaluable.
For those who worry about messing up or thinking it’s a complicated task, I can reassure you—it’s often simpler than calling a technician for minor adjustments. In fact, I made a mistake early on by rushing into fixes without understanding the root cause, which only worsened the wobble. That experience taught me the importance of diagnosing correctly before trying costly solutions.
In the next sections, I’ll walk you through proven methods to stabilize your stove and ensure it stays perfectly level. Before that, though, let me ask—have you recently noticed your stove tilting or wobbling after a repair or installation? If so, don’t worry—we’ve got this covered.
Assess the Surface and Prepare for Adjustment
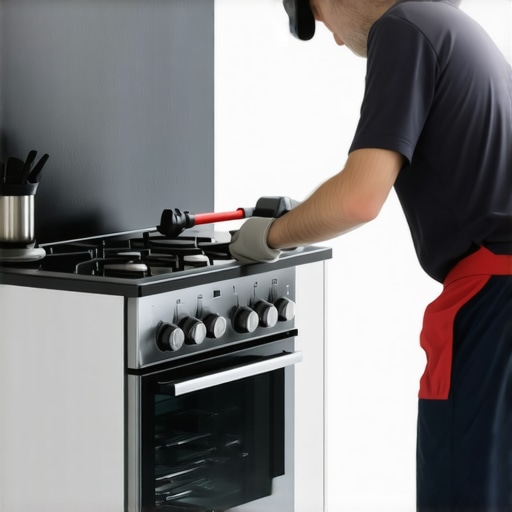
Begin by carefully inspecting the stove to identify which corner or side is uneven. Use a level if available; otherwise, place a straight object like a ruler across the surface to note unevenness. Before making any adjustments, disconnect the stove from power and gas supplies to ensure safety. Remember, safety first—it’s like turning off the main power before changing a light bulb to avoid shocks.
Determine the Type of Legs or Support Pads
Most stoves have adjustable legs or support pads. Check if your model has screw-in legs or rubber supports that can be moved. I once had a slide-in range where the adjustable legs were hidden beneath a removable kickboard panel. After removing the panel, I could access the legs easily. If you’re unsure about your model, consult the user manual or visit the manufacturer’s website for specific instructions.
Adjust Legs to Level the Stove
Using a wrench, turn the adjustable legs clockwise or counterclockwise to raise or lower each corner. Tighten the lock nuts afterward to maintain the position. Think of it like adjusting the legs on a table to prevent wobbling—small turns make a big difference. During my attempt, I started with the most uneven corner, and after a few adjustments, the wobble was gone. Keep checking with your level after each tweak, much like tuning a musical instrument.
Supplement with Support Pads or Shims
If the legs aren’t enough or are non-adjustable, use shims or support pads made of plywood, rubber, or other materials to stabilize the surface. Place them under the legs or at points where the stove contacts the countertop. I used thin cardboard shims in a pinch, which helped stabilize a wobbly gas stove. Be cautious—ensure shims are sturdy and won’t compress over time, which could reintroduce wobble. These are like tiny scaffolds that provide just enough support to keep everything steady.
Secure and Test Stability
Once adjustments are made, gently shake the stove to confirm stability. Place some weight like a heavy pan or a bag of flour on top to simulate regular use, then check for movement. If it remains stable, reconnect the power and gas, and do a quick test run to ensure everything operates safely. Remember, a stable stove isn’t just about comfort—it’s critical for safe cooking and appliance longevity. Having fixed my own stove, I learned that patience in adjusting legs and using the right support materials pays off. For more complex issues, or if your stove isn’t level after these steps, consider consulting a professional or visiting this guide on washer or appliance troubleshooting.When dealing with appliance warranties and repairs, it’s easy to fall into the trap of common misconceptions. Many assume that warranties cover all repair costs or that appliance installation is a straightforward process, but the reality is often more nuanced. Let’s dig deeper into some misconceptions and advanced pitfalls that homeowners frequently overlook.
A prevalent myth is that extending a warranty guarantees comprehensive coverage indefinitely. However, most warranties come with fine print that excludes accidental damage or certain parts, such as seals or cosmetic issues. For instance, many people don’t realize that their extended warranty might not cover damage caused by improper installation or neglect. Always read the fine print or refer to the document that most people lose, which can void your warranty entirely if not kept safe.
Another mistake is believing that same-day service means your issue will be fixed that very day. In fact, many homeowners underestimate the complexity behind scheduling repairs. Some technicians require parts to arrive first, or they need to assess the problem thoroughly before fixing it—the “oops” mistake lies in assuming instant solutions when, in reality, misdiagnosis can lead to return visits and delays. If you’re unsure about the technician’s credentials, verifying their certification is crucial. You can learn more about how to verify your repair technician on trusted sources.
Advanced Question: How can homeowners identify hidden issues during appliance repairs that might not be immediately apparent?
Detecting hidden issues requires a keen eye and understanding of certain signs. For example, a refrigerator that cools unevenly might seem fine at first but could have a faulty thermostat or low refrigerant levels. Using diagnostic tips found in guides like how to identify a bad thermostat or how to troubleshoot common problems can save you money and trouble. Remember, simple checks such as inspecting door seals or cleaning filters can reveal underlying issues that, if overlooked, could lead to larger problems down the line.
A common pitfall among homeowners is neglecting to document their appliances’ maintenance history or repair records. This simple oversight can complicate warranty claims, especially when dealing with manufacturer disputes. Always keep digital or physical copies of your repair receipts and service reports. This documentation can become invaluable if a warranty claim is contested.
Making informed decisions about repairs and warranties requires understanding the subtle distinctions between factory and extended warranties. Factory warranties typically cover specific parts and workmanship defects for a limited time, whereas extended warranties might include additional services but can also be more restrictive.
By knowing these hidden nuances, you can avoid costly mistakes and ensure your appliance repairs and warranties truly serve your interests. Have you ever fallen into this trap? Let me know in the comments.
Invest in Reliable Maintenance Tools for Peace of Mind
One of my top tips for ensuring long-term appliance performance is using quality, purpose-built tools. For example, having a digital multimeter has become indispensable in diagnosing electrical issues. I personally prefer the Fluke 117 because of its accuracy and durability—it helps me quickly determine if a component like a thermostat or fuse is functioning properly.
Another essential tool is a calibrated infrared thermometer. It allows me to spot overheating parts, such as the compressor in my refrigerator, preventing potential failures. I always check the temperature settings on my appliances to ensure they operate within manufacturer-recommended ranges, which extends their lifespan and reduces energy costs. Learn more about troubleshooting thermostats in this guide.
Why a Quality Service Software Can Save You Time
When managing multiple appliances, I rely on maintenance management software like HomeMaintenancePro. It helps me track repair dates, maintenance schedules, and warranty info—saving me from costly oversights. These tools are especially valuable when scaling repairs or setting up a small repair business, ensuring consistent service and adherence to warranties. Predicting future appliance needs is easier when you have detailed records at your fingertips.
Long-Term Results Often Depend on Routine Checks
Regularly inspecting power cords, support brackets, and seals can prevent major breakdowns. I’ve adopted quarterly maintenance routines—like cleaning refrigerator door seals with a mix of vinegar and water or checking drainage lines for clogs—to keep appliances operating efficiently. Maintaining these checks prolongs appliance life and reduces the likelihood of sudden failures.
How do I keep my appliances functioning over time?
Consistent maintenance and modern diagnostic tools are vital. I suggest scheduling professional inspections annually, especially for complex systems like HVAC or refrigeration. Modern appliances also benefit from smart monitoring systems, which notify you of issues before they become costly repairs. For instance, resetting a smart home camera is straightforward if you learn the proper steps—check out this detailed guide for tips.
Moving forward, I predict that integration of IoT sensors will become standard, offering real-time diagnostics and predictive maintenance. Embracing these advancements can make appliance upkeep more efficient and less stressful.
If you’re ready to optimize your appliance care routine, start by investing in a reliable digital multimeter and scheduling a professional inspection. These simple steps can significantly enhance durability and performance—try it today!
Lessons I Wish I Learned Before My Stove Wobble Turned Into a Costly Fix
- One of the hardest lessons was realizing that a wobbling stove isn’t just an annoyance but a sign of underlying issues that can escalate if ignored. Early detection and simple adjustments can save you hundreds in repair costs and prevent accidents.
- I underestimated the value of inspecting support structures like legs or shims. Simple tools like a level and a wrench, combined with patience, made all the difference in achieving a perfectly stable setup.
- Failing to understand the nuances of different support systems can lead to ineffective fixes. Taking the time to identify whether your stove uses adjustable legs or requires support pads is crucial for a lasting solution.
- Overlooking safety precautions, such as disconnecting power and gas before repairs, can lead to dangerous situations. Prioritize safety to avoid mishaps and ensure a smooth fix.
- Finally, I learned that investing in quality tools and taking the time to research your specific model can turn a frustrating wobble into a confident DIY project, saving money and giving peace of mind.
Tools and Resources That Changed My Appliance Repair Approach
- Digital Multimeter – I trust the Fluke 117 for quick, accurate electrical diagnostics, helping me determine if a component like a thermostat or fuse is at fault. Reliable tools are key for confident repairs.
- Infrared Thermometer – A handy device for detecting overheating parts, such as the compressor or burners, preventing future failures and extending appliance lifespan. My go-to is the Etekcity Lasergrip for its precision.
- Maintenance Management Software – Tools like HomeMaintenancePro streamline tracking repairs, warranty dates, and schedules, keeping my appliances in top shape and avoiding overlooked maintenance.
- Expert Guides and Manuals – Websites offering step-by-step repair instructions tailored to specific models, like the comprehensive guide on diagnosing a bad thermostat, have been invaluable for my DIY journey. Check out [this resource](https://discountappliancehub.com/how-to-identify-a-bad-thermostat-in-your-refrigerator) for detailed troubleshooting.
Your Next Step: Embrace the Power of Preventative Care
Fixing a wobbly stove doesn’t have to be intimidating—in fact, it’s a great starting point for taking control over your appliances. Regular inspections, proper support, and the right tools can keep your appliances running smoothly for years to come. Remember, small preventative actions pay off big time in durability, safety, and savings. So, why not start today? Your kitchen and wallet will thank you for it. Have you tackled a tricky appliance fix before? Share your story below, and let’s help each other keep everything running perfectly.