I remember the first time I installed a garbage disposal. Excited, I dove into the project without thinking much about the detailed steps—only to find myself battling a leak just days later. That small, seemingly insignificant oversight cost me time, frustration, and a little extra money for repairs. It was a lightbulb moment that made me realize an essential step most homeowners overlook.
Why Skipping the Right Drain Setup Can Cost You
Ever had your brand-new disposal humming loud but refusing to spin? That’s often a sign that something wasn’t set up correctly during installation. One of the most overlooked but crucial steps is creating a proper drain hose loop. This simple technique prevents backflow from your sink into the dishwasher or disposal, saving you from future messes and potential damage. For a deeper dive, check out how a simple drain hose loop can keep your kitchen drain-free here.
Secure the Drain Hose Properly
Begin by connecting the drain hose to your dishwasher, ensuring it extends downward into the drainpipe without any kinks or twists. Use a high-quality clamp to fasten the hose securely, preventing leaks. Remember, a loose connection can cause water puddles like the one I experienced when my first installation failed. To avoid this, create a proper drain hose loop as shown here.
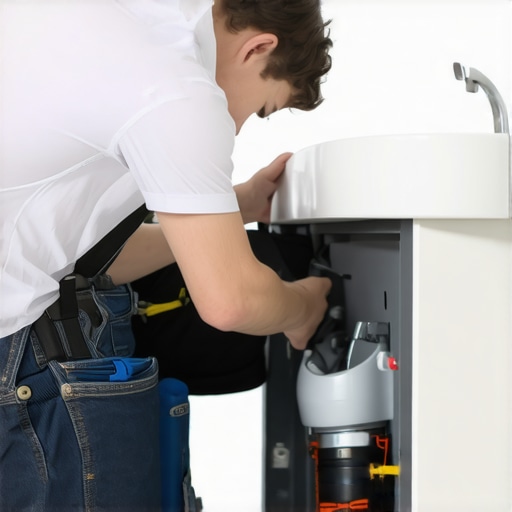
Position and Level the Dishwasher Correctly
Carefully slide the dishwasher into its designated spot, making sure it’s flush against the cabinets. Use a level to check both side-to-side and front-to-back alignment. Adjust the leveling feet accordingly—this step is crucial; an uneven dishwasher can leak or make excessive noise. When I did mine, a quick adjustment made my dishwasher run silently and prevent leaks.
Connect Water Supply with Precision
Attach the water inlet hose to the dishwasher’s inlet valve, tightening it with a wrench. Use Teflon tape on threaded connections to prevent drips. An improper connection here can mimic a leak or high water pressure issues, which I encountered as water slowly seeped from the connection until I tightened it fully. Also, ensure the gas line (if applicable) is properly sealed to avoid dangerous leaks—never skip this step.
Test for Proper Drainage and Sealing
Once everything is connected, run a short cycle to check for leaks. Observe the connections, especially around the drain hose and water inlet. Be vigilant for any signs of water escaping; if you see any, tighten connections immediately. Double-check the gasket seals if there’s any water pooling around the door or base. Regular seal checks, like those discussed here, are essential to maintain warranty validity and prevent leaks.
Final Checks and Safety Precautions
Ensure all electrical connections are secure and the power cord is properly plugged in. Turn on the water supply and run a test cycle, paying close attention to noises or leaks. If issues persist, same-day service providers can quickly diagnose problems—like when I had my water heater leak, prompt action saved me from further damage. Remember, always verify that the installation complies with local codes to avoid voiding your warranty, which can be affected by drain mishaps or improper connections discussed here.Many homeowners believe that understanding the basics of appliance repair is enough to avoid costly mistakes, but in reality, the details often make all the difference. Contrary to popular belief, not all warranties are equal, and small missteps can invalidate coverage. For instance, proper installation techniques—like creating the correct drain hose loop—are sometimes overlooked, leading to warranty voids if not done correctly. In-depth knowledge about these nuances can save you money and frustration.
Why Do Most People Misjudge the Role of Professional Service in Repairs?
Many assume that calling a same-day technician will always guarantee a quick fix, but the reality is more complex. The quality and scope of the repair depend heavily on the technician’s expertise and adherence to manufacturer guidelines. Relying solely on quick appointments without verifying their qualification might result in incomplete fixes or warranty issues, especially if parts are improperly installed or seals are compromised. Experts emphasize that trusting certified professionals and understanding warranty stipulations are crucial for long-term appliance health here.
Common Myth: All Repairs Void Warranties
This is a widespread misconception. Many believe that any DIY fix or third-party repair automatically invalidates the manufacturer’s warranty. However, warranty terms often specify that repairs done by certified technicians or with approved parts are valid and may even strengthen your coverage. The key is understanding your specific warranty conditions, such as the importance of using genuine parts and following proper installation protocols here. Skipping these details can be a costly mistake.
How Can Overlooking Minor Details Lead to Major Repairs?
For example, a small error like an incorrect drain hose connection or improper leveling can cause leaks that damage internal components. Such issues may not be immediately obvious but can escalate into expensive repairs or warranty denials if ignored. Regularly inspecting and maintaining critical connection points—like ensuring the gasket seals are intact—can prevent these hidden problems from turning into disasters. These nuances transform routine maintenance into a safeguard for your investments here.
Remember, understanding the finer points of appliance installation and repair isn’t just for technicians—it’s a vital part of protecting your home and wallet. Double-check your procedures, stay informed about warranty stipulations, and don’t hesitate to seek expert advice when necessary. Have you ever fallen into this trap? Let me know in the comments.
Keeping It Working: Tools I Recommend for Appliance Care
Maintaining your appliances over the long haul requires more than just basic knowledge; it demands the right set of tools and a disciplined approach. As someone who’s been in the trenches dealing with everything from clogged drains to faulty wiring, I can attest that investing in specific, high-quality equipment can save you time, money, and frustration. One of my go-to items is a digital multimeter, which I use to safely troubleshoot electrical components like heating elements and control boards—an essential step before calling in professionals. For plumbing issues, I swear by a digital leak detector, which helps locate hidden water leaks that could lead to costly water damage if left unchecked. Sharp, precision screwdrivers are invaluable when removing panels or replacing door seals, especially since stripped screws are the bane of many DIY repairs. My favorite is a set with magnetic tips, making the process smoother than ever.
Beyond physical tools, I rely heavily on specialized software for diagnostics. Many modern appliances now have built-in self-test modes accessible via app or physical buttons, which I utilize to identify issues proactively. For example, smart washing machines often provide error codes that, with the right app, translate into actionable insights—saving me from unnecessary parts replacements. These diagnostic tools also support regular maintenance routines, like checking for worn seals or clogged filters, which are crucial for the longevity of your appliance. Regularly scheduling these inspections, aligned with manufacturer recommendations, can significantly extend the lifespan of your units.
How do I maintain appliances over time?
The secret lies in adopting a consistent maintenance routine complemented by the right tools. For instance, creating a proper drain hose loop in your dishwasher is vital to prevent backflow—an issue discussed extensively here. Using a voltage tester periodically helps ensure electrical safety, especially after power surges or appliance upgrades. Additionally, replacing filters and seals as recommended can prevent minor leaks from escalating into major repairs, which ties back into the importance of regular inspections.
Looking ahead, I predict the integration of IoT devices will further revolutionize appliance maintenance, providing real-time diagnostics and predictive alerts. This means fewer surprises and better long-term results for homeowners. To stay ahead, consider investing in smart diagnostic tools compatible with your appliances, such as Wi-Fi-enabled leak detectors—these can notify you immediately of any irregularities, even while you’re away.
Don’t wait for a leak or breakdown to take action. For example, one advanced tip I highly recommend is periodically conducting a gasket integrity test using a digital multimeter combined with a pressure gauge. This check can identify subtle deterioration long before a leak occurs, allowing for preventive maintenance. As the saying goes, an ounce of prevention beats a pound of cure. So, why not try implementing this routine into your appliance care today? It could make all the difference in keeping your appliances humming smoothly and your home protected.
What the Hardest Lesson About Appliance Repair Taught Me
The most challenging part of appliance repair isn’t diagnosing the issue but understanding how small oversights—like skipping a proper drain hose loop—can turn minor problems into major headaches. I once learned the importance of following manufacturer guidelines precisely, especially when it comes to sealing and leveling, as those tiny details safeguard your warranty and prevent water damage. Such lessons remind me to never underestimate the power of thoroughness in every repair or installation step.
Secrets Versus Myths in Quick Fixes
Many homeowners believe that a quick fix or a hurried call to a technician will solve everything instantly. But I’ve found that trusting the right resources and understanding the core mechanics—like recognizing how a loose water inlet hose can mimic a leak—saves the day more often than not. The real secret lies in patience and verified knowledge, not shortcuts. Learning to differentiate between myths and facts has significantly improved my DIY success rate.
The Hidden Cost of Overlooking Small Details
It’s easy to dismiss minor issues, but those small mistakes, like improper gasket seals or wrong drain height, can escalate into costly repairs or warranty voids. I’ve seen firsthand how routine inspections and paying attention to tiny signs—like a slow drain or slight leak—prevent big disasters. This reinforced my belief that preventive measures, rooted in careful observation, are the smartest investments in maintaining appliance longevity.
My Essential Toolkit for Appliance Care
I swear by a set of high-quality tools that make maintenance and repairs smoother. A digital multimeter helps troubleshoot electrical hiccups safely; a leak detector pinpoints hidden water issues early; precision screwdrivers prevent stripped screws during delicate tasks; and a reliable level keeps appliances properly aligned. These tools, combined with good diagnostic apps, make appliance care manageable and empower me to handle most issues confidently.
Embracing Proactive Home Maintenance
Looking ahead, integrating smart diagnostic tools—like Wi-Fi leak detectors or app-controlled error code readers—can revolutionize how homeowners maintain their appliances. Staying ahead with scheduled inspections, gasket tests, and filter replacements ensures longevity and reduces emergency repairs. I encourage everyone to adopt a proactive mindset, turning home appliance maintenance from a chore into a safeguard for your comfort and budget.
Pressure, Practice, and Progress
Remember, mastering appliance repairs isn’t about perfection from the start but about continuous learning and vigilance. Start small—like ensuring your drain hose loop is correct or replacing worn seals—and build your confidence. Every small success will motivate you to learn more, leading to better care for your appliances and peace of mind. Why not take the first step today in making your home safer and more efficient?