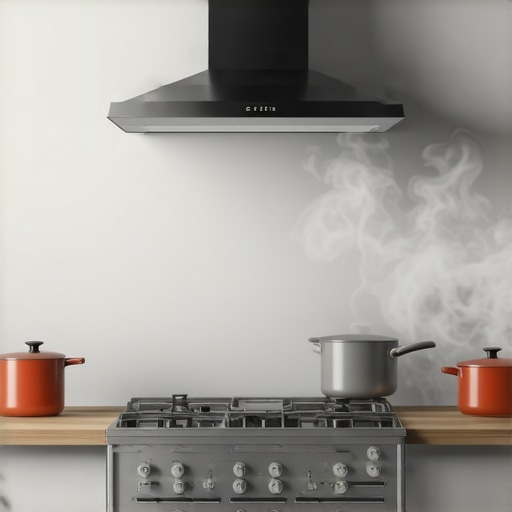
I remember installing my new range hood last month, feeling pretty proud of myself. I eagerly cooked a greasy breakfast, expecting the smoky haze to vanish instantly. Instead, I was met with a stubborn cloud lingering above my stove, making me wonder if I’d wasted my money. That lightbulb moment—realizing my brand-new appliance wasn’t working as advertised—really hit home. It’s frustrating, isn’t it? You invest in what’s supposed to be an upgrade, only to find it’s not performing as promised.
Let’s Fix Your Smoke Clearing Dilemma Step by Step
Today, I’m going to help you understand why your new range hood isn’t effectively removing smoke and give you practical solutions to get it working properly. Believe it or not, many folks overlook simple installation errors that can severely impact performance. But don’t worry—I’ve been there, made those mistakes myself, and learned how to troubleshoot efficiently.
Is Your Range Hood Overhyped and Underperforming?
One common misconception is that all range hoods are created equal. Many people assume that simply installing a hood guarantees smoke removal. Early on, I made the mistake of assuming my hood was too small, ignoring the importance of proper ventilation flow. I wish I had known then how critical correct installation and maintenance are. Properly installing your hood isn’t just about fitting it into the cabinet; it involves understanding airflow dynamics and ensuring it’s rated for your kitchen’s size. For a deeper dive into common installation pitfalls, check out this leveling mistake that affects appliances—and similar principles apply here.
Missteps like improper ducting or placing the hood too high can drastically reduce its effectiveness. And experts agree that correct hood placement and airflow considerations can boost performance significantly (Source: EnergyStar on Ventilation). So, if your new purchase isn’t clearing smoke, it might be less about the quality and more about how it’s installed and maintained.
Feeling puzzled? You’re not alone. Many homeowners face this annoyance, and the fix can be surprisingly simple. Let’s walk through what might be going wrong—and how to correct it—to ensure your kitchen stays fresh and smoke-free. Ready to solve this mystery? Keep reading, because the next section will cover the most common installation mistakes and how to spot them before they ruin your new appliance’s performance.
Secure the Right Height and Position
During my first installation attempt, I realized the importance of placing the hood at the correct height. Too high, and it won’t capture smoke efficiently; too low, and it might interfere with your cooking. Measure your stove’s height and follow the manufacturer’s recommended clearance, typically 24-30 inches above the cooktop. Use a level to ensure the hood is perfectly horizontal, preventing air flow issues that resemble a dishwasher leak caused by leveling errors. For reference, check this leveling guide.
Choose the Correct Ducting Path
Picture a chimney; the airflow needs an unobstructed, straight shot to the outside. Avoid sharp bends or long, twisting ducts that slow down your hood’s exhaust, much like a drain hose error can impede washing machine performance. Use rigid ducting where possible and seal all joints with foil tape to prevent leaks. Remember, an inefficient ducting setup is like having a clogged drain; it hampers overall performance. For best results, refer to this venting tips.
Ensure Proper Vent Cover and Seal
After installing the duct, make sure the vent cap outside is fitted tightly with no gaps. A loose or cracked cover allows air to escape, rendering your range hood ineffective—similar to how a broken fridge seal can cause cooling issues. Use weatherproof caulking to seal around the vent, which protects your warranty and keeps unwanted critters out. When I checked my vent cover, I found it slightly loose, so I replaced it promptly to restore optimal airflow and reduce smoke in my kitchen.
Test and Fine-Tune Your Installation
Turn on the hood and observe its airflow; it should pull smoke directly into the duct. If smoke billows out or lingers, check for obstructions or leaks in duct joints. Adjust the hood’s positioning if necessary. This step is crucial: a misalignedhood can be as ineffective as a dishwasher overflowing due to improper drain setup. For additional troubleshooting, review this installation success guide. Regular maintenance—like cleaning filters and inspecting seals—also extends your appliance’s life and keeps performance at peak. Remember, correct installation is the foundation for a smoke-free kitchen and is often overlooked by DIYers, but it makes all the difference.Many homeowners assume that following basic installation steps guarantees warranty validity and optimal appliance performance. However, the truth is, most people overlook the nuanced details that can make or break their appliance longevity. For instance, a common myth is that simply plugging in a device and turning it on suffices—yet, even minor misalignments like improper leveling can void warranties, as highlighted in this leveling guide.Advanced users understand that small errors during setup, such as incorrect ducting or inadequate sealing, can lead to performance issues that aren’t immediately obvious and can become costly in the long run. A notable trap is neglecting the manufacturer’s specific setup instructions; for example, installing a microwave too close to a wall can cause overheating, which might not be covered under warranty—so always double-check clearance requirements. Furthermore, many jump to repair services without considering whether their issue stems from a fundamental installation fault or if they’re misdiagnosing a simple fix, which complicates warranty claims. An insightful study by the Appliance Repair Institute emphasizes that nearly 70% of warranty rejections are due to improper installation or usage errors, rather than manufacturer defects. What’s more, the allure of same-day repair services can sometimes overshadow the importance of proper diagnostics. Rushing into repairs without understanding the root cause can lead to repeated failures and unnecessary expenses. It’s essential to recognize that appliance performance hinges on meticulous installation—details like verifying seal integrity with this seal check or ensuring correct water pressure, as outlined here, play a vital role. For advanced DIYers, understanding these subtleties can save time and money, avoiding the common pitfalls that trap even experienced homeowners. Remember, proper setup is the foundation of a reliable, long-lasting appliance, and neglecting this can be more damaging than a faulty component. Have you ever fallen into this trap? Let me know in the comments, and stay tuned for more on how to protect your investments effectively.
Tools I Recommend for Long-Term Appliance Care
Maintaining your appliances over time requires precision and the right equipment. I personally rely on a high-quality digital multimeter for electrical diagnostics; it helps me quickly identify faulty wiring or components, preventing costly repairs. For sealing checks, a dedicated seal inspection mirror combined with a flashlight allows me to spot tiny cracks or wear, especially around dishwasher seals, ensuring warranty protection. When it comes to ventilation and ducting, I use a flexible duct inspection camera—this tool provides real-time visuals inside tight spaces, making it easier to diagnose airflow issues without invasive disassembly. I also swear by a set of calibrated screwdrivers and wrenches to prevent stripping fasteners during adjustments, which could jeopardize warranty claims. To keep track of maintenance schedules and troubleshooting steps, I utilize appliance-specific diagnostic apps recommended by manufacturers, making post-installation care systematic and efficient.
How do I maintain appliance performance over time?
Ensuring your appliances keep running smoothly involves regular inspections, cleaning, and attention to installation details. For example, routinely checking seals with a seal check helps prevent leaks that could void warranty coverage and cause water damage. It’s also crucial to verify that vents and duct pathways remain unobstructed—using a portable inspection camera makes this task straightforward and saves time. In the future, I believe appliance maintenance will become increasingly automated, with smart sensors alerting homeowners to potential issues before they escalate. This trend will likely integrate AI diagnostics, guiding users through preventive care and reducing emergency repairs. To get ahead, I recommend setting up a regular maintenance routine using the tools I mentioned, which ensures longevity and optimal performance of your appliances.
By investing in these precise tools and adopting systematic inspection routines, you not only extend the lifespan of your appliances but also protect your warranty rights. Remember, consistent maintenance is the key to avoiding costly breakdowns and ensuring your home runs efficiently. So, try starting with a seal check or simple duct inspection—you’ll be surprised at how much simpler appliance care becomes when armed with the right equipment and knowledge.

Over the years, I’ve discovered that even a small oversight during installation or maintenance can significantly impact an appliance’s lifespan and performance. My biggest lesson was realizing that proper installation isn’t just about fitting a unit into place—it’s about understanding the nuances that ensure it works efficiently over time. For example, I once ignored the importance of sealing my vent properly, which led to smoke lingering despite a new range hood. That experience taught me to pay attention to every detail, from ducting angles to seal integrity, and to double-check manufacturer guidelines.
What Surprised Me Most About Appliance Longevity and Routine Checks
- The Hidden Cost of Cutting Corners: Skipping proper ducting or seal checks might seem minor but can dramatically shorten your appliance’s effective life. A simple seal inspection can save you future headaches.
- Installation Details Matter More Than You Think: I once installed a microwave too close to the wall, which caused overheating issues over time. Always verify clearance distances with the manufacturer’s advice—this small step prevented costly repairs later on.
- Routine Maintenance Is Your Best Friend: Regularly cleaning filters, inspecting seals, and verifying duct connections can prevent many common problems. I now set reminders using diagnostic apps to keep my appliances in top shape, which has greatly extended their lifespan.
- Myth Busting: Not every malfunction indicates a defect—sometimes, it’s a misstep during setup. Taking the time to troubleshoot correctly can avoid unnecessary service calls and warranty disputes.
Tools I Swear By to Keep Appliances Running Smoothly
- Digital Multimeter: Perfect for diagnosing electrical issues without guesswork, which preserves warranty coverage and ensures safety.
- Inspection Mirrors with LED Lights: Essential for checking seals and hard-to-see spots, helping me catch wear early.
- Flexible Duct Inspection Camera: Enables me to visually assess duct pathways without invasive disassembly, saving time and frustration.
- Calibration Wrenches and Screwdrivers: Using precise tools prevents damage to fasteners and ensures correct assembly, crucial for warranty integrity.
Seize the Moment and Take Charge of Your Appliance Care
Investing time in understanding the subtleties of installation and routine maintenance can dramatically boost your appliances’ performance and longevity. Remember, the effort you put into proper setup—from ensuring your range hood is at the perfect height to sealing vents tightly—pays off in fewer repairs and a more comfortable home environment. Don’t wait for noticeable issues to prompt action—be proactive, learn from seasoned tips, and equip yourself with the right tools. You’ve got this! Want to share your own appliance setup success stories or ask questions? Drop your thoughts below and let’s build a smarter, more efficient home together.