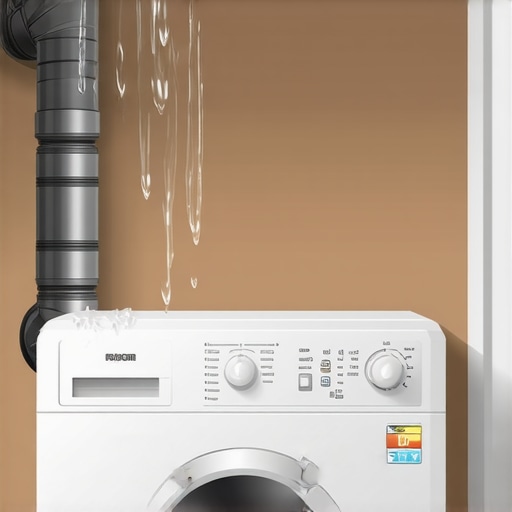
It was one of those mornings that starts with a frustrating surprise—I opened my laundry room door only to be greeted by a damp, musty odor and a small puddle pooling under the dryer. At first, I thought it was a simple leak or perhaps spilled water, but as I investigated, I realized the water was coming from inside the dryer vent. That lightbulb moment hit me hard: my dryer vent was actually dripping water inside my house, and I had no idea what was causing it.
Don’t Ignore the Drip—Here’s Why It Matters
You might be tempted to brush off a small amount of water or a damp wall, thinking it’s just normal condensation. But in reality, water inside your dryer vent can lead to bigger problems—like mold growth, wood rot, or even damage to your drywall—costly repairs that nobody wants. Plus, it can be a sign that your ventilation system isn’t working properly, risking your indoor air quality and dryer efficiency.
I’ll admit, my early mistake was ignoring the problem for too long, thinking that reaching for a quick fix would do. Turns out, I was ignoring a hidden issue that could have led to significant damage and higher energy bills.
Is Your Dryer Vent Actually Worth the Hype?
Many folks underestimate the importance of good vent maintenance, assuming that once it’s installed, it will work forever. But I learned the hard way that neglecting proper vent care can turn a simple installation mistake into a water dilemma—something I wish I’d known earlier. According to the U.S. Fire Administration, clogged or improperly maintained dryer vents are a leading cause of house fires, which really hammers home the importance of keeping vents clear and functioning.
To avoid making my mistake, I dove into research and learned some practical tips to prevent water from dripping inside your home. The goal here is not just to fix the current issue but to understand the underlying cause so you can protect your home long-term.
In the next sections, I’ll walk you through some straightforward steps to identify the root of the problem and fix it safely. Whether it’s a simple unclogging or a more complex vent replacement, these tips will help you safeguard your investment and keep your laundry routine hassle-free.
So, if you’ve ever faced that unsettling feeling of dampness or water pooling near your dryer, ask yourself—have you checked your vent lately? If not, you’re not alone, but it’s definitely time to take action. Let’s get into the practical fixes now and prevent this sneaky water drip from turning into a bigger headache.
Inspect Your Vent System Thoroughly
Start by disconnecting your dryer from power and detaching the vent hose. Examine the entire length for clogs, kinks, or damage. Remember, a clogged vent is like a clogged artery—restricting airflow and causing moisture buildup. Use a vacuum or brush to clear out lint and debris. I had a similar experience where debris was packed into the vent; clearing it fixed the water issue immediately, restoring proper airflow and preventing further leaks.
Check the Vent Cap and External Exhaust
Go outside and inspect the vent cap. Ensure it’s not blocked by leaves, nests, or snow. Clear any obstructions. A blocked cap causes moisture to back up into the vent, leading to water inside. When I cleaned my vent cap, I noticed a small bird’s nest—removing it prevented rainwater from entering and accumulating inside the duct.
Assess the Vent’s Pitch and Length
Proper pitch ensures water doesn’t settle inside the duct. It should slope downward away from the dryer. If it’s flat or sloped toward the house, water can collect. Alternatively, if the vent is excessively long or has multiple turns, consider professional installations to optimize airflow. I once rerouted my vent with a gentle slope, which dramatically reduced moisture buildup.
Seal Any Gaps or Cracks
Look for gaps around the vent cap or where the duct connects to the house. Use high-quality foil tape or sealant to prevent air and water leaks. Remember, leaks can cause moisture ingress, mimicking condensation. In my case, sealing the connection points with specialized vent tape stopped water leaks and protected my drywall from damage.
Consider Installing a Backdraft Damper
A damper prevents outside air and moisture from entering the duct when the dryer isn’t operating. It’s like a one-way valve—allowing airflow out but blocking moisture inflow. I added a damper to my vent, which prevented rain from causing water inside the vent, keeping my laundry area dry.
Seek Professional Help for Complex Repairs
If these steps don’t resolve the issue, it might be a sign of a deeper problem like a faulty vent installation or internal condensation issues. Don’t hesitate to contact a qualified technician, especially if you suspect hidden damage or need replacement of long sections. I once called an expert, which saved me from costly future repairs and ensured my system complied with safety standards. Learn more about common installation mistakes that void warranties at this resource.
While it’s tempting to believe that professional installation, prompt repairs, and warranties are straightforward, many homeowners overlook nuanced pitfalls that can compromise their investments. One prevalent myth is that once an appliance is installed professionally, no further oversight is necessary; however, improper initial setup can void warranties or cause future malfunctions. For example, failing to follow manufacturer specifications during installation might trigger warranty exclusions, as detailed in this hidden warranty clause. Additionally, many assume that same-day repair services are only about convenience, but in reality, they often involve complex scheduling and technician readiness, making some providers less reliable than advertised. A common mistake is to choose the cheapest or quickest option without verifying credentials or experience, risking further damage or warranty voidance. Furthermore, customers often overlook the importance of verifying if the repair technicians are authorized or certified; unqualified repairs may not be covered under warranty or could damage the appliance further. The misconception that warranties cover every cost encourages neglect—be aware that extended warranties or service agreements sometimes have fine print, such as exclusions for improper installations or DIY repairs. A perfect example is the warranty exclusions linked to installation errors. For advanced homeowners seeking peaceful performance, understanding these nuances prevents costly surprises. Moreover, the rush to schedule same-day service might lead to overlooking critical diagnostics, resulting in unnecessary repeat visits or overlooked underlying issues. Remember, not all ‘fast’ solutions are comprehensive. To ensure your appliances remain under warranty and operate optimally, confirm that installation matches manufacturer specifications, verify technician credentials, and scrutinize warranty terms carefully. Be cautious of the trap where urgency overrides due diligence, leading to subpar repairs or warranty conflicts. For more guidance on avoiding warranty pitfalls, see my detailed post on how DIY fixes can void your warranty. Have you ever fallen into this trap? Let me know in the comments.
Maintaining your appliances effectively requires the right combination of tools, knowledge, and routine checks. Over time, using specialized equipment can make all the difference in preventing breakdowns and ensuring optimal performance. One tool I swear by is a high-quality digital multimeter—it’s essential for diagnosing electrical issues safely and accurately. I personally prefer the Fluke 117 because of its reliability and user-friendly interface, which allows me to quickly test circuits and identify faulty components without invasive disassembly.
Another invaluable asset is a cordless inspection camera, like the DEPSTECH WiFi Endoscope, which helps me conduct thorough inspections inside tight spaces—especially in plumbing or behind panels—without dismantling entire units. This saves time and reduces the risk of accidental damage. I also recommend a flexible, lint-free microfiber cloth and a gentle cleaning solution to keep vents, filters, and seals pristine, preventing dust buildup that can impair functionality.
From a software perspective, I utilize diagnostic apps linked to smart appliances—these allow me to monitor appliance health, receive alerts about potential issues, and identify error codes before they escalate. For appliances with smart interfaces, keeping the firmware updated is crucial; I set reminders to check for updates monthly, ensuring my devices benefit from the latest security patches and performance improvements. This proactive approach helps in catching problems early, reducing the need for costly repairs down the line.
How do I maintain appliance performance over time?
Adopting a regular maintenance schedule is key. For instance, scheduling quarterly inspections of filters, seals, and vents, and performing visual checks for signs of wear or corrosion can extend appliance lifespan significantly. Additionally, maintaining a log of repairs and inspections helps track recurring issues, informing better future maintenance strategies. For complex diagnostics or when in doubt, consulting with professionals and leveraging their specialized tools—like leak detectors or ultrasonic sound leak alarms—can prevent minor issues from becoming major failures.
Looking ahead, I predict that advancements in IoT and remote diagnostic tools will make appliance maintenance even more seamless. Smart diagnostics embedded in appliances will alert homeowners to issues well before they become visible, perhaps even suggesting precise corrective actions.
If you’re ready to elevate your appliance care, I suggest trying out a professional-grade multimeter combined with regular software updates and cleanings. These small steps can dramatically improve long-term performance and warranty protection. Remember, equipment like proper plumbing connections also plays a vital role in appliance longevity. Don’t underestimate the power of proactive maintenance—your appliances will thank you in the long run.
How I Stumbled Upon My Biggest Dryer Vent Revelation
After experiencing that damp, musty smell and unexpected puddle, I realized that neglecting the water inside my vent could have resulted in extensive damage. My lightbulb moment was understanding that routine maintenance is not just about efficiency but also about preventing costly surprises that lurk behind the scenes.
The True Cost of Overlooking Vent Care
Missing the signs of vent issues can lead to mold, structural rot, and even fire hazards—risks most homeowners aren’t prepared for. I learned that quick fixes are tempting, but taking the time for thorough inspections and proper repairs genuinely protects your investment, avoiding hidden expenses down the line.
What Going Beyond Routine Maintenance Taught Me
Deep dives into vent inspection revealed that many common mistakes—like improper sealing or neglecting external obstructions—are easily overlooked yet highly harmful. My experience taught me that proactive checks and understanding the root causes empower homeowners to act confidently and prevent water or lint build-up.
Complex Problems Require Personal Connection with Experts
While DIY fixes are valuable, complex vent repairs or replacements benefit from professional expertise. Establishing a relationship with certified technicians ensures your system adheres to safety standards, saving you from warranty issues or future breakdowns. I discovered that selecting qualified help made a world of difference, especially for tricky long duct runs or structural repairs.
Gaining Insider Wisdom About Appliance Problems
- Learning about proper vent slope and cap positioning saved me from recurring water issues, emphasizing the importance of detailed inspections. The devil is in the details, and understanding how small missteps affect the entire system can be eye-opening.
- Knowing how to identify poor installation practices and warranties clauses helped me avoid costly regrets. Don’t assume your appliances are foolproof—verification and knowledge are your best tools.
- Recognizing the importance of regular software updates and using diagnostic apps kept my appliances performing optimally and prevented unnecessary repair calls. Staying informed about emerging tech can complement physical maintenance effectively.
Tools and Resources That Changed My Approach
- High-quality multimeter—Trustworthy testing tools like the Fluke 117 let me diagnose electrical issues safely, avoiding guesswork.
- Inspection camera—A flexible WiFi endoscope revealed tight spots and internal damage unseen with just a visual glance, saving me time and money.
- Maintenance logs and checklists—Staying organized helped me spot recurring problems early and prepare for future repairs.
- Educational blogs and tutorials—Continuing learning through reputable sources, including some I found linked within community forums, kept my skills sharp and informed better decisions.
Keep Moving Forward: Your Dryer Vent Secrets Await
Remember, identifying water retention and airflow issues early on is the key to avoiding extensive damage. Regular checks, understanding your system’s unique quirks, and knowing when to seek professional help can turn you into an insider with appliance repair confidence. Don’t wait for that musty smell to tell you it’s time—take action now and safeguard your home from hidden, costly surprises. What’s the first step you’re planning to take toward better appliance care? Share your thoughts below!