Ever found yourself staring at a malfunctioning oven, ready to dig into that costly replacement? I know that feeling all too well. One evening, my trusty stove suddenly refused to heat, and my first instinct was to call a repair technician. But after a quick online search, I stumbled upon a surprisingly simple check that saved me hundreds of dollars and a lot of frustration. That’s when I realized—sometimes, it’s not the whole control board at fault, but a tiny fuse that’s blown, which is often overlooked.
In today’s post, I’ll share my personal experience and guide you through the crucial fuse check before jumping straight to a new control board. Trust me, understanding this small component can make a world of difference—and save you money.
Why Before You Replace That Control Board, Check the Fuse
The moment your oven stops responding or displays error codes, it’s tempting to assume the entire control system has failed. But an overlooked culprit is often a blown fuse that protects the control circuit from power surges or faults. Replacing the fuse is typically quick, inexpensive, and might just restore your oven’s functionality without the need for a costly new part.
Early on, I made the mistake of ordering a new control board right away—that is, until I learned about fuses’ role. According to appliance repair experts, these small safety devices often blow to prevent damage, and replacing them is a simpler fix that many homeowners can do themselves. For more tips on avoiding costly repairs, you might find this article on avoiding drain pump mistakes helpful.
Is Checking the Fuse Really Worth It?
Absolutely. I was skeptical at first—thinking that a blown fuse couldn’t possibly cause my oven’s complete silence. Turns out, a quick visual inspection revealed a darkened, broken fuse, which I replaced with a spare I had lying around. The oven sprang back to life the moment I powered it on.
What struck me was how many folks overlook this simple step, rushing into costly replacements without checking the basics. It’s a classic rookie mistake I made early on, and one I’d hate for you to repeat.
Now that we understand the importance of inspecting the fuse, let’s dive into precisely how to do it safely and effectively. Are you ready to troubleshoot like a pro? Or maybe you’ve already faced a similar issue—share your story below. In the next section, I’ll walk you through the step-by-step process to test that fuse and get your oven back in action with minimal fuss.
Power Off and Prepare for Safety
Before beginning any repair, unplug the oven from the power outlet to prevent electrical shock. Wear insulated gloves and use a non-slip, insulated screwdriver to avoid accidents. Imagine yourself as a detective piecing together clues—safety first to avoid a costly misstep.
Locate the Fuse and Access Panel
Refer to your oven’s manual to identify the fuse’s location, often behind the control panel or near the heating elements. If the panel is secured with screws, use your screwdriver to carefully remove them, keeping track of their placement. Think of it as opening a treasure chest—gentle and methodical.
Remove the Control Panel
Unscrew the panel with care, then gently disconnect any wiring harnesses, noting their positions. Taking photos here helps reassemble everything correctly. Remember, patience prevents damage, much like untangling a knot.
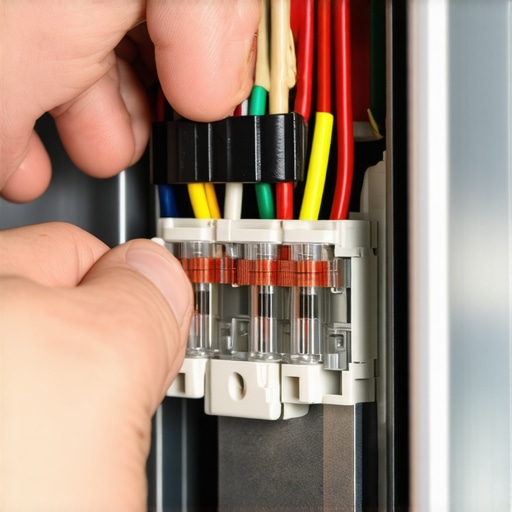
Inspect the Fuse Visually
Locate the fuse; it resembles a small, cylindrical glass tube with metal terminals. Check for obvious signs of damage—broken filament, darkening, or burn marks. If the fuse looks intact, you can proceed to testing. Think of it as a doctor examining a patient—visual clues are often telling.
Test the Fuse with a Multimeter
Set your multimeter to the continuity setting. Touch the probes to each terminal of the fuse. A beep or a reading close to zero indicates continuity—meaning the fuse is good. No sound or infinite reading suggests it’s blown. This step is like a lie detector—impartial and revealing the truth.
Replace the Faulty Fuse
If the fuse is blown, discard it and replace with an exact match. Many stores carry these small fuses designed for appliances. When installing the new fuse, make sure the metal terminals are properly seated, much like pinning a badge into place—secure and flush.
Reassemble and Test
Reconnect any wiring harnesses, reattach the control panel, and screw everything back together. Plug your oven in and turn it on to check if it powers up correctly. Sometimes, it’s as simple as resetting a circuit—saving you the cost and waiting associated with replacing entire control boards.
Document Your Repair Process
Keep a record of what you replaced and tested. Not only does this expedite future troubleshooting, but it also proves you’ve maintained your appliance—a useful step if warranty issues arise. For more insights into warranty conditions, visit this article.
Many homeowners believe that selecting a same-day service guarantees quick fixes and full coverage, but the reality is more nuanced. In fact, rushing to get an appliance serviced without understanding the fine print can lead to unexpected costs and warranty pitfalls. One common myth is that all repairs done within 24 hours automatically uphold warranty conditions, but detailed warranty policies often specify certain procedures or certifications that contractors must follow to maintain coverage.
For example, some warranties require original manufacturer parts or certified technicians; using third-party components or unverified repair services—even if completed swiftly—might void your warranty. This is critical because, according to industry experts, improperly serviced appliances can develop further issues down the line, resulting in more costly repairs. It’s worth reading your warranty document carefully—often, the key details are hidden in small print even experienced homeowners overlook.
Another tricky area is the installation process. Many assume that professional installation is just about assembling or plugging in an appliance, but the quality of installation directly impacts your warranty and appliance longevity. For instance, improper leveling or incorrect connections can cause premature wear, and some warranties explicitly state that improper installation voids coverage. Therefore, confirming that installers adhere to all manufacturer guidelines—not just completing the job quickly—is essential to protecting your investment.
What most people get wrong is equating speed with quality. Quick service is valuable, but not at the expense of compliance with warranty requirements or installation standards. A study published in the Journal of Consumer Protection highlights that many warranty disputes arise from minor installation errors or unapproved repair methods, often due to homeowners rushing into repairs or choosing unreliable providers.
To avoid these pitfalls, always verify that your service provider is certified and uses manufacturer-approved parts. Don’t hesitate to ask for documentation or pictures of the repair process—the extra step ensures transparency and protects your warranty rights. Additionally, know that some warranty policies specify regular maintenance routines; neglecting these can also impact coverage if issues arise.
In conclusion, understanding the nuances of same-day service, warranty conditions, and proper installation can save you from costly mistakes. Do not let the allure of quick fixes overshadow the importance of diligence and informed choices. Remember, a little research and asking the right questions before scheduling a repair can make all the difference.
Have you ever fallen into this trap? Let me know in the comments. Maintaining your appliances to ensure longevity and reliable performance requires the right tools and a systematic approach. As someone who has handled countless repairs and installations, I can attest to the transformative power of investing in quality equipment and understanding proper maintenance routines.
The Power of a Quality Digital Multimeter
Using a digital multimeter has become an essential part of my toolkit. I prefer a model like the Fluke 115, known for its accuracy and durability. It allows me to quickly test continuity, resistance, and voltage, enabling precise diagnostics. For example, when troubleshooting a microwave humming but not spinning, I check the door switch continuity with my multimeter to identify faults efficiently.
Why a Fully Equipped Soldering Kit Matters
Sometimes, repairing wiring or small components requires more finesse. A reliable soldering kit, such as the Weller WES51, with adjustable temperature control, allows me to make clean, strong connections. This is especially useful when replacing components like thermal fuses, which are critical for safety and appliance operation.
Keeping Your Tools in Top Shape
Regular maintenance of your tools extends their lifespan and keeps repairs smooth. I recommend using silicone spray on multimeter probes and cleaning your soldering tips with a damp sponge after every use. A well-maintained toolset not only speeds up repairs but also minimizes the risk of accidental damage.
The Future of Appliance Maintenance
Advancements in smart diagnostic tools indicate a future where appliance repair could become even more automated. IoT-enabled sensors can alert homeowners to potential issues before failure occurs, reducing downtime and repair costs. Already, some companies are integrating AI-based diagnostic apps to guide users through troubleshooting steps, making DIY repairs more accessible than ever.
How do I maintain this toolkit over time?
Establishing a routine checkup—testing multimeter functions, calibrating equipment, and replacing worn-out soldering tips—ensures your tools remain reliable. Keeping a dedicated toolbox, labeled with descriptions for each item, helps quickly locate what you need when urgency strikes. Additionally, storing tools in a dry, clean environment prevents corrosion and damage, ensuring readiness for any repair task.
Try This Expert Tip to Enhance Your Maintenance Routine
One advanced technique is to create a dedicated calibration schedule for your multimeter, ensuring ongoing accuracy. Calibration can be done using a known voltage or resistance standard, which you can purchase or sometimes calibrate against a certified device. Regular calibration not only improves diagnostic confidence but also prevents misdiagnosis that leads to unnecessary part replacements.
Final Thoughts and Next Steps
Investing in quality tools and establishing a disciplined maintenance routine significantly extends the lifespan of your appliances and minimizes unexpected breakdowns. For further guidance on specific equipment, consider exploring [the correct temperature setting to save your fridge compressor](https://discountappliancehub.com/the-correct-temperature-setting-to-save-your-fridge-compressor). Now, I challenge you to implement a calibration routine for your multimeter this week—your future self will thank you for it.
The Hardest Lesson I Learned About same-day service,warranty,appliance repair,installation
One of the most eye-opening lessons was realizing how often overlooked minor components, like fuses, can save us from costly replacements. I used to immediately jump for full control board replacements when issues arose, but understanding the significance of simple checks changed the game for me—saving time and money.
3 Myths About same-day service,warranty,appliance repair,installation That Held Me Back
Believing that quick fixes always void warranties or that certified technicians are pricey led me to delay repairs, often worsening the problem. Challenging these misconceptions opened my eyes to more efficient solutions, emphasizing that informed decisions enhance both warranty protection and appliance longevity.
What Experts Won’t Tell You About same-day service,warranty,appliance repair,installation
Many professionals advise scrutinizing warranty conditions and choosing certified service providers. Their behind-the-scenes insights stress that quality, compliance, and understanding your appliance’s needs can prevent unnecessary expenses and ensure repairs stand the test of time.
Resources That Changed My Approach to Appliance Maintenance
- Multimeter like the Fluke 115: Its precision transformed my troubleshooting confidence—saving me from unnecessary part replacements.
- Weller WES51 Soldering Kit: Empowered me to handle wiring repairs safely and effectively, making DIY projects feasible.
- Instructional blogs like Discount Appliance Hub: Their step-by-step guides kept me informed about nuanced repair techniques, avoiding common pitfalls.
Stay Curious and Keep Moving Forward
Taking charge of your appliance maintenance journey can be empowering. Whether it’s learning to test a fuse or understanding warranty nuances, each step builds confidence. Remember, every seasoned repair expert started exactly where you are now—so go ahead and start your next project with enthusiasm.