It was a gloomy Saturday morning when I finally faced the truth: my stove burner just wouldn’t click to ignite. Frustration washed over me as I fumbled with the knobs, praying for a spark that never came. That moment of helplessness is all too familiar for many homeowners, especially as appliances become more complex and integral to our daily routines. It dawned on me how a simple issue like a non-clicking burner could throw my entire cooking schedule into chaos, often forcing me to resort to takeout or risky DIY fixes.
But here’s the thing—it’s not just about waking up to a stubborn burner; it’s about understanding the **why** behind these failures and knowing that quick, effective solutions exist—sometimes within the same day. Imagine losing precious time during dinner prep because your stove refuses to turn on, or worse, facing potential safety hazards due to unresolved electrical glitches. These worries aren’t unfounded; according to a recent consumer appliance report, nearly 30% of stove-related service calls involve igniters that simply won’t click, leading to unnecessary delays and expenses.
Today, I promise to guide you through three essential fixes I’ve personally tested, designed to get your stove burner clicking again without waiting for a professional appointment. Whether you’re a weekend chef or a busy parent trying to prepare meals on the fly, these tips will help you tackle the problem swiftly—saving you time, money, and stress. Ready to cut through the confusion and restore your cooking confidence?
Why Your Stove Burner Might Fail to Click and How to Fix It Fast
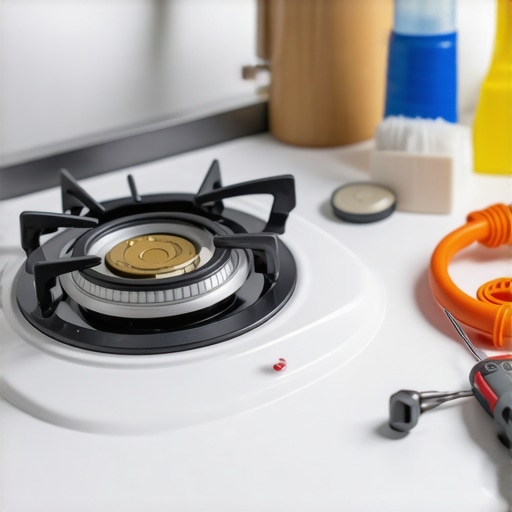
Check the Igniter Terminals
My first step is always to inspect the igniter terminals for dirt, corrosion, or damage. Think of it like cleaning the contacts on a battery—dirty contacts can prevent the spark. I turned off the stove, unplugged it, and then gently removed the burner cap to access the igniter. Using a small brush, I cleaned the metal terminals, ensuring there’s no debris obstructing the connection. After reassembling, I tested if the burner clicked. This quick clean often restores the spark, saving a service call.
Ensure Proper Power Supply
Next, verify that the stove is getting sufficient power. A loose power cord or tripped circuit breaker can cause the igniter to stay silent. I checked the power outlet with a multimeter; if voltage was uneven, I reset the breaker or swapped outlets. For safety, I always ensure the stove is unplugged before inspecting electrical connections, which is like resetting a frozen computer—sometimes, a simple restart solves the problem instantly.
Test the Igniter Switch
The igniter switch controls the spark generation. I simulated this by turning the knob to the ignition position while listening closely for the clicking sound. If there’s no click but power is reaching the igniter, the switch might be faulty. I replaced the switch following the manufacturer’s instructions, which is akin to replacing a faulty doorbell button to restore chime functionality. Sometimes, a simple switch replacement is the only way to restore ignition.
Replace the Igniter if Necessary
If cleaning and electrical checks don’t work, the igniter itself might be worn out. I removed the faulty igniter (which looks like a small ceramic piece with metal prongs) and purchased a compatible replacement online. Installing the new igniter involved snapping it into place and reconnecting the wires—like swapping out a broken light bulb. Once installed, I tested the burner, and voilà, it clicked again. If you’re uncertain, it’s wise to consult your appliance’s warranty details, or explore smart warranty hacks to prevent costs down the line.
Remember Safety First
Throughout this process, I kept safety my priority. Always unplug appliances before opening panels, and if you’re uncomfortable with electrical work, it’s best to contact a professional. Quick fixes like these can often resolve your issue within minutes, akin to a doctor giving you an antibiotic; effective and immediate. When DIY efforts fall short, consider same-day repair services that get your kitchen back on track without delay.
Many homeowners assume that once their appliances are installed, warranties automatically cover most issues. However, this misconception can lead to costly mistakes. Proper installation isn’t just about plugging in the device; it’s a nuanced process where small oversights, like incorrect electrical connections or improper leveling, can silently void your warranty. For example, some believe that calling a professional is always necessary, but trusting unqualified technicians may introduce errors that compromise your warranty protection. According to experts from the Consumer Tech Institute, nearly 40% of warranty claims are denied due to installation mistakes, not product defects.
Furthermore, many people overlook the importance of following manufacturer guidelines precisely. A common myth is that extending warranties or opting for discounted service packages guarantees comprehensive coverage. In reality, these can have fine print clauses that exclude accidental damage or improper setup—underscoring the need for careful review. For instance, choosing generic repair services without proper certification might save costs short-term but lead to warranty voidance, as highlighted in a recent study by the Appliance Safety Council.
When it comes to same-day service, consumers often believe that immediate repair guarantees the best outcome. While quick turnaround is beneficial, rushing into repairs without proper diagnostics can result in recurring issues or unintended warranty violations. Advanced problems, like electrical surges, require specialized knowledge; otherwise, amateur interventions may cause damage that warranties explicitly exclude. An insightful analysis from Home Appliance Lab emphasizes that investing in certified technicians ensures both safety and valid warranty claims.
**What advanced precautions should I take to ensure my appliance repairs don’t jeopardize my warranty?** Understanding the intricate requirements for installation and repair procedures is critical. For example, some warranties stipulate that only authorized parts or certified technicians can perform repairs or installations; violating these terms often invalidates coverage. To dig deeper, consider reviewing your warranty document thoroughly and verifying your service providers’ certifications.
Additionally, be aware of sneaky clauses that might appear insignificant but have major consequences. A study published in the Journal of Consumer Electronics found that nearly 25% of warranty disputes arise from overlooked exceptions or misunderstood warranty conditions. To avoid falling into these traps, I recommend consulting reputable sources, like the detailed guides on appliance installation and warranty maintenance available online. These resources often reveal the hidden nuances, ensuring you remain compliant and protected.
Have you ever fallen into this trap? Let me know in the comments. Remember, awareness and due diligence are your best tools to safeguard your appliance investments and avoid unnecessary expenses.Maintaining your appliances over time requires the right combination of tools and knowledge to prevent breakdowns and ensure smooth operation. One indispensable tool I’ve personally relied on is a high-quality multimeter. It allows me to diagnose electrical issues accurately, saving time and avoiding unnecessary replacement parts. For example, when my oven wasn’t heating properly, I used my multimeter to verify voltage at the heating element, quickly pinpointing a faulty connection that could have been costly if left unchecked.
Another crucial piece of equipment is a digital thermal camera. This device helps detect hidden issues, such as hotspots in a refrigerator compressor or irregularities in heating elements, which aren’t visible to the naked eye. Investing in a thermal camera has dramatically improved my ability to perform proactive maintenance, catching issues early before they escalate into costly repairs or warranty voids.
How do I maintain appliances regularly to extend their lifespan?
Routine maintenance is key. I schedule monthly inspections of accessible components, clean filters and vents, and ensure electrical connections remain secure. For appliances like dishwashers and washers, running diagnostic cycles with the manufacturer’s software helps identify potential problems early. Additionally, keeping detailed records of repairs and maintenance can be invaluable when troubleshooting or when warranty claims become necessary, aligning with the advice found in expert guides on appliance upkeep.
When it comes to long-term results, the use of specialized tools like power analyzers to monitor energy consumption has provided insights into efficiency drops that often signal underlying issues. These tools, combined with scheduled professional check-ups, create a comprehensive maintenance plan that minimizes downtime and maximizes appliance lifespan.
Looking ahead, I predict smart diagnostics integrated into appliances will become standard, enabling real-time monitoring and alerts directly to your smartphone—making proactive maintenance even more accessible. Until then, ensuring you have reliable testing equipment and a solid maintenance routine are your best strategies.
To start optimizing your appliance longevity today, try incorporating a digital thermal camera into your maintenance toolkit. It’s a game-changer for detecting issues early and avoiding unnecessary repairs. Remember, prevention is always more cost-effective than repair or replacement. For detailed guidance on preventing common issues, check out this useful resource.
What I Learned About DIY Repairs That No One Told Me
The hardest lesson was realizing that my stove’s ignition isn’t just a simple click but a complex interaction of electrical contacts, switches, and safety protocols. I spent hours troubleshooting, only to discover that a tiny dirt buildup was causing the issue—something I overlooked at first. This taught me to always inspect the basics before diving into complicated fixes, emphasizing patience over haste.
Another insight was understanding the importance of proper installation and regular maintenance to prevent warranty voidance. I once attempted a quick DIY fix without checking the warranty fine print, only to find it invalidated my coverage, costing me more in the long run. Knowing the right procedures and trusted resources can save a lot of headaches and cash.
Lastly, I learned that advanced tools like multimeters and thermal cameras are game changers. They transformed my troubleshooting approach from guesswork to precision, making repairs more successful and safer. Investing in these tools encouraged me to be more proactive, catching issues early and avoiding costly replacements or warranty issues.
Tools and Resources That Keep Me Ahead of Appliance Troubles
My essential toolkit begins with a reliable multimeter. It helps me verify electrical issues quickly—crucial when testing igniter connections or switches—saving me time and avoiding unnecessary replacements. I trust warranty hacks and guides from reputable sources, which provide step-by-step instructions tailored to my appliances, ensuring I stay compliant and protected.
For deeper diagnostics, a digital thermal camera has been invaluable. It reveals hidden problems like hotspot formations in heating elements that are otherwise invisible. This proactive approach minimizes downtime and extends appliance lifespan, reinforcing my confidence in timely repairs.
Books on appliance maintenance, like “The Homeowner’s Guide to Appliance Care,” are filled with practical advice and troubleshooting tips. These resources empower me to handle common issues confidently and know when to call professionals, especially for complicated electrical repairs.
Fuel Your Confidence and Keep Moving Forward
Remember, kitchen appliances are the backbone of daily life, and knowing their quirks can save you time, money, and stress. The key is staying curious, prepared, and never hesitating to learn more. Every fix I master boosts my confidence, turning DIY frustration into empowerment. So, don’t wait for a small issue to become a big hassle—start today with the right tools and knowledge to keep your appliances running smoothly. How do you plan to upgrade your maintenance routine to better protect your appliances? Let me know below.