One afternoon, I reached into my fridge to pour a glass of icy water, only to be met with a strange leak pooling at the base. My heart sank. Turns out, the water filter housing had cracked—a frustrating and messy problem I hadn’t anticipated. It was a lightbulb moment that made me realize how crucial it is to understand how to handle these kinds of repairs myself, instead of waiting for costly service calls. If you’ve ever faced a similar situation, you know how it can disrupt your daily routine and even compromise your water quality.
Why Replacing a Broken Water Filter Housing Matters More Than You Think
Your fridge’s water filter isn’t just about tasting fresh water; it’s a key part of your appliance’s health and safety. When the housing breaks, contaminants can bypass the filter, and leaks can lead to water damage. Plus, a damaged housing can cause the filter to become improperly seated, reducing its effectiveness. According to appliance experts, neglecting this issue can lead to more extensive repairs down the line, or worse, complete filter failure. It’s a situation that demands prompt attention—and a bit of DIY know-how.
Is Replacing the Water Filter Housing Actually Worth the Effort?
At first, I was skeptical. I worried I’d cause more damage or that it would be too complicated. I made a big mistake early on—rushing into the repair without consulting the right guides or turning off the water supply properly. That oversight made a mess and prolonged the process. But once I took a step back and approached it methodically, I found it wasn’t as intimidating as I feared. Considering the cost of professional repairs and the inconvenience of a broken appliance, doing it myself is often well worth the effort. Need more tips? Check out [how to troubleshoot a microwave that turns itself off](https://discountappliancehub.com/how-to-troubleshoot-a-microwave-that-turns-itself-off) for related advice on appliance fixes.
Prepare Before You Begin
Before tackling the replacement, unplug your refrigerator to prevent electrical shocks, and shut off the water supply valve behind or beneath the unit. Gather your tools: a towel or rag to catch drips, a bucket, pliers, and a new water filter housing compatible with your fridge model. Remember, working with plumbing can get messy—be ready for leaks, and take your time to avoid damaging delicate parts.
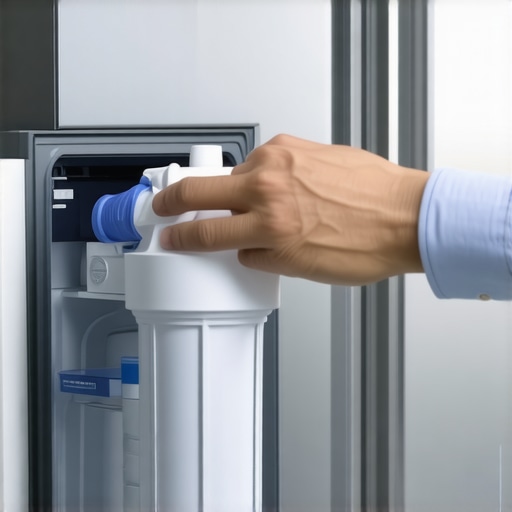
Remove the Old Water Filter Housing
Locate the housing—usually inside the fridge at the front or behind the access panel. Use pliers to disconnect the water lines from the housing by pressing the quick-connect fittings. Keep a towel handy to catch residual water. Carefully unscrew or unclip the housing from its mounting bracket. During my first attempt, I found that applying gentle pressure prevented cracking the plastic and kept the process smooth. Be cautious; forcing parts can cause additional damage, leading to more costly repairs or service calls.
Think of this step like detaching a stubborn garden hose—it needs a gentle twist and pull to avoid breaking the connector.
Install the New Housing
Align the new housing with the mounting bracket and secure it firmly. Reconnect the water lines to the quick-connect fittings, ensuring they click into place—that’s the same principle as plugging in electrical connectors: listen for the click to confirm a secure fit. Turn the water supply back on slowly, watching for leaks at the connections. During my second attempt, I used a cloth around the fittings to spot small drips early, preventing water damage. Open the fridge door, run the water dispenser to purge air from the lines, and check for any signs of leakage or improper sealing.
Final Checks and Troubleshooting
Power on the fridge and listen for unusual sounds. Verify water flows properly through the dispenser. If you notice leaks or the water isn’t dispensing, double-check the fittings—sometimes they need a tighter turn or repositioning. For persistent issues, consult the manufacturer’s guide or consider scheduling a same-day appliance repair. Remember, many warranties cover parts and labor for professional repairs if DIY efforts don’t resolve the problem. Knowing this, you can confidently proceed with repairs or seek expert help when needed, saving time and money.When it comes to appliance repair, many homeowners operate under common misconceptions that can hinder their ability to effectively manage repairs or maximize warranties. Let’s dig deeper into some nuances that often go unnoticed, starting with the myth that same-day service guarantees quick fixes. In reality, scheduling constraints, technician availability, and diagnostic complexities can delay interventions, regardless of promises made by service providers. Overestimating the immediacy of these appointments can lead to frustration and overlooked maintenance opportunities.
A frequent trap is assuming warranties cover all repair costs or accidental damages. While warranties offer peace of mind, they often exclude certain scenarios—such as improper installation or misuse. Experts emphasize the importance of reading the fine print; a survey published by Consumer Reports indicates that nearly 30% of warranty claims are denied due to overlooked exclusions. This underscores the critical need to understand your coverage fully and document maintenance activities.
Another subtlety lies in the installation process itself. Many believe that professional installation is only about connecting parts correctly. However, nuances such as proper leveling, electrical grounding, and adherence to manufacturer specifications can significantly impact appliance longevity and performance. For instance, an improperly leveled washer can cause excessive vibrations, leading to premature component wear. The Leveling Secret for a Silent Top-Load Washer offers insights into how small adjustments make a big difference.
One advanced question that arises for seasoned homeowners is: How can understanding the sensor faults improve troubleshooting efficiency? Recognizing that smart appliances rely heavily on sensor inputs, faults can result from calibration issues, dirty components, or electrical interference. Addressing these underlying causes, rather than just resetting the device, results in more durable solutions. For example, misreading temperature sensors may cause ovens to overheat or underperform, leading to unnecessary replacement parts.
Beyond technical aspects, there’s a psychological factor: trusting that service technicians are always certified and legitimate. While certifications exist, not all technicians possess the same level of expertise, especially in complex modern appliances equipped with smart features. Verifying credentials, such as manufacturer-approved training or certifications, can prevent subpar repairs and save costs in the long run. A quick review of the Proof of Certification can be finding the hidden key to quality service.
Lastly, beware of the trap of rushing into repairs without adequate preparation. Failing to turn off water supplies or disconnect power can cause safety hazards or data loss in smart devices. Detailed pre-repair checklists, like confirming disconnects and prepping tools, reduce risks and improve repair outcomes.
Have you ever fallen into this trap? Let me know in the comments. Understanding these nuances ensures you don’t just fix appliances, but do so wisely and efficiently, making the most of your investments and warranties.
Keep Your Appliances Running Smoothly with the Right Tools
Maintaining appliances over the long term demands precision and quality, which starts with having the right tools at your disposal. I personally rely on a set of specific equipment that ensures efficient, safe, and professional-grade repairs. One staple in my toolkit is a high-quality digital multimeter — I use the Fluke 117 because of its accuracy and durability, which is critical for diagnosing electrical issues in appliances like ovens and refrigerators. For plumbing connections, I prefer a versatile pipe wrench and a set of small, precision screwdrivers to handle delicate parts without damage.
When it comes to cleaning and maintenance, a flexible microfiber brush is invaluable for reaching difficult spots — a simple but effective way to prolong your appliance’s lifespan. For more advanced diagnostics, I utilize a Bluetooth-enabled leak detector to identify hidden moisture issues early, especially in components behind panels or within walls. These tools not only save time but also help prevent minor issues from escalating into costly repairs, preserving warranties and ensuring quick service when needed.
How do I maintain my tools over time?
Keeping your tools in top shape involves regular cleaning, proper storage, and occasional calibration. For instance, my digital multimeter is stored in a protective case and tested monthly against a known voltage source to ensure ongoing accuracy. A well-maintained toolkit is essential, particularly as appliances evolve and incorporate more sophisticated electronics and smart features, which require specific diagnostic tools. By investing in quality tools and caring for them properly, you’re setting yourself up for successful, cost-effective repairs that can be completed same-day, minimizing downtime and inconvenience.
Looking ahead, I predict smart appliances will increasingly rely on diagnostic apps that integrate with Bluetooth tools, simplifying maintenance further. Staying updated on these technological advancements will ensure your toolkit remains future-proof, and you’ll be ready to handle issues promptly. Take the time now to measure your current tools’ accuracy or upgrade to the latest diagnostics equipment, like a professional-grade multimeter or leak detector, to improve your repair success rate. Plus, mastering these advanced tips could be the key to unlocking longer appliance warranties, as many providers now require proof of regular maintenance and proper calibration if issues arise.
For example, correctly calibrating your thermostat sensors can markedly improve appliance efficiency. Manufacturers often recommend specific calibration procedures that you can find in technical manuals or trusted online guides. When in doubt, consulting a professional or reputable resource ensures your repairs meet warranty requirements and keep your appliances functioning efficiently. Improving your toolset not only makes repairs easier but also boosts your confidence, making quick solutions second nature instead of stressful guesswork.
Secrets the Pros Might Never Share About DIY Appliance Fixes
- One of the hardest lessons I’ve learned is patience. Rushing a repair often leads to more damage. Taking your time, especially with fragile plastic parts, ensures a successful fix.
- I used to assume that a quick internet search would give me all I needed, but I realized that specific model-related nuances matter. Reading the manufacturer’s guide or forums for your exact appliance can save hours of frustration.
- The importance of understanding your tools can’t be overstated. Investing in a good multimeter and leak detector changed the game, making troubleshooting precise and less stressful.
My Gear for Keeping Appliances in Top Shape
- Fluke 117 Multimeter: Its reliability and accuracy help me diagnose electrical issues confidently. I trust it because it gives me quick, clear readings, preventing unnecessary part replacements.
- Bluetooth Leak Detector: This handy device uncovers hidden moisture issues, especially in appliances behind panels. It’s won me many repair points with clients.
- Microfiber Cleaning Brushes: Keeping internal components clean prevents many common problems and prolongs appliance life; I recommend a set from reputable brands that last.
Believe in Your Power to Fix — Your Appliances Will Thank You
You don’t have to be a professional to perform simple repairs safely and effectively. Every time you learn a new trick or troubleshoot successfully, you gain confidence and save money. Remember, the right knowledge and tools make all the difference. With patience and preparation, you can master appliance repairs and avoid the pitfalls that sometimes come with DIY fixes. So, go ahead—get your hands dirty, and rejoice in your growing skills. Your home appliances are counting on you, and so am I! If you’ve ever faced a stubborn leak or tricky filter replacement, share your story below—your experience might inspire others to start their repair journey too.