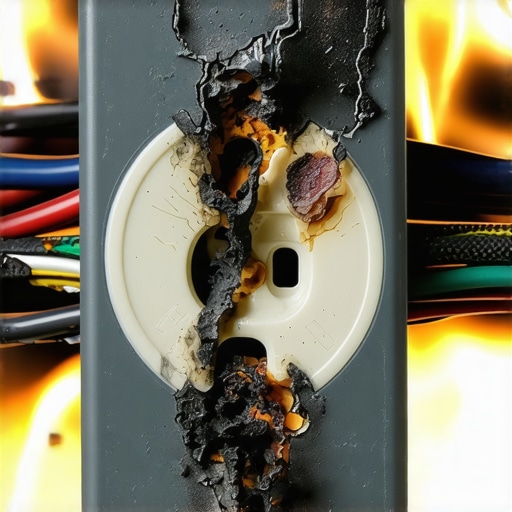
I remember the first time I saw one of my kitchen outlets melt a little during a busy holiday dinner preparation. The sudden smell of burnt plastic sent a jolt through me—what on earth had gone wrong? As a homeowner trying to handle DIY fixes without purely relying on pros, I learned the hard way that a seemingly small mistake with wire nuts can lead to serious, even dangerous, problems in our kitchens.
Why Overlooking Wire Nut Properly Can Turn Tragedy Into a Surprising Fire Hazard
It’s easy to think that wiring is straightforward—twist, secure, done. But beneath that layer of simplicity lies a common trap that trips up many DIY enthusiasts like us: the improper use of wire nuts. When installed incorrectly, wire nuts can overheat, melt, and in worst cases, cause outlets or even walls to catch fire. Early on, I made the mistake of assuming that just twisting wires together with a wire nut was enough. Turns out, this quick fix overlooks crucial steps that ensure safety and durability.
What’s more startling is that according to fire safety experts, faulty wiring, including bad wire nut connections, is among the leading causes of electrical fires in homes (source: National Fire Protection Association). That’s why I’m sharing this experience—so you don’t have to go through the same shock I did.
Have you ever faced a melting outlet or an unexplained electrical smell and wondered if it’s something you can fix yourself? Well, understanding the correct wiring technique and the top mistake to avoid can save your home and your peace of mind.
In the following sections, I’ll walk you through how to identify a wire nut mistake, proper installation techniques, and the signs that indicate it’s time to call in a professional. If you want to explore more about ensuring your appliances are safely calibrated after DIY fixes, check out this helpful guide on [calibrating your oven temperature](https://discountappliancehub.com/how-to-calibrate-your-oven-temperature-without-calling-a-pro). Let’s keep your kitchen safe and functioning smoothly—no more meltdowns, literally.
stripping wires correctly Before attaching a wire nut, strip about 3/4 inch of insulation from each wire end using a quality wire stripper. Avoid nicking the copper, which can weaken the connection and cause overheating. During my first attempt, I neglected precise stripping, resulting in loose connections that heated up over time. Proper stripping ensures a solid contact and reduces risk of melting.
Use the right tools
Always employ a dedicated wire stripper suited for your wires’ gauge. Do not use scissors or knives, which can damage the conductor, leading to poor contact. I once tried to save time with pliers, but the resulting jagged edge led to intermittent power. Investing in quality tools makes a tangible difference in safety and durability.
Twist wires securely
Before applying the wire nut, twist together the stripped wires tightly using two fingers or pliers. This step creates a uniform connection, reducing the risk of exposed strands that can arc or spark. I remember struggling to twist wires properly in a cramped ceiling fixture, but taking my time and applying steady pressure sealed the connection well. A firm twist is fundamental to safe wiring.
Choose the correct-sized wire nut
Match the wire nut to the number and gauge of wires you’re connecting. Check the packaging for guidance—using a too-small nut can pinch wires too tightly and cause damage, while a too-large nut may not secure the wires properly. When I mistakenly used a small wire nut on multiple large wires, it overheated and melted after a few minutes. Always verify size and capacity beforehand.
Secure the connection and twist again
Once the wire nut is in place, turn it clockwise until it’s snug. To ensure a tight fit, gently tug on each wire—it shouldn’t slip out. If a wire feels loose, re-tighten or replace the nut immediately. During a recent upgrade, securing the nut firmly prevented a future malfunction that could have caused outages or hazards. Proper tightening is your last line of defense.
Inspect and test the connection
After installation, visually inspect the wire nut and wires for any exposed strands or gaps. Use a voltage tester to check that power flows correctly without any abnormal flicker or warmth at the connection point. I learned to always double-check by testing, catching a faulty connection that wouldn’t have been noticed otherwise. Vigilance here protects your home and loved ones.
Remember safety precautions
Always turn off power at the circuit breaker before starting work. Confirm that the circuit is dead with a non-contact voltage tester. Keep your workspace dry and use insulated tools. When in doubt, consult a professional or reference reliable guides like this calibration guide. My accidental jolt underscored the importance of adhering to these safety measures. Proper preparation and cautious work prevent sparks, shocks, and fire hazards. Many homeowners assume that appliance installation and repair are straightforward tasks—simply follow instructions, and everything will be fine. However, beneath this surface lies a complex web of nuances that, if overlooked, can lead to costly mistakes and compromised warranties. Contrary to popular belief, more experienced DIY enthusiasts know that meticulous attention to detail and understanding subtle technicalities are vital for long-term appliance performance and safety.
One common myth is that warranties will cover damages caused by installation errors or improper repairs. In reality, most manufacturer warranties explicitly state that improper installation or unauthorized repairs void coverage. This misconception can tempt homeowners into quick fixes that seem economical but end up costing them dearly when issues arise. For instance, neglecting to follow the precise power surge guidelines outlined in warranty documents can result in claims being denied—glaring evidence that understanding warranty stipulations isn’t optional.
Another nagging trap is the assumption that same-day service always guarantees a fix within hours of calling. While the idea promises convenience, it often overlooks the technician’s workload, parts availability, and the complexity of certain issues. Advanced problems, like a refrigerator control board malfunction or a microwave that isn’t hotspots, demand diagnostic expertise that can’t be rushed. In fact, rushing repairs without proper diagnosis might lead to unnecessary component replacements, compounding expenses.
How do installation nuances impact appliance longevity and warranty validity?
Some advanced users ask: “Is there a way to ensure my installation doesn’t inadvertently void my warranty?” The answer lies in recognizing the importance of following manufacturer-specific guidelines, especially regarding electrical connections, grounding, and placement. Over-tightening or misaligning appliance mounts, neglecting proper drainage loops, or using incompatible power sources can introduce subtle issues that degrade performance over time and void warranties. Paying attention to these details—and documenting them through photos or receipts—can serve as proof if warranty disputes arise.
Moreover, common mistakes like improper appliance leveling can cause operational failures especially in washing machines and refrigerators, which depend on precise positioning. An uneven load can stress components, leading to early wear, and often, technicians will refuse warranty coverage if improper leveling is identified as the root cause. Hence, understanding the importance of correct placement is crucial.
Keep in mind that even in repairs, knowledge of special conditions—such as the significance of power surge protection for smart appliances—can make the difference between temporary fixes and lasting solutions. For example, appliances connected to unprotected outlets are vulnerable to voltage surges, which not only damage internal components but can also void warranty claims. To safeguard your investments, consider installing high-quality surge protectors, especially for sensitive smart appliances.
Finally, don’t underestimate the value of continuous learning. For a deeper dive into how technical details affect appliance warranties and repair success, explore guides like calibrating your oven or understanding washer drainage issues. These resources help you avoid common pitfalls and ensure your appliance performs optimally for years to come.
Remember, the key to mastering appliance longevity isn’t just about following basic steps but knowing and respecting the subtle technical nuances that owners often overlook. Have you ever fallen into this trap? Let me know in the comments.
Optimizing Your Maintenance Routine with the Right Equipment
To keep your appliances running smoothly over the years, investing in top-tier tools is essential. I personally swear by a high-quality digital multimeter like the Fluke 117, which allows me to accurately test voltage and diagnose electrical issues. Its durability and precision enable me to quickly identify faulty wiring or blown fuses without guesswork. For cleaning and minor repairs, a cordless screwdriver such as the DEWALT DCF887 is invaluable; its variable speed and torque settings give me control when removing panels or tightening screws, preventing damage.
Another tool I rely on heavily is a specialized cleaning kit for appliance vents and filters. Regular maintenance of filters, like high-efficiency dryer lint traps, can be the difference between a safe, efficient appliance and a fire hazard. Remember the hidden lint trap inside your washer? Its routine cleaning is crucial, as detailed here.
Leveraging Software for Precise Diagnostics
Technical diagnostics have evolved with software solutions that can analyze appliance issues remotely. For instance, certain smart refrigerators come with companion apps that alert you to irregular temperatures or connectivity problems. As these devices increasingly connect to your Wi-Fi, using their integrated diagnostic tools can preempt major failures. I recommend software like Appliance Assistant Pro, which consolidates error codes and troubleshooting guides—saving time and reducing unnecessary service calls.
Future trends seem headed toward AI-powered diagnostics that can interpret data from sensors in real-time, predicting failures before symptoms appear. Staying ahead requires not just hardware tools but also embracing these advanced software insights.
How do I maintain my appliances over time?
Consistent maintenance is the backbone of appliance longevity. Schedule regular inspections—monthly for filters and vents, semi-annually for internal components—and keep detailed logs. For example, replacing or calibrating your oven’s temperature sensor as recommended (see here) can prevent uneven baking and save on costly repairs. Using the right tools and software to conduct these checks ensures your appliances perform as intended year after year.
Additionally, keep an eye on warranties and understand their coverage. Proper installation and maintenance—supported by tools like the Wi-Fi-enabled diagnostic apps—are vital to avoid voiding warranties, especially if you plan to scale your setup or upgrade appliances in the future.
Trying one advanced tip, such as calibrating your oven temperature using a dedicated thermometer, can significantly enhance cooking results and extend appliance life. For your next DIY project, consider integrating a digital thermometer and follow the steps outlined here.
Uncovering the Unexpected Pitfalls in DIY Appliance Fixes
One of the most eye-opening lessons I learned was how even small oversights, like neglecting proper wire nut installation, could escalate into serious hazards. I used to think a simple twist was enough, but I now realize the importance of meticulous attention to detail, especially when dealing with electrical connections in appliances. This mindset shift has saved me from potential fires and costly repairs, reinforcing that patience and precision are invaluable.
My Go-To Tools and Resources for Confident Repairs
Over time, I’ve trusted tools like the Fluke 117 multimeter for accurate diagnostics and the DEWALT DCF887 screwdriver for controlled assembly. These tools have become staples in my repair routine, providing reliability and peace of mind. Additionally, websites offering detailed guides on topics such as calibrating your oven temperature or cleaning appliance filters have been instrumental in expanding my knowledge and ensuring long-lasting, safe fixes.
The Power of Small Adjustments and Education
Every successful repair taught me that understanding the nuanced technicalities—like correctly installing drainage loops or verifying surge protection—is crucial for appliance longevity and warranty health. Investing in continuous learning, through detailed guides or expert advice, has empowered me to prevent issues before they happen. I encourage you to stay curious and proactive; your appliances, and your home, will thank you.
Insider Wisdom for Long-Term Appliance Confidence
- Never underestimate the importance of proper wire stripping and tight twisting—these small steps can prevent overheating and fire hazards.
- Always verify the correct sizing of wire nuts and double-check connections with testing tools before powering up.
- Read your manufacturer’s warranty details carefully; understanding what can void coverage saves headaches in the future.
- Avoid rushing repairs; a little extra patience ensures safety and durability, especially when dealing with complex appliances.
- Keep learning from reputable sources like this calibration guide to enhance your DIY skills and appliance lifespan.
My Reliable Arsenal for Safe and Effective Repairs
- High-quality digital multimeter to diagnose electrical issues accurately.
- Precision screwdriver set tailored for appliance fasteners.
- Cleaning kits for filters, vents, and moisture-sensitive parts.
- Downloadable diagnostic apps that decode error codes and recommend actions.
Take Action and Protect What Matters
Your home appliances represent an investment of time and money—why not take control to ensure their safety and optimal performance? By embracing meticulous techniques, leveraging the right tools, and continuously educating yourself, you’re building a foundation for appliance longevity and peace of mind. Don’t wait for a meltdown to realize the importance of proper installation and maintenance—start applying these lessons today.
Have you ever realized a simple fix earlier could have prevented a major issue? Share your experiences below and inspire others to work smarter, not harder!