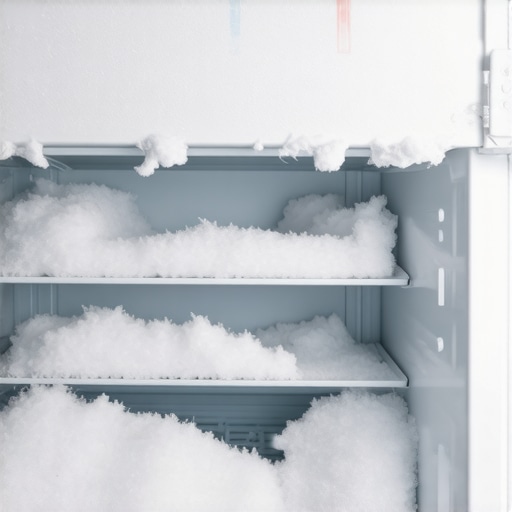
It was a chilly Saturday morning when I opened my freezer, expecting the familiar hum and cold snap that keeps my ice cream hard and veggies fresh. Instead, I was greeted with a frosty, snow-covered mess and a frustrating realization—my freezer wasn’t working properly. That moment of shock and annoyance? Totally relatable. I felt like I’d failed as a homeowner overnight.
If you’ve ever experienced that strange combination of a snow-dusted freezer and warm contents, you’re not alone. It’s one of those baffling problems that can leave you feeling helpless, wondering if you’ve ignored some crucial maintenance step or if your appliance is just too old to save. But here’s the truth I learned through personal experience: it’s often a straightforward issue that can be fixed—and I’m here to help you do exactly that.
The Frustration of Frozen Frost and Warming Food
Let’s face it, a freezer is supposed to be your cold, silent guard against spoilage, not a mini winter wonderland inside. When frost starts building up excessively, it suggests something’s not quite right. Sometimes, the frost is a sign of a broken door seal or clogged defrost drain. But more often than not, the culprit is a problem with the condenser fan or defrost system—components that, if overlooked, can turn your appliance into an ice sculpture that refuses to stay cold.
From my early mistakes, I can tell you that ignoring this issue only worsens the problem. I once thought I could defrost it manually and forget about it. That was a mistake. The buildup of ice can actually prevent proper airflow and cause the compressor to overwork, leading to more issues—eventually risking the loss of your food and hefty repair bills. According to appliance experts, improper defrosting procedures can exacerbate freezer problems, sometimes even voiding the warranty if you’re not careful. It’s essential to diagnose and fix the root cause early on.
Is Fixing a Frosted Freezer Really Worth It?
Initially, I wondered if my freezer was just too far gone—thinking I’d need a new one altogether. But after a little research and a few tried-and-true tips, I realized the fix was often surprisingly simple. Whether it’s cleaning the condenser coils, inspecting the door gasket, or resetting the defrost timer, many issues can be tackled without a costly replacement. If you’re skeptical, I get it. I was too at first. But trust me, many freezer headaches are fixable with the right knowledge. You can check out some signs you need a same-day appliance repair before disaster strikes.
In the next sections, I’ll walk you through how to identify the root cause of that frosty buildup and restore your freezer to its rightful chilling glory. Ready to make your freezer run like new? Let’s dive into the practical steps that will empower you to solve this common, yet pesky problem.
Unplug and Empty Your Freezer
First, safety is key. I always unplug the appliance to prevent any electrical hazards. Then, remove all food items and place them in coolers or another fridge. This clears the space for inspection and prevents spoilage during repairs. Remember, never work on an appliance while it’s plugged in.
Defrost the Freezer Efficiently
I used a hairdryer set on low heat to speed up the melting process of built-up ice. Keep the dryer at a safe distance to avoid damaging parts. Alternatively, placing towels around the base to soak melting ice works well, but it takes longer. This method helps loosen thick ice buildup that obstructs airflow.
Inspect the Door Seal for Gaps
Check the gasket around the door for cracks or gaps causing moisture ingress. I pressed a dollar bill along the gasket; if it slides out easily, the seal needs replacement. A faulty seal can lead to excess frost formation, so ensuring it’s airtight saves energy and prevents ice buildup.
Clean the Condenser Coils
Dirty coils hinder heat exchange, causing the compressor to work harder and potentially leading to frost issues. I used a coil cleaning brush and vacuum to remove dust and debris from the coils underneath or at the back of the fridge. Regular cleaning—at least twice a year—can prevent frost problems and extend your freezer’s lifespan.
Check the Defrost Drain
If the drain is clogged, melting water can’t exit properly, leading to ice formation. I poured warm water into the defrost drain to flush out any blockages. If water backs up or leaks, the drain may need professional cleaning or replacement. Clearing this allows proper drainage and reduces ice buildup.
Test the Defrost System Components
The defrost heater, thermostat, and timer work together to prevent frost accumulation. I manually tested these components with a multimeter. If a part shows no continuity, it likely needs replacement. For example, a faulty defrost thermostat can cause ice to form unchecked. Replacing bad parts restores the system’s function.
Replace Faulty Components and Reassemble
Once identified, I ordered replacement parts from a trusted supplier. Installing them is usually straightforward—disconnect connections, fit new parts, and secure them properly. Ensure all screws and clips are tight before sealing the freezer back. Proper installation prevents future frost buildup.
Power Up and Monitor Performance
Plug the freezer back in and monitor temperature and frost levels over the next 24 hours. Use a thermometer to ensure it reaches the desired cold temperatures, typically around 0°F (-18°C). Keep the door closed as much as possible to maintain consistent cooling.
These steps, though seemingly detailed, became second nature after my initial attempts. I vividly remember fumbling with the coils and then marveling at how smoothly my freezer operated afterward. Staying proactive with maintenance and understanding each component’s role can save you from costly repairs and food spoilage.
When it comes to appliance installation and repair, many homeowners operate under assumptions that could cost them time and money. A prevalent misconception is that all service calls are equal; in reality, understanding the nuances of scheduling, warranties, and expert diagnostics can make a significant difference. For instance, many believe that a quick same-day repair is always necessary or cost-effective, but sometimes, waiting for a scheduled appointment allows for better diagnosis and long-term solutions.
Why Do Some Repairs Take Longer Than Expected?
One advanced mistake is assuming that a repair’s duration is solely dictated by the technician’s availability. In truth, the complexity of modern appliances—with smart features and integrated systems—means that a seemingly simple fix might require specialized tools or diagnostics. According to industry experts, misinterpreting repair complexity can lead to inadequate planning or even voiding warranties if DIY methods are attempted without proper knowledge.
Another common myth is that warranties fully cover all repair costs. This misconception can trap homeowners into believing their repairs are free when, in fact, certain conditions or service providers might void the warranty if installation was improper or if non-approved parts were used. For example, an improperly installed dishwasher might not be covered if subsequent issues arise, emphasizing the importance of professional installation and understanding warranty fine print.
Beware the Installation Pitfall
Many think that installation is a straightforward process. However, errors like improper leveling or neglecting manufacturer’s guidelines can lead to problems that mimic defective appliances—leaks, noise, or even complete malfunction. Aligning with expert advice, ensuring installation follows all recommended procedures avoids these pitfalls. Trusting DIY installation might save initial costs but can compromise warranty protections and cooling or heating efficiencies.
Additionally, the allure of quick fixes can tempt homeowners to seek emergency repairs with providers promising “anytime, anywhere” service without checking credentials or reviews. While this might seem convenient, it increases the risk of subpar workmanship or hidden charges. Instead, look for technicians with proven expertise—especially in Wi-Fi-connected appliances—who can accurately diagnose issues without unnecessary part replacements. This approach reduces waste, saves money, and preserves your appliance warranties.
Let’s not forget the importance of proactive maintenance. Regular servicing and understanding advanced appliance features—like the smart sensors or climate controls—can prevent minor issues from escalating. Knowing the subtle signals, such as strange noises or irregular cycles, and addressing them early can extend appliance lifespan and ensure warranty coverage remains intact.
So, do you fall into the trap of oversimplifying installation or repair processes? Or have you been misled by myths about warranties? Share your experiences below and learn to navigate the intricacies that can save you money and frustration in the long run. Remember, the devil is in the details—understanding these nuanced differences makes you a smarter homeowner and an informed consumer.
How Do I Maintain My Appliances Over Time?
Maintaining appliances isn’t just about quick fixes; it requires the right tools and consistent routines. From digital multimeters for diagnosing electrical issues to specialty brushes for cleaning coils, investing in quality equipment saves time and money in the long run. I personally rely on a Fluke digital multimeter because of its precision, durability, and ability to verify component continuity quickly, which is crucial when checking thermostats or motors. A magnetic coil cleaning brush is also indispensable for keeping condenser coils spotless, ensuring efficient heat exchange and preventing frost buildup—a common issue I address regularly.
Furthermore, software tools like appliance diagnostic apps help track recurring issues and guide troubleshooting steps. For instance, I use a diagnostic checklist app to log symptoms and receive tailored recommendations, speeding up repairs and reducing unnecessary part replacements.
Over time, regularly inspecting wiring harnesses and gasket integrity with these tools helps catch problems early and prolongs appliance lifespan. As technology advances, we can expect more smart diagnostics integrated into appliances, making maintenance even more proactive. Choosing reliable hardware and learning to interpret diagnostic results empowers homeowners to handle many issues without immediate professional intervention, saving both money and downtime.
What Are My Top Tools for DIY Appliances Maintenance?
For me, a digital multimeter is non-negotiable—it verifies electrical continuity and diagnoses component failures with ease. A coiled brush combined with a vacuum helps keep condenser coils dust-free, reducing overload on compressors. Additionally, a maintenance button on modern HVAC units, when pressed periodically, resets cycles and optimizes performance.
To keep your appliances working reliably, implement routine inspections using these tools—checking seals, filters, and connections. If these checks reveal issues, try to address them before they escalate. For example, inspecting the pressure switch in your washer can prevent long delays or leaks, as detailed here.
Looking ahead, integration of smart diagnostic tools will make appliance maintenance even more intuitive, providing real-time alerts for potential issues. Embrace these innovations now by curating a set of essential equipment to keep your appliances performing optimally—it’s an investment that pays dividends over years of reliable service.
Want to get started? Try using a multimeter to test your refrigerator’s compressor motor or defrost heater. This simple step can help you identify failures early and avoid costly repairs. Remember, mastering these tools not only empowers you but also helps maintain warranty validity by ensuring proper troubleshooting.
Secrets Only Repair Veterans Know About Freezer Mysteries
- One of the biggest lightbulb moments for me was realizing that a simple function test with a multimeter could save hours of guesswork. It’s tempting to call a repair guy immediately, but knowing how components like thermostats and defrost heaters behave can significantly cut costs and frustration.
- Many homeowners overlook the importance of regular maintenance, like cleaning coils or inspecting door seals. Ironically, the tiny details often cause the biggest problems—like a cracked gasket leading to frost buildup—that could have been prevented with a monthly quick check.
- Getting familiar with the defrost system’s inner workings transformed my approach to appliance care. When I learned that clogged drains or faulty thermostats could turn my freezer into an icy tundra, I started addressing issues proactively, which extended the appliance’s lifespan dramatically.
My Go-To Tools That Let Me Fix My Freeze-Frame Moments
- A reliable digital multimeter like the Fluke I use gives me confidence to test electrical components accurately—no more guesswork, just solid diagnostics.
- Cleaning tools such as coil brushes and vacuum attachments help me keep condenser coils spotless, preventing excess frost and lowering energy bills over time.
- Diagnostic apps and checklists available online have become my secret weapon—they make troubleshooting straightforward and prevent me from missing key steps that could void warranties or cause further damage.
Stay Courageous: Your Freezer’s Second Chance Awaits
Fixing a frosted freezer isn’t just about saving money—it’s about reclaiming control over your home appliances. Each small repair enhances your skills and confidence, turning a frustrating snowstorm into a triumph of DIY ingenuity. Remember, many issues are easier than they seem, and with the right tools and knowledge, you’re capable of restoring your appliance to pristine, icy perfection. Don’t let frost defeat you—take action today and keep your food fresh and your freezer happy!
Have you ever been stumped by a freezer problem that turned out to be simpler than expected? Share your story below—I’d love to hear how you tackled it!