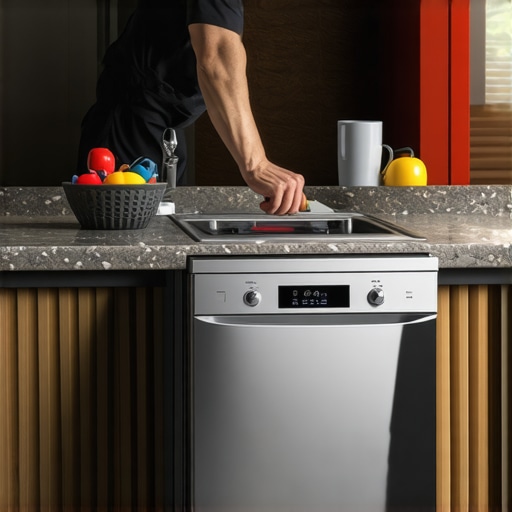
I vividly remember the moment I watched my newly installed dishwasher wobble uncontrollably every time I closed the door. It was a small movement at first, but soon I realized that if I didn’t secure it properly, the entire unit could shift, cause water leaks, or even crack my beautiful granite countertop. That lightbulb moment made me realize how critical proper installation and securing techniques are—not just for peace of mind but also to prevent costly repairs down the line.
Why Securing Your Dishwasher to Granite Counters Matters More Than You Think
When I first installed my dishwasher, I underestimated how important it was to anchor it correctly. Granite countertops are stunning, but they’re also rigid and unforgiving if appliances aren’t properly secured. Without proper support, the vibrations from even a standard cycle can cause the dishwasher to move, potentially leading to water damage, cracked surfaces, or misaligned doors. Plus, a wobbly dishwasher isn’t just an annoyance—it can compromise the longevity of the appliance and void warranties.
Over the years, I’ve learned that the key lies in understanding the right fastening methods and ensuring your dishwasher is bolted securely to prevent future issues. It might seem like a straightforward step, but skipping it can be a recipe for disaster. According to recent studies, improperly secured dishwashers are among the top causes of countertop damage and water leaks in kitchens with granite surfaces.
If you’ve ever faced the frustration of water leaks or the expense of countertop repairs, you’re not alone. Many homeowners neglect this vital step, either because they’re unaware or overwhelmed by installation instructions. That’s why I want to share my experiences and guide you through the best practices for securing your dishwasher properly.
Have you ever had to deal with a dishwasher that shifted during operation or, worse, caused damage to your countertops? If so, keep reading. The upcoming sections will walk you through the simple, effective steps to ensure your dishwasher stays put—saving you headaches and money in the long run. Plus, understanding the common mistakes can help you avoid repeated mishaps.
Let’s dive into the practical side of things now, so your kitchen appliances can serve you without causing unintended chaos.
Start with the Right Tools and Materials
Gather a high-quality angle drill, masonry screws or bolts specifically designed for granite, a sturdy wrench, and a drill bit that matches the screw size. Using the proper tools is like choosing the right parts for an engine—ensure everything fits perfectly to prevent future issues. I once tried to secure my dishwasher with generic screws, only to find them stripping after a few uses, leading to more work later. So, investing in the right hardware pays off.
Identify Optimal Mounting Points
Pull out your dishwasher and look at its base for pre-drilled holes. These are your anchor points. Measure the distance between these holes and the corresponding spots on your granite countertop to plan where to drill. Be precise; drilling in the wrong spot can crack your granite or weaken the support. For my installation, I used painter’s tape over the drilling area to prevent the drill bit from slipping—highly recommended. Remember, granite is tough but unforgiving, so clarity in this step saves hassle later.
Mark and Drill Carefully
With a marker, mark the exact spots where you will drill. Use a small pilot hole first—it’s like making a guide for your screw—then go larger to fit the masonry anchors. A key tip: keep the drill at a 90-degree angle to the countertop to avoid cracking. I once had a close call with misalignment, which caused a hairline crack; slow and steady wins here. If you’re unsure, check out this guide for detailed steps on appliance anchoring.
Insert Anchors and Secure Bolts
Place masonry anchors into the drilled holes, tapping gently until flush. Then, screw in the bolts, tightening securely but not so tight as to risk cracking the granite. Think of it as tightening lug nuts on a wheel—you want firmness without overdoing it. When I secured my dishwasher this way, I noticed much less wobbling during cycles. Properly anchored, the appliance will stay stable, preventing movement and possible damage.
Double-Check Alignment and Stability
Once fastened, push your dishwasher back into position. Open and close the doors—check for any misalignment or wobbling. If there’s movement, tighten the bolts further or reposition as needed. Since my initial attempt left the unit slightly unbalanced, I adjusted the anchors slightly, which made a noticeable difference. This step ensures safety, appliance performance, and preserves your beautiful countertops.
Review Your Work and Prevent Future Wobbles
Finally, revisit all fasteners periodically—especially after heavy cycles—to ensure bolts haven’t loosened. Use a level to verify your dishwasher is perfectly aligned. Remember, a slight tilt can cause leaks or strain on seals over time. During my first few washes, I made it a routine to check and tighten the anchors; it extended my dishwasher’s lifespan significantly. Proper securing isn’t a one-time step but part of ongoing maintenance that safeguards your investment.
Myth Busting: Why Quick Fixes Can Be Tricky
Many homeowners believe that opting for same-day service guarantees a flawless repair or installation, but in reality, the rush often compromises quality. Rushing to fix an appliance without thorough diagnosis may lead to recurring issues, which can void warranty coverage or cause additional damage. For example, some technicians might forgo detailed assessments, leading to incomplete repairs that rear their heads later. This misconception can trap homeowners into paying more in the long run. Remember, speed should not override thoroughness.
The Overlooked Power of Proper Documentation
When it comes to warranties, numerous people think that showing proof of purchase or initial installation suffices. However, many overlook the importance of proper warranty transfer procedures and detailed maintenance records. Failing to document repairs, service calls, or modifications can invalidate warranty claims when you need them most. The subtle nuance here is that having comprehensive documentation, including dates, service details, and parts used, strengthens your position significantly.
Common Mistakes During Appliance Installation
One frequent error is neglecting to follow manufacturer guidelines precisely, especially regarding clearance and leveling. For instance, improper leveling can lead to excessive vibration, early wear, or even leaks in dishwashers or refrigerators. Also, skip installing critical support brackets or seals, which can cause long-term performance issues. My experience shows that meticulous adherence to installation steps can be the difference between a durable setup and recurring repairs.
Why do most people overlook the fine print in warranties?
Because warranty terms are often written in complex legal language, consumers might ignore clauses like regular maintenance requirements, proper installation standards, or specific repair procedures. Ignorance of these details can invalidate claims, even when the appliance is defective. For example, failing to perform periodic maintenance or unauthorized repairs can be costly mistakes. Expert advice suggests reading the fine print thoroughly and following all specified procedures to preserve warranty validity.
Keep in mind that equipment sometimes requires skillful handling beyond superficial fixes. For example, understanding the nuances of proper sanitization and maintenance can extend appliance lifespan and maintain warranty coverage. Have you ever fallen into this trap? Let me know in the comments.
Maintaining your appliances over time requires not just diligence but also the right tools and methods to ensure long-term performance. One of my go-to instruments is the digital infrared thermometer, which I use to check for hot spots and uneven temperatures in devices like ovens and refrigerators. This tool has saved me from potential breakdowns by catching issues early before they escalate. Additionally, a high-quality multimeter is essential for diagnosing electrical problems—I’ve personally found models like the Fluke 117 invaluable for their accuracy and durability. Investing in these precise instruments allows me to confidently troubleshoot and maintain my appliances without relying solely on professional services.
When it comes to cleaning and sanitizing, I recommend using a ultrasonic cleaning device for small parts such as dishwasher spray arms or ice maker components. This method ensures thorough removal of mineral deposits and grime, which can impair functionality. For example, regularly sanitizing the ice maker with a dedicated ultrasonic cleaner helps prevent blockages and bacterial buildup, extending appliance lifespan—and here’s a tip: check out the detailed process at this guide.
Software updates and firmware checks are often overlooked but are crucial for modern appliances. I stay ahead by scheduling monthly reviews of device manuals and manufacturer websites to ensure my smart appliances are running the latest software. This proactive step can improve efficiency and patch security vulnerabilities.
Looking ahead, I believe the trend toward integrated diagnostic tools and automated maintenance alerts will become mainstream, making appliance care even more straightforward. Imagine receiving a notification on your smartphone when a component begins to show signs of wear, prompting timely repairs.
How do I maintain appliances over time? Consistent cleaning, precise diagnostics with the right tools, and keeping firmware updated form my core routine. For instance, regularly checking the status of your dryer’s drum belt with a specialized multimeter helps prevent unexpected breakdowns.
Finally, don’t neglect the importance of proper calibration. I often use an oven calibration kit that mimics different temperature settings—testing and adjusting my oven ensures perfect cooking every time, saving me from costly calibration services. Try incorporating one advanced maintenance tip today, like verifying your appliances’ sensor functions with a multimeter, and experience the peace of mind that comes with knowing your appliances are in top shape.
Over the years, I realized that proper securing of appliances, especially dishwashers on granite countertops, isn’t just a matter of convenience—it’s a crucial step that safeguards your investment. My lightbulb moment came after experiencing a wobbling dishwasher, which threatened to damage my countertops and cause water leaks. This taught me that attention to detail during installation translates into peace of mind and long-term savings.
Lessons That Changed My Approach to Appliance Installation
- Ensure all fasteners are rated for your surface: Using masonry anchors specifically designed for granite has prevented cracks and looseness, saving me costly repairs.
- Measure twice, drill once: Precision during marking and drilling avoids damaging your beautiful countertops, a tip I wish I had followed sooner.
- Regularly revisit and tighten: Post-installation checks for stability and wobbling have extended the lifespan of my dishwasher and kept my countertops pristine.
Tools and Resources That Make a Difference
My essential toolkit includes a high-precision digital caliper, a hammer drill with masonry bits, and premium masonry anchors. I trust these tools because they deliver reliable results that prevent common installation pitfalls. Additionally, resources like this detailed guide have been invaluable in refining my approach and avoiding costly mistakes.
The Power of Confidence in Your Appliance Maintenance
Taking control of securing your dishwasher and maintaining your appliances offers a sense of empowerment. Small actions like periodic stability checks or revisiting mounting points can prevent leaks or damage, ultimately saving you stress and money. Remember, enduring appliance care isn’t about perfection—it’s about awareness and proactive habits that protect your home. Have you noticed wobbling during your appliance’s cycle? Share your experiences below and let’s learn together how to keep our appliances—and countertops—safe and sound.